Simple Polaroid-based Polarizing Apparatus

The Polaroid

One is going to need a quantity of polarizing film (polaroid) for any easily constructed polarizing apparatus. Fortunately, the material is inexpensive and readily available from any number of sources online. When seeking the material for construction one should purchase linear polarizing polaroid rather than the circularly polarizing filters common in photography. Do not hope to luck out with a bargain by purchasing the sort of polarizing film sold for use with LCD screen repair and refurbishment, it will not prove suitable.

The size of the film purchased will vary depending on the sort of apparatus which is planned but in most cases a small piece of five square centimeters (two square inches) is enough. One shouldn’t feel obligated to purchase expensive polaroid whether that expense is attributed to the supposed quality of the film (the perfectness of the polarization) or its thickness or any protective coating. Very often one may have the option to purchase polaroid in varying thickness, and the thicker film is useful for applications that require a large self-supporting filter, but in many cases the thinner product is preferable simply because it is easier to work with.

The Example

Not one to miss out on a potential market, Bausch & Lomb marketed a simple polarizing apparatus for users who did not require (or have the budget for) the more complex prism-based variety. Below is seen an exceedingly simple set composed of polarizing film set into light metal frames. One portion is a 21mm disc and the other is of 32mm, a split ring retainer is included. The concise instructions on the reverse of the box direct the user to install the smaller disc in a standard eyepiece by separating the components of the eyepiece so that the disc may rest upon the eyepiece diaphragm. The eyepiece itself then becomes the analyzer which is in this instance the rotating component. The 32mm disc is sized to be compatible with filters used in most substages and serves as the polarizer.

Simple commercial example of a type anyone can produce.

Simple commercial example of a type anyone can produce.

Right away one can see that an essentially identical set may be produced for just a few dollars. If one is loath to risk the cleanliness of an ocular by separating the components to insert the analyzer, a cap may be fashioned that holds the polaroid and fits above the microscopes eyepiece. It will work in precisely the same fashion and has the advantage of not requiring an ocular be put aside for polarizing work only. Regrettably, one will recognize very quickly that such a set, whether the analyzer is integrated with an ocular or placed over it, will not work effectively on a binocular or trinocular microscope.

Special Considerations

For microscopes equipped with binocular or trinocular heads, one should place the analyzer in a location such that it acts upon the light prior to that light being sent into the eyepiece or photo tubes. Fortunately it is often a simple matter to remove the microscopes head and place the analyzer within. Once the analyzer is positioned one must look to the way in which the polarizer may be accommodated. In most cases it is not advisable to use a 32mm disc placed in the substage filter holder simply because rotating it once positioned is inconvenient. Very often only a small effort need be expended to create a holder that may be placed in the substage to facilitate rotating the polarizer. In any case one should endeavor to arrange polarizer and analyzer so that both may be quickly removed or installed, and one of the two is rotatable.

Improvised polarizer and analyzer in place on AO Spencer microscope

Improvised polarizer and analyzer in place on AO Spencer microscope

In the photograph at right one can see that a simple disk of polarizing film has been placed intermediate to the objective turret and trinocular head of this AO Spencer Microstar microscope to serve as the analyzer. A rotating polarizer has been constructed from a plastic film canister lid and aluminum screw cap, it fits conveniently in the 32mm filter recess of the microscopes integrated illuminator. By virtue of the microscopes construction only one finger screw needs to be loosened to remove the head and place the analyzer. For ease of handling, and so that it may serve double duty the analyzer was cut to a size of 32mm and may be used as the polarizer when placed in the substage filter holder of a monocular microscope. One should note that the polarizer is of a size that no light may pass out of the integrated illuminator that does not pass through the polarizer.

Next time: eye-candy! A few nice photomicrographs of slides with bright-filed and polarized light. -K

Elucidating Illuminators: IV

Ray Diagrams

By far the most complicated of the bright field illumination methods, it wouldn’t do to continue on about Köhler illumination without first explaining what sets it apart from critical illumination. In the previous post we found that critical illumination places an image of the light source in the field of view had at the eyepiece, Köhler illumination does not. The reason that Köhler illumination does not put an image of the light source in the eyepiece image (the image plane of the specimen) is that the path of the illuminating rays of light differs substantially from that of the image forming rays of light. It may seem strange to think of at first, but it will become quite clear after a bit of explanation. If it does not seem straight forward, refer back when setting up for Köhler illumination and things will no doubt fall into place.

Above: Image forming rays. Below: Illuminating rays.

Above: Image forming rays. Below: Illuminating rays.

In the rough sketch above we can see the path of image forming rays, and the path of illuminating rays. For interested parties unused to the conventions of ray diagrams, it will suffice to say that where the rays intersect an image is formed. Looking specifically to the image forming rays of each diagram we can see where an image of the light source is formed: at the diaphragm of the lamp, at the diaphragm of the substage condenser, at the rear focal place (rear lens) of the objective, and within the lens of the observers eye. One will also note that as the image of the lamp is formed at the same location as a diaphragm, that diaphram will likewise be in focus with the light source image. For this reason when set up for Köhler illumination we should be able to observe an image of the light source on the substage diaphragm and an image of the substage diaphragm together with that of the light source at the back lens of the objective. We also can see that an image of the lamps diaphragm will be formed at the image plane of the specimen, and again where it will be magnified further by the eyepiece. For this reason, when focused on the specimen, we should be able to stop down the lamps diaphragm and see the edges of it in focus with the specimen.

If a moment is taken to observe the eye in each part of the above image two important things can be observed; even if not readily apparent in the crude diagram. The path of the image forming rays shows that an image of the specimen converges on the fovea, while the image of the light source does not. Looking to the portion of the eye that is filled by the light forming rays, it is seen that an image of the light source is formed at the iris, and the rays diverge across the retina.

Köhler Illumination

Before getting into the set up process a few important notes are necessary. A filament image is apt to be extremely brilliant, take care to lower the intensity of the light appropriately. Do not fall into the misconception that light sources equipped with a permanent ground glass filter or opal bulb are not able to provide Köhler illumination. It will just be very difficult to determine if the light source is in focus on the field diaphragm of the lamp and substage diaphragm. This difficulty may generally be overcome by the introduction of a disturbance (a pencil mark or foil point) on the bulb or ground glass.

  1. Arrange the bulb of the illuminator in conjunction with the condenser system of the lamp so that an image of the light source is in focus in the plane of the illuminators condenser. Adjustments depend on those available with the illuminator itself, but determining focus is generally a simply matter of introducing a ground glass or scrap of paper at the diaphragm opening.
  2. Open the lamps field diaphragm and stop down the diaphragm of the substage condenser.
  3. Position the illuminator so that an image of the light source (generally the lamp filament) may be seen in focus on the surface of the microscopes substage condenser. If set up for horizontal use it is exceedingly simple. When working vertically or at a comfortable incline it seems very difficult until, one takes a small mirror and positions it to view the substage diaphragm easily when standing ready at the microscope.
  4. Open the substage diaphragm and focus a well stained smear or thin section of uniform thickness on the stage using a 16mm objective and 10x eyepiece.
  5. Adjust the field diaphragm of the illuminator until it is seen in the field of view had at the microscopes eyepiece.
  6. Adjust the substage up or down until the field diaphragm is seen in focus within the image plane of the specimen.
  7. Open the field diaphragm of the illuminator until it is no long seen at at the microscopes eyepiece.
  8. Remove the microscopes eyepiece and sight down the body tube from a distance of ten inches (250mm).
  9. Adjust the substage condenser diaphragm until the brightly lit back lens of the objective is just seen to be obscured.
  10. Replace the eyepiece.
  11. Repeat steps 5-10 whenever the objective is changed.

It’s worth noting that when sighting down the body tube for step 8 one should be able to see a clear image of the light source. One should also be able to image the field diaphragm and substage diaphragm, which makes this step a wonderful time to stop and center the illuminator and substage condenser. At step 9 it may be necessary to obscure more or less of the back lens to provide for optimal contrast; from 25-33% is the recommended amount which should be obscured. Every increase in contrast beyond that which allows for the microscopist to better discern detail is still an theoretical decrease in numerical aperture and should be avoided if increased contrast is not revealing additional detail.

Examples

Filament image as seen in mirror.

Filament image as seen in mirror.

In the photograph at left, the arrangement of a small mirror for observing the filament image as projected onto the underside of the substage condenser may be seen. In order to better illustrate the situation a bulb with a single long coiled filament was used. For microscopy it is often better to use a bulb with multiple filaments (or an opal bulb or diffuser) so that the entire underside of the substage diaphragm may be filled with light; doing so will result in a more uniformly lit field.

Field diaphragm of the illuminator

Field diaphragm of the illuminator

At right the image of the the very constricted field diaphragm may be seen. In practice it will not be necessary to stop down the diaphragm to such an extent. The color fringes seen around the diaphragm opening are evidence of the fact the the microscope condenser is of the chromatic (Abbe) type. The fact that the color fringe is of different colors on the left and right sides is proof that the illumination is not entirely axial. For critical work it would be advisable to take the time to properly align both the filament to the lamps condenser and the mirror to the same so that the color fringes are concentric to each other.

Escherichia coli with 16mm objective and 10x ocular.

Escherichia coli with 16mm objective and 10x ocular.

In the above photomicrograph we see that although the use of a single coil filament bulb produces a bright image, it is not uniform. Note in particular the right margin of the image where the coils of the filament are most apparent. Despite the limited size of the single coil filament, and the large field of view provided by the 16mm objective, it is worth pointing out that the central portion of the image is well lit by the commonly available bulb. There is no need to rush out and buy an expensive specialty bulb.

Notes:

∗Most introductory courses in physics will cover the basics of ray diagrams as they relate to the use of mirrors and lenses. A simple web search will provide ample explanations and illustrations.

†It can be difficult for some people to view the rear lens of the objective unassisted. To provide assistance one can purchase or construct a phase telescope (Bertrand lens) that is used to align a phase contrast apparatus and sight the rear of the objective with that.

‡When it is not possible to dim the light with the apparatus itself or appropriate filters one may often simply place a plug in dimmer switch between the wall socket and the illuminator without ill effect. Color temperature will be affected but, that is infinitely preferable to damaged vision

Elucidating Illuminators: III

Principle

The logic behind both critical and Köhler illumination deals with an optical formula that proves for optimal resolution one needs to match the optics of the lighting system with the optics of the image forming system. In theory, it would be ideal to use a matched pair of objectives, one for viewing the specimen and the other for illumination. As suitable as it would be optically, one may see any number of reasons why this arrangement would prove prohibitive.

Critical Illumination

Edward Nelson used the optical principles of noted microscopist Ernst Abbe to outline a process of specimen illumination which would come to be known as Nelsonian, or more commonly, critical illumination. A broad wicked lamps flame (a homogeneous light source) was the primary source of artificial light for microscopy in that day. The large evenly lit flame was free of grain and relatively uniform, making the chief disadvantage of the method less troubling than one might expect. It is best to use a ground glass filter or opal bulb to provide a comparably homogeneous light source when one wishes to employ critical illumination today.

Little more than a means of focusing the light source on the specimen, critical illumination is possible with nearly any source of illumination. The microscope must be equipped with a condenser capable of providing a numerical aperture which matches that of the objective to be used. Additionally, that condenser must be focusable-though it does not matter if the range is significant for most arrangements, and provided with a diaphragm of some sort which may be altered to fit the objective in use. When critical illumination is achieved an image of the light source is seen in the image plane of the specimen, and the numerical aperture of the illumination system is matched to the objective in use. Put another way, if one were to replace the lamp with their own eye, the specimen would be seen in focus with resolution comparable to that obtained with the objective. Almost any microscope with a condenser can achieve critical illumination, no doubt one reason for its long-term popularity.

Method With a Diffuse Light Source

  1. Position the microscope so that the rays from a light source are passed into the optical axis, either directly or with the flat face of a two-sided mirror.
  2. Using a 16mm objective and 10x ocular bring a stained smear or thin section into focus on the microscopes stage.
  3. Open the condenser diaphragm fully and rack the microscopes condenser up or down until a clear image of the light source is seen in the image plane of the specimen.
  4. Remove the ocular and sight down the body tube with the eye positioned ten inches from the tube.
  5. Stop down the iris diaphragm of the condenser until the back lens of the objective is seen just to be reduced in size.
  6. Replace the ocular and repeat steps 3-5 whenever the objective is exchanged.

Example A (Diffuse Lite Source)

Bulb image with critical illumination and frosted bulb.

Light source image with critical illumination and frosted bulb.

Above is the eyepiece image as seen when set up for critical illumination using a desk lamp with a standard frosted household bulb. The microscope used had a spiral focusing condenser that provided a movement of less than 5mm. It was still more than enough to focus the lamp which was around 250mm distant from the mirror, the plane side of which was used. One can clearly see the printing on the surface of the bulb.

Method With a Condensed Light Source

  1. Prepare a focusing assist, it may be anything from the tip of a sharpened pencil to a dissecting needle. I prefer a small point of card stock with a lightly gummed back.
  2. Position a light source so that the point from which rays emanate is from six to ten inches from the microscopes mirror.
  3. Focus the light source so that it projects a lit field large enough to fill the surface of the mirror.
  4. Arrange the flat face of the microscopes mirror so rays from the light source are passed into the optical axis.
  5. Using a 16mm objective and 10x ocular bring a stained smear or thin section into focus on the microscopes stage.
  6. Hold the focusing assist against the point from which the rays of light emanate.
  7. Open the condenser diaphragm fully and rack the microscopes condenser up or down until a clear image of the focusing assist or light source is seen in the image plane of the specimen.
  8. Remove the ocular and sight down the body tube with the eye positioned ten inches from the tube.
  9. Stop down the iris diaphragm of the condenser until the back lens of the objective is seen just to be reduced in size.
  10. Replace the ocular and repeat steps 5-8 whenever the objective is exchanged.

Example B (Condensed Light Source)

The illuminator with frosted household bulb and ground glass Corning Day-Light filter.

The illuminator with frosted household bulb and ground glass Corning Day-Light filter.

The illuminator was positioned as seen at right. When using a ground glass filter the ground surface of the filter becomes the light source, and it is this surface that must be focused with the condenser for critical illumination. We can use an inexpensive household light bulb, opal bulb, or clear coiled filament bulb without issue. With a clear bulb one can focus on the filament image that shows on the ground glass, without the filament image a focusing assist is essential. The assistance in this case is provided by something I felt people would have on hand; a point cut from the adhesive surface of a Post-it®‡ note. Put it in place for focusing and then remove it or adjust the mirror slightly to bring move it beyond the field of view. Only minor adjustments for alignment, stopping down the iris diaphragm, and re-focusing of the condenser will be required when switching between objectives. Once the illuminators condenser if focused it will not be necessary to re-focus for other objectives provided the distance to the mirror is not changed.

First is an image of the filed of view taken with a 16mm objective and the focusing assist in place as critical illumination is set up. In it one will note the pronounced color fringes on the edges of the focusing assist. The microscope used is equipped with an Abbe substage condenser. Not corrected either for chromatic or spherical aberration, it is the primary source of the fringes seen in the image bellow.

Image of focusing assist in image plane of specimen.

Image of focusing assist in image plane of specimen.

Next is an image of the same specimen, taken with the same set up and without altering the position of the slide. Even with the low quality of the camera system (Nikon 1 J1 positioned with image sensor at eyepoint) one will note that we are nearly able to resolve the Mycobacterium tuberculosis in this stained sputum smear using a common 10x Bausch & Lomb eyepiece and (less common) achromatic 3mm 0.85NA (60x) objective from the 1940’s.

Critical illumination at high magnification.

Critical illumination at high magnification.

Pointers

The focusing assist is not always essential, but will greatly speed matters along when using a finely grained filter or opal bulb. Be mindful if one is working with bare bulb or a condensed lamp as the assist and field lens may become quite hot.

If working with lower powers one may need to remove the upper lens of the substage condenser to provide a large enough cone of light for the objective. In some microscopes the upper lens of an Abbe condenser is screwed into the base of the stage (rather than the upper surface of the condenser) and one may need to unscrew and place it on top of the condenser for use with objectives of 16mm. If the image of the light source is distracting it is a better practice to lower the condenser rather than raise it, resolution will be reduced but unless one is working near the limit of the objective it will not be significant.

If one has a condenser that is not equipped with an iris diaphragm (first rail against the manufacturer) then prepare an opaque filter that can perform the same service. A small piece of aluminum foil can be punctured to provide a suitable aperture for a given objective. The diaphragm must be matched to the rear lens of the objective so that the numerical aperture of the condenser is matched to the objective. If used without oil the maximum numerical aperture of any condenser is limited to unity by the refractive index of the air through which the light passes.

Notes:

∗Some swear by the use of a special slide for setting up critical illumination, preferring anything from a cross hair to a micrometer; it has even been recommended that one use a standard slip on which has been scored a line with a diamond or carbide pen. Such slides may not prove sufficient when attempting to focus fine detail at low power. A well stained specimen of uniform thickness will do well in any circumstance.

†For a homogeneous light source this is the ground glass, flame or opal bulb. For a light source with condenser this is the field lens of the condenser. For a light source used in conjunction with a bulls eye lens it would be that lens.

‡I absolutely adore Post-it® notes. As it’s my birthday tomorrow, I really hope someone who’ll be at the party gives me a few packets!

I guess we’ll do Köhler next time; I should have known I’m too much of a chatterbox to get everything in one post! -K

Elucidating Illuminators: II

Part II: The Various Types of External Illuminator

As to sources of illumination for light microscopy, the choice is nearly limitless. For general use nearly any source of light, natural or artificial, may be made to serve. A desk lamp, an overhead fluorescent fixture, a candle, gas lamp, white cloud in the Northern sky, even a torch propped on a camp table may provide the light necessary for microscopy. Such improvised sources are beyond the scope of todays missive; we will instead look to that particular class of light source that was designed for use with the microscope.

Examples

Bausch & Lomb microscope illuminators of various types

Bausch & Lomb microscope illuminators of various types

In the above photograph may be seen a variety of microscope illuminators. Each of the illuminators is capable of providing ample light and operates on AC current. One may infer from the variety of designs that each was intended to serve particular needs. Of those pictured some will serve for both transmitted and incident lighting, Köhler or critical illumination, microprojection, visual microscopy or photomicrography. Some are equipped with transformers to modify light intensity while others rely on filter holders of different sorts.

Illuminator A is a very high intensity lamp that is well suited for microprojection. It is equipped with a 200watt incandescent bulb which even with the light-baffled chimney and large airspace around the bulb gets quite hot after a sort time. Within the lamp housing a primary reflector is mounted behind the bulb and a two lens, friction fit, condenser system is mounted before it. The lenses of the condenser are fitted in a permanent relationship with each other and slide in or out of the body in unison allowing an image of the bulb, or a uniformly lit field to be focused at the required distance with ease. A slot in the rim of the condenser housing permits the use of various filters though only one may be used at a time. The stand permits the lamp to be raised sufficiently high to permit its use as a source of incident lighting. Due to the intense light provided by this illuminator it should not be used for ordinary visual work, but it can provide ample light for the highest power dark-field plate and film photomicrography.

B is a variety of illuminator that was once considered essential to effective microscopical work. It is able to provide Köhler illumination and features a large ventilated lamp housing with a baffle to keep excess light from the work-room. It is fitted with a standard medium base light bulb socket that may be adjusted to center the bulb or fillament in relation to the condenser system. Before the bulb is mounted a spiral focusing multi-lens condenser that terminates in an iris diaphragm. There is additionally mounted (yet not in contact with the diaphragm) a metal box in which is held a glass water-cell. A removable three filter holder is mounted to the water cell box allowing the use of filters from 2 too 3 inches, either square or round in any combination. A water cell may be filled with water simply to lower the physical transmission of heat along the path of light when observing sensitive specimens, but it may also be filled with chemical solutions to provide particular lighting characteristics. Once the bulb and condenser have been properly aligned and centered one need only assure that the illuminator is the proper distance from the microscopes mirror when setting up for Köhler illumination. Although not so bright as illuminator A, this apparatus may be used for visual and photomicrographic work of any sort.

Next is seen illuminator C which is an earlier and less well outfitted example of much the same sort. The housing and condenser arrangement is nearly identical although the lenses in use are of significantly larger diameter. It does not have an iris diaphragm or water-cell although such accesories were available at the time of its manufacture. A single filter holder for use with 3¼ inch square filters is mounted at the terminus of the condenser. Although this example can not provide Köhler illumination when used with a powerful 100watt incandescent bulb it can provide critical illumination with sufficient light for photomicrographic, microprojection, and dark-field work. Like the previous example it is well suited for visual work.

D may be seen as a more modern and less complex version of B. It uses a low voltage high intensity halogen bulb mounted in a heat dissipating lamp housing on the end of an articulated arm attached to a heavy base providing adjustable power. The two lens condenser is spirally adjustable and carries an iris diaphragm and friction fit filter holder that permits the use of any combination of two circular or square 2 inch filters. This illuminator can provide high power Köhler illumination for all needs, excepting the most demanding microprojection work. Raised above the microscopes stage it can provide incident lighting for use with compound or dissecting microscopes. The only disadvantage of such an illuminator is that accompanying the use of a bulb that is not apt to be carried by local retailers.

Of those pictured the most commonly found is that designated E, a common Nicholas illuminator. The primary use of such a light source is in providing intense incident lighting for low power dissecting microscopes. Many varieties of microscope intended for low power work are fitted with holders in which the self contained lamp housing may be placed so as to provide a stable position that will remain constant from use to use. It is also common to use an articulated arm mounted to the transformer to allow positioning of the lamp as in this example. The rear of the lamp housing is designed to provide ventilation for the high intensity halogen bulb, while the narrow front portion bears two condensing lenses in a fixed relationship so as to provide a bright uniform spotlight with which to light an opaque object. An illuminator of this sort should not be used for visual work with transmitted light as even at the lowest power setting it is damagingly bright. A Nicholas illuminator will do nicely when using a long working distance objective on a compound microscope to examine an opaque object, the bright light can penetrate even strongly textured objects with ease.

Explanations

One will note that without exception all of the above illuminators are equipped with one form or another of condensing system. The use of a series of lenses integral to the illuminator eliminates the need for a bulls-eye lens between light source and microscope mirror as was common practice before the adoption of standard illumination methods. It additionally greatly reduces the time one will spend in setting up for critical illumination as only a limited range of focus will be possible so that one need not set the apparatus a different distance from the microscope from session to session. If practical it can be a great asset to fix both illuminator and microscope to a suitably large board the maintains them in the proper relationship.

All of the above illuminators may also be set up for critical illumination (A and E included, though it would certainly damage the users eye) so that an image of the lamps filament is in sharp focus with the image plane of the specimen. In practice, this would require that each of the bulbs used be of the clear glass variety. B and C are both fitted for use with a common medium base bulb which permits the use of bulbs of the sort one would use in indoor lighting. If one elects to use a standard lighting bulb a variety of different effects become possible. An opal white bulb may be used to obscure the image of the lamps filament and provide a more uniformly lit field of view. Specialty photographic bulbs may be used to provide for the proper white balance with various photographic films. If however, one uses a frosted white bulb, it will be found that an image of the filament shows through, and all that will be achieved is the introduction of grain. It will generally be advisable to use only clear bulbs and then obscure the filament with a frosted glass filter as required, rather than purchase a variety of bulbs and be obliged to change from one to the other after waiting for the bulb to cool.

Looking at any of the above one might immediately recognize that the only exotic component is in most cases the lamp house and iris diaphragm. It would then be a simple matter to improvise a system of illumination that works as well if only one is willing to sacrifice the compact form represented in the above. Take for example a standard ceramic lamp base mounted to a board, place over it a large tea-tin that has had a hole of an inch or two diameter cut in one face coincident with the bulb. Cut a few slits on the opposite side over the bulb for ventilation and the housing is taken care of. One need only then mount two short focus lenses (Plano-convex arranged with the convex surfaces facing being optimal) at their primary focus from each other and provide some method of aligning them with the hole in the tin to obtain a means of achieving critical illumination. Introduce a fixed diameter diaphragm of appropriate size, and one can approximate Köhler illumination at the cost of a few dollars and an afternoons effort.

Notes:

∗Transmitted light refers to light which is passed (transmitted) through the specimen while incident light refers to light which falls upon (may be considered incident to) the specimen.

†At one time a solution of copper sulfate with various additives was used as the most accessible means of obtaining monochromatic light visually comparable with daylight.

‡For whatever reason color corrected bulbs for photography are less expensive that appropriately sized corrective filters.

Next time we will set up for Köhler illumination with a representative illuminator (B) and critical illumination with an other (C). -K

Elucidating Illuminators: I

Integrated Illumination

The choices one has in microscope illumination are often, of late, made by the microscope manufacturer. That choice is not always the one that the user would make for themselves, or even the best for general use. In general one might say that with integrated illumination, whatever the quality, age, or price of the microscope, one can rely on prompt success when it comes to simply obtaining an image. The perfectness of that image may range from excellent to abyssal, but something will certainly be seen at the eyepiece.

Today, if one is possessed of a microscope with integrated illumination little need be done for acceptable operation. A microscope equipped with a mirror is as easy for general, but more complex for critical work, when compared to a stand with integrated illumination. The mirror microscope is next to impossible to use at its full ability without a measure of effort and understanding of some of the methods of illumination for transmitted light microscopy. Let us begin by looking first towards a number of microscopes equipped with integrated illumination of various sorts and speak to the merits and abilities of each.

Köhler Illumination with the BalPlan

IMG_1656rotatecropedit
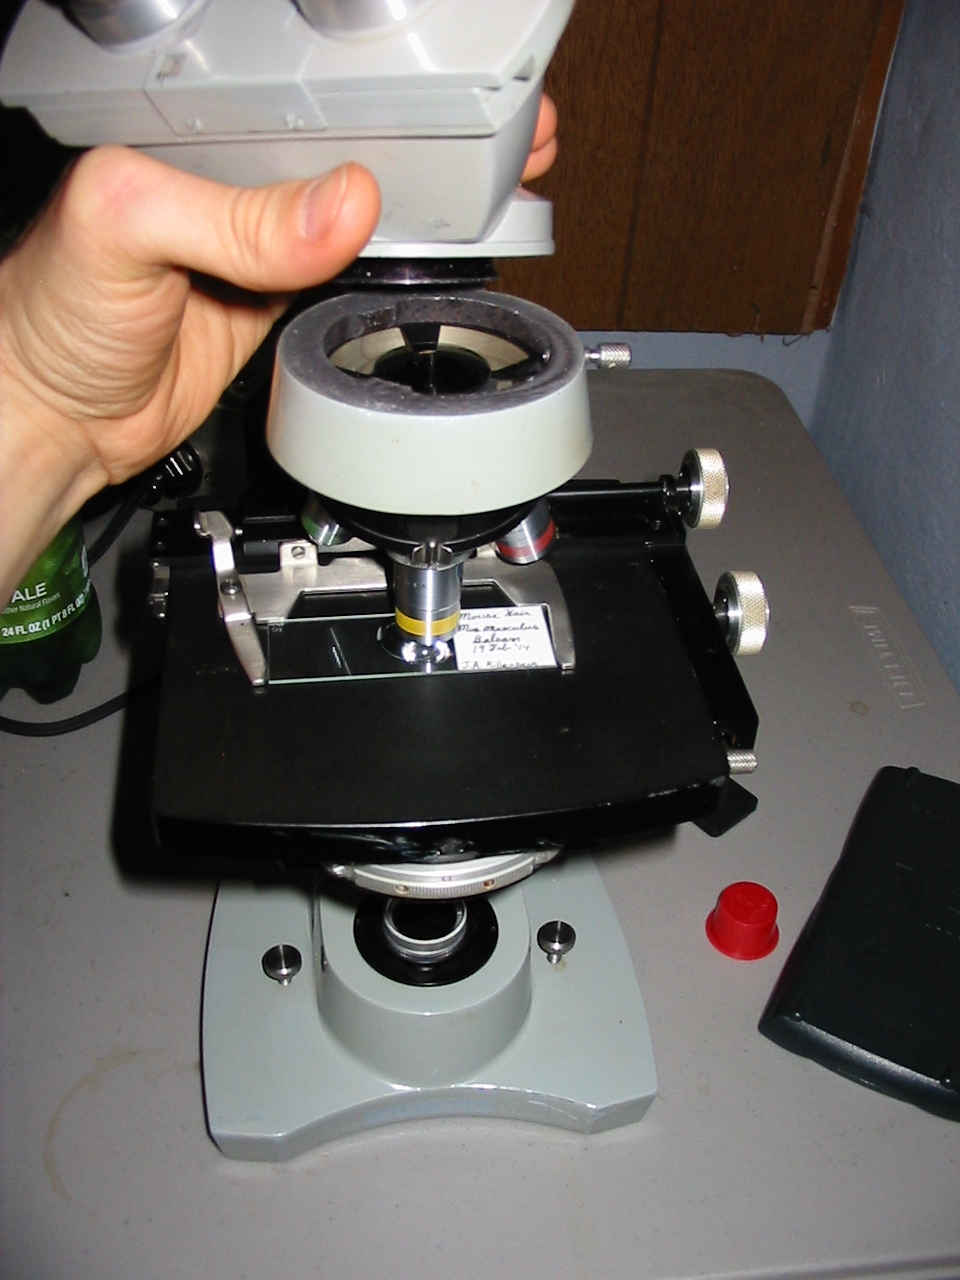
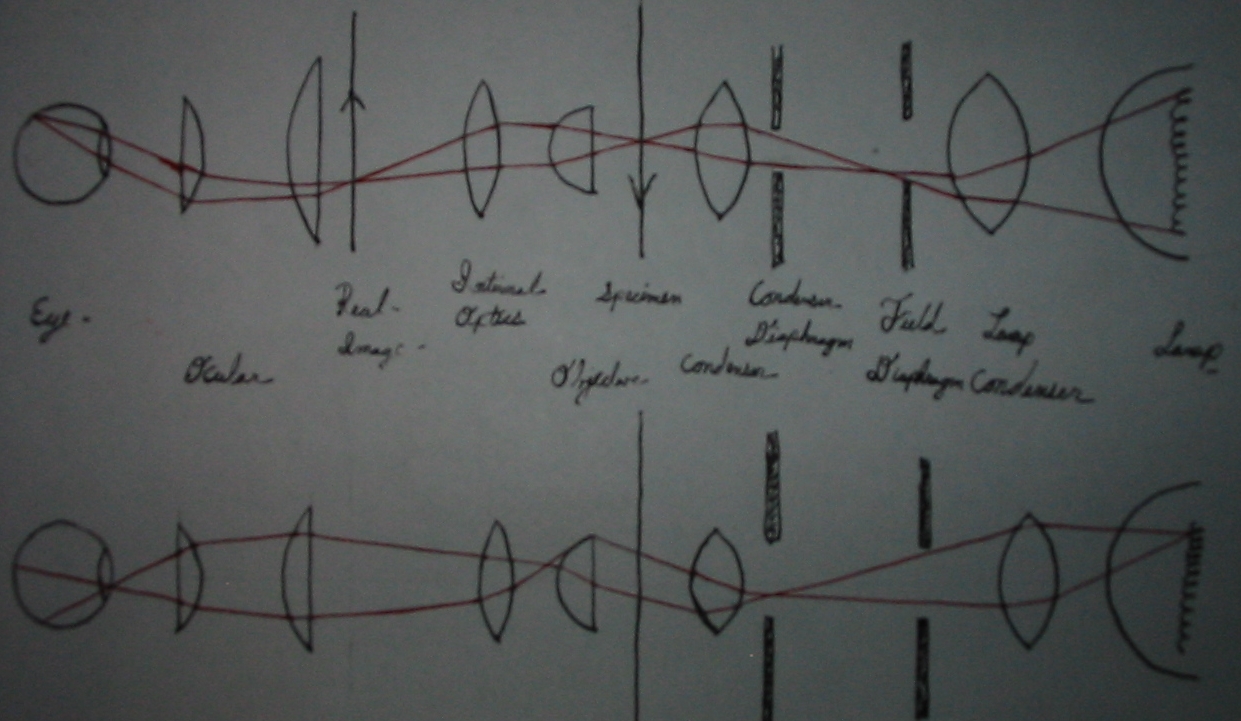
This model of the Bausch & Lomb Balplan uses a halogen lamp mounted in the base to illuminate a ground glass Plano-convex lens secured in the base. From there, a beam is sent through an iris diaphragm and fixed focus lens towards a right angle mirror which sets the light vertically through a second lens. The coherent light which emanates from this lens is then passed through the microscopes rack and pinion 1.25N.A. aplanatic condenser. The condenser is equipped with an auxiliary lens which may be swung into place to expand the pencil of light and provide a large enough light source for use with a low power finder objective.

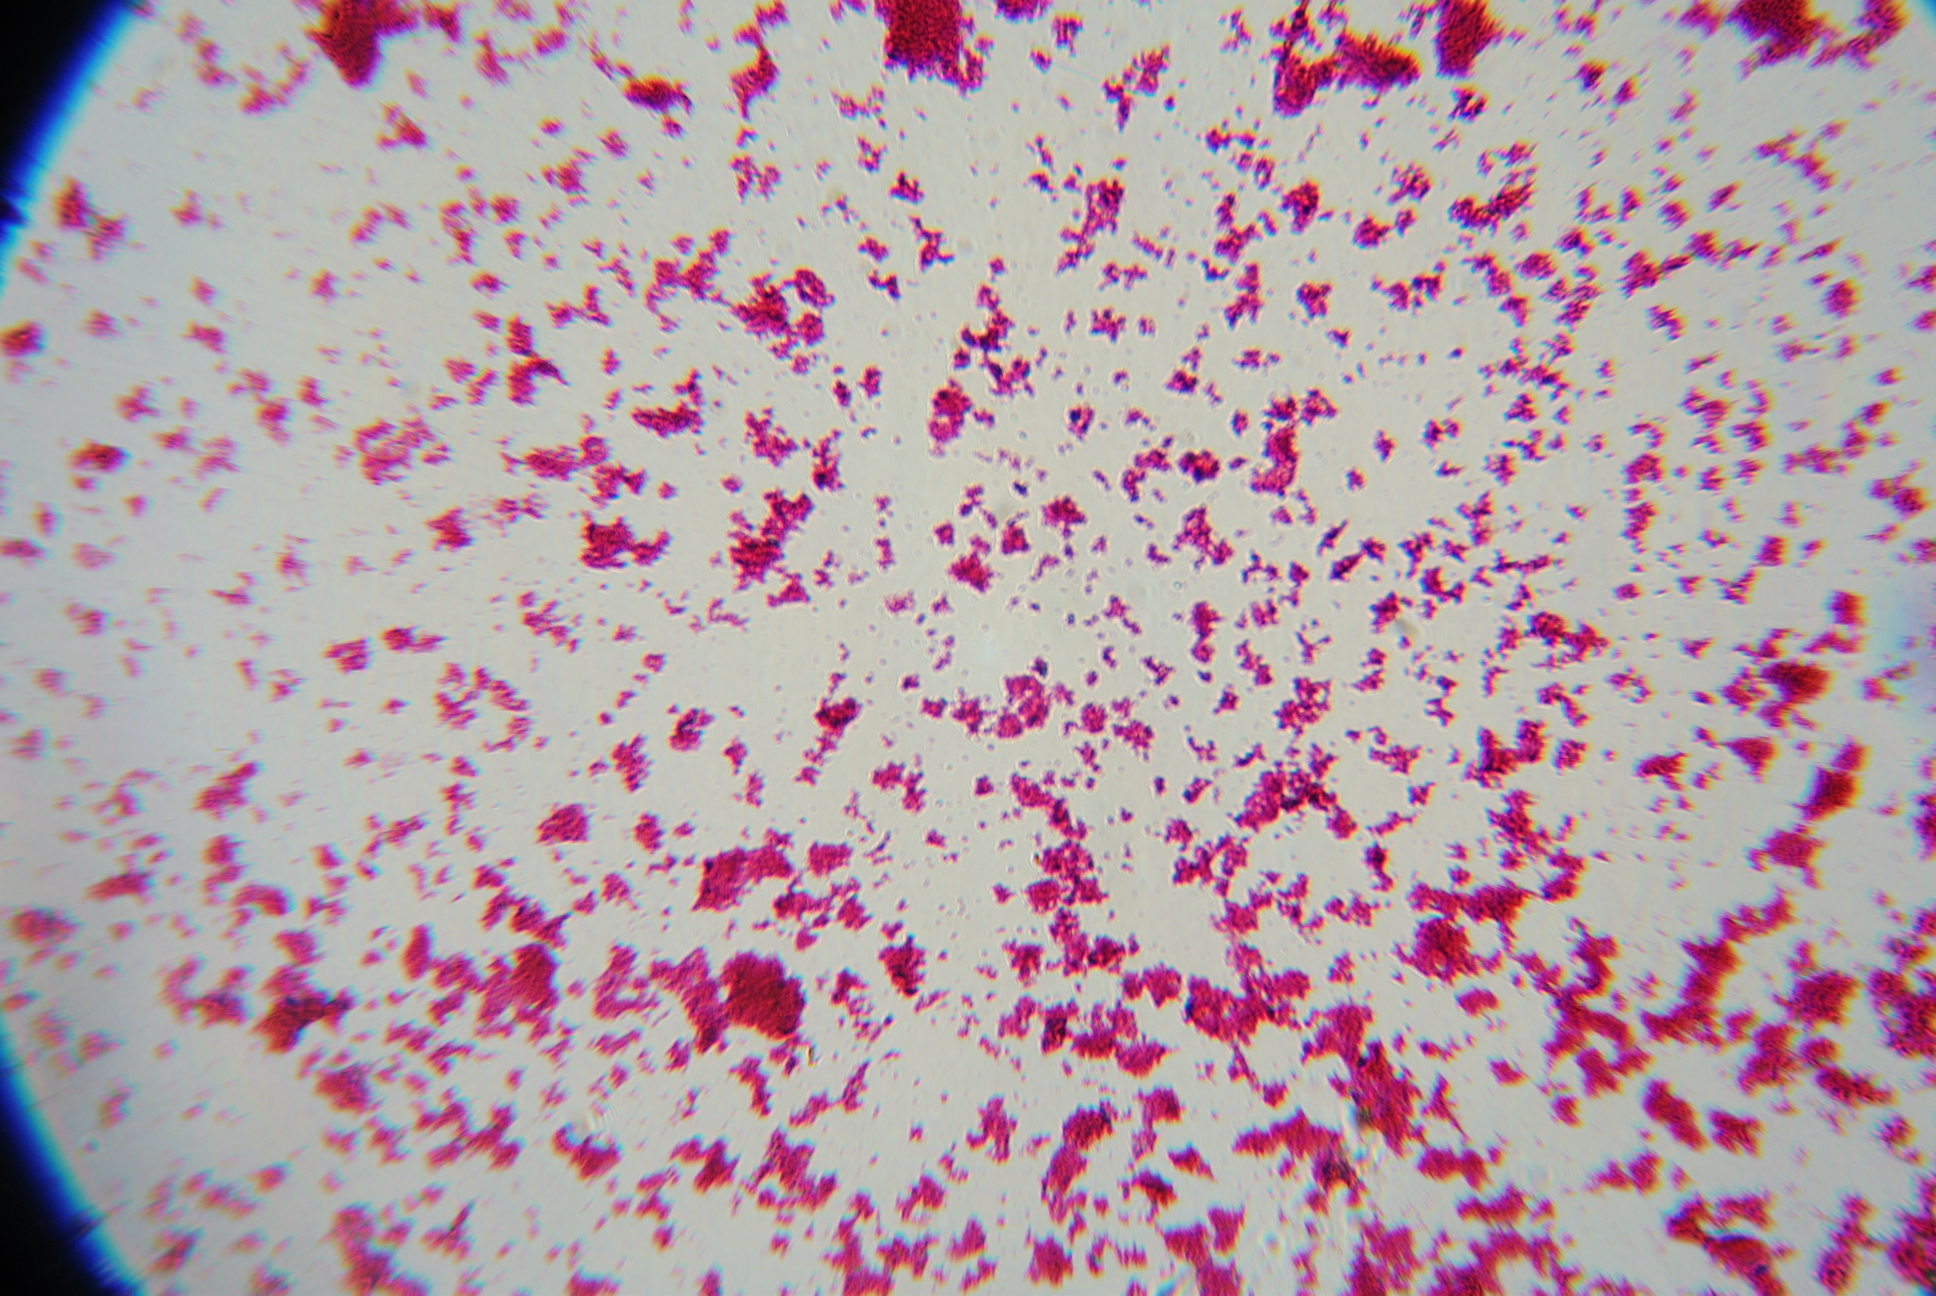
With an object in place (and in focus) it is the work of a moment to obtain a focused image of the iris of the illuminator using the condenser, and adjust the iris of the condenser to so that the numerical aperture of the condenser matches that of the objective for true Köhler illumination. The method of August Köhler to provide a field of light perfectly uniform and out of focus, while retaining all the characteristics required for maximum resolution are today recognized and accepted as optimum for advanced work. Köhler illumination puts a focused image of the light source (the filliament of the lamp or grain of a ground glass screen) at the iris diaphragm opening of the substage condenser and again at the back focal plane of the objective. A bright evenly lit field is then formed at the iris diaphragm opening of the illuminator and in the image plane of the focused microscope slide.

In the photograph the illuminators iris diaphragm has been stopped down well beyond what would be used in practice to better show the in focus diaphragm simultaneous with the image plane of the specimen. Note that despite the light source being a ground glass there is no visible grain in the photomicrograph.

Critical Illumination with the AO Fifty

IMG_1658rotatecropedit
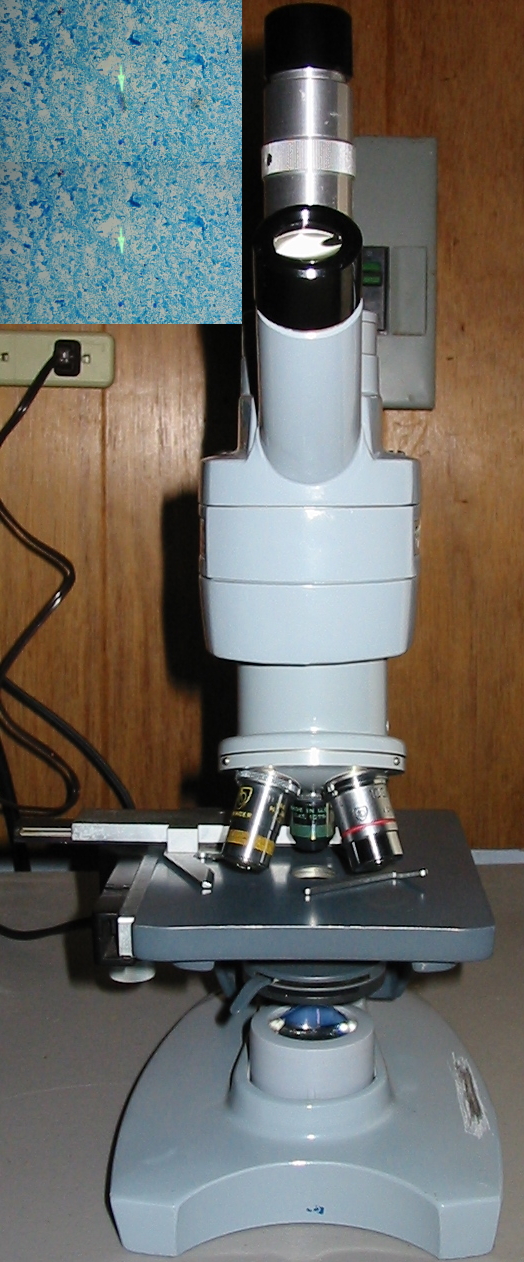
This American Optical Fifty series microscope makes use of an uncomplicated 15watt (medium base) incandescent bulb as the light source. Mounted in an adjustable housing in the microscopes base the light of the bulb is sent first through a blue filter. Immediately above the filter is mounted a single short focus Plano-convex lens with a ground glass flat surface. This arrangement makes up the integrated illuminator common to microscopes of the Fifty, Sixty, One-Fifty, and One-Sixty series. Above the field lens of the illuminator is a 1.25N.A. Abbe condenser on rack and pinion adjustment.

With this setup Köhler illumination is not possible. Instead a less perfect but far less mechanically demanding type of illumination known as critical illumination is possible. Prior to the modern acceptance of Köhler illumination as the gold standard it was practice to work with a large light source and less complex illumination apparatus. Rather than a focused image of the light source, a brightly lit field is formed at the opening of the substage iris diaphragm and the back focal plane of the objective. Unfortunately, this results in a focused image of the light source (and all its attendant grain or irregularities) being formed in the image plane of the specimen. The worker is then apt to throw the substage condenser slightly out of focus so as to avoid the distracting image of the filament when not using a sufficiently large homogeneous light source.

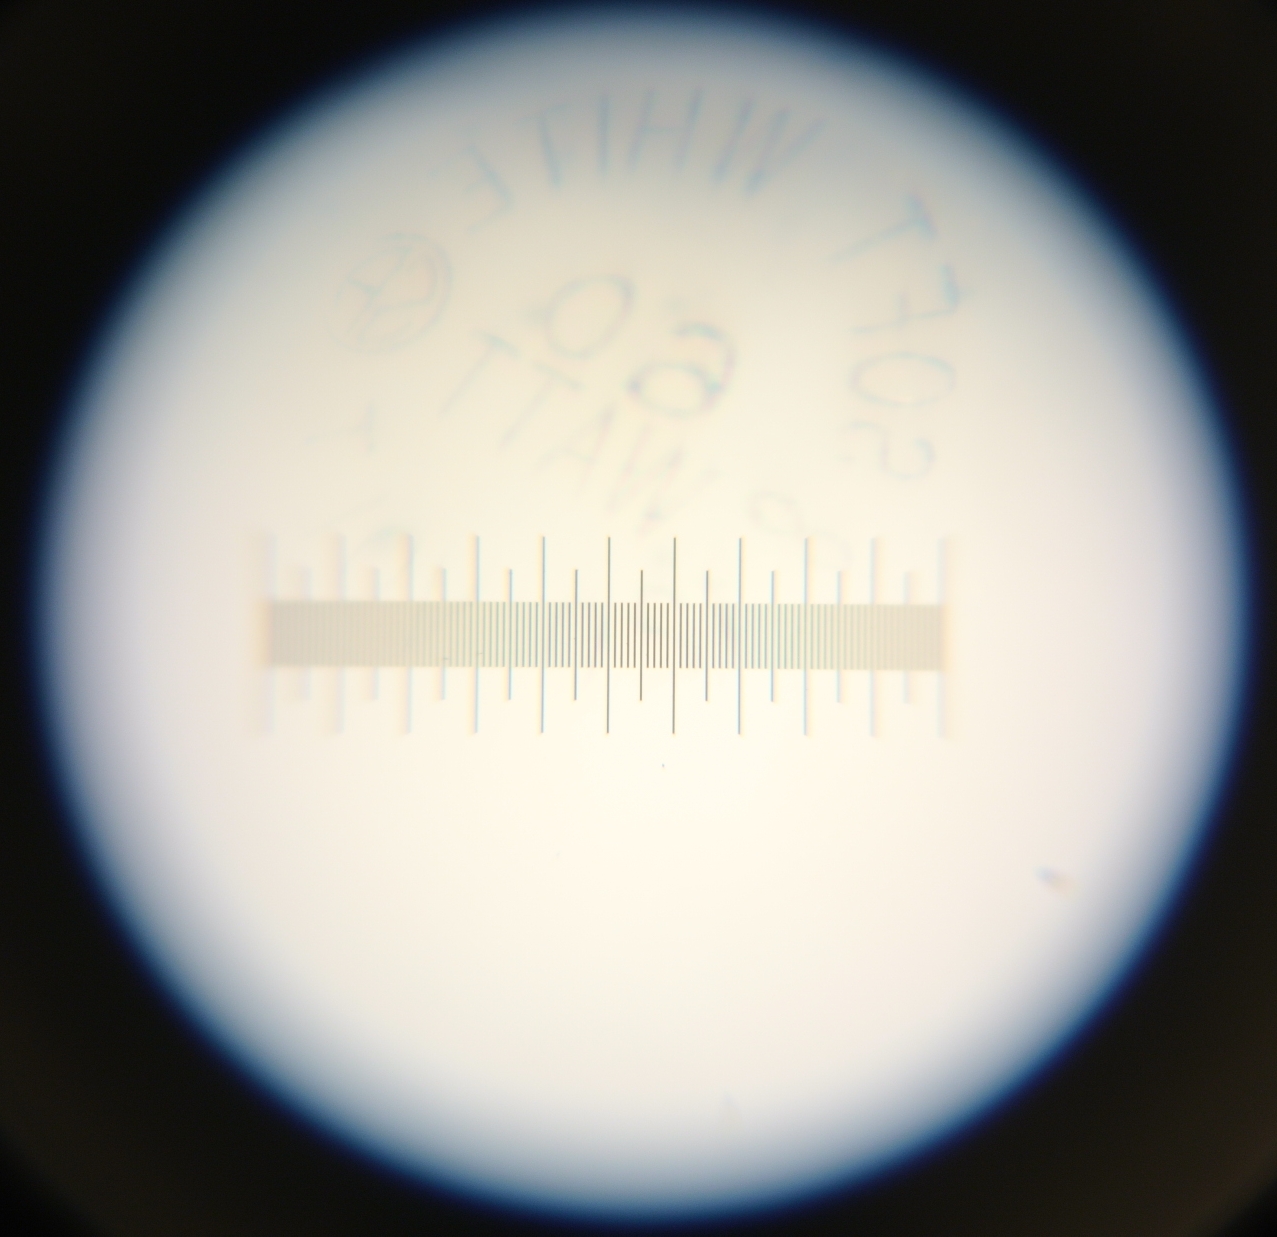
Not that in the upper photomicrograph there is evidence of dust on the ground glass illuminator, as shown by dark areas indicated by the pointer. In the lower photomicrograph the substage condenser has been thrown slightly out of focus to prevent grain and dust from appearing in the image plane of the specimen. In general use one may chose to rack the condenser up or down if the grain of the illuminator is found distracting, there is however a slight increase in spherical aberration and decrease in resolution.

Add-on Integrated Illumination

IMG_1657cropedit
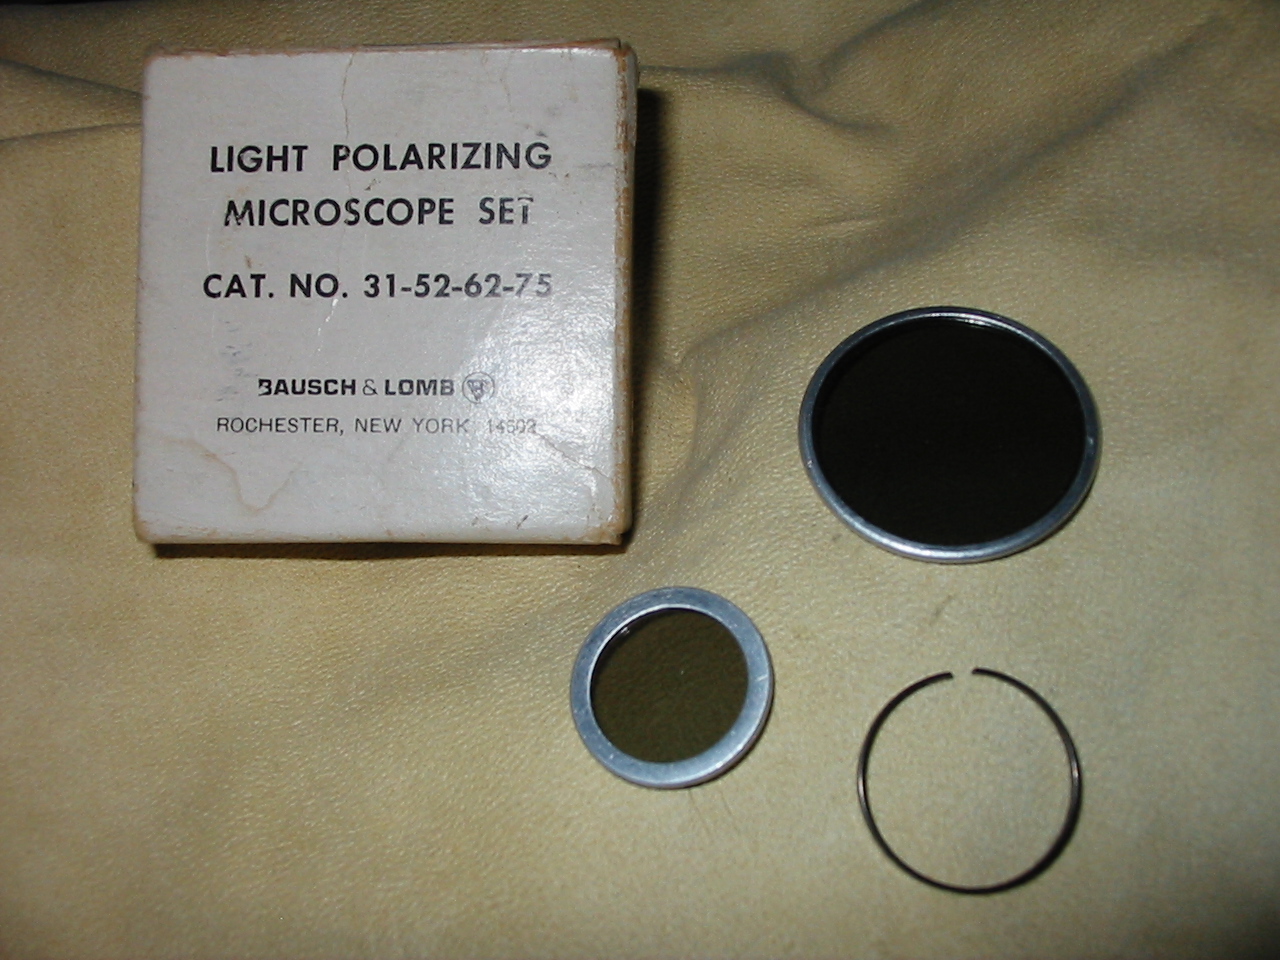
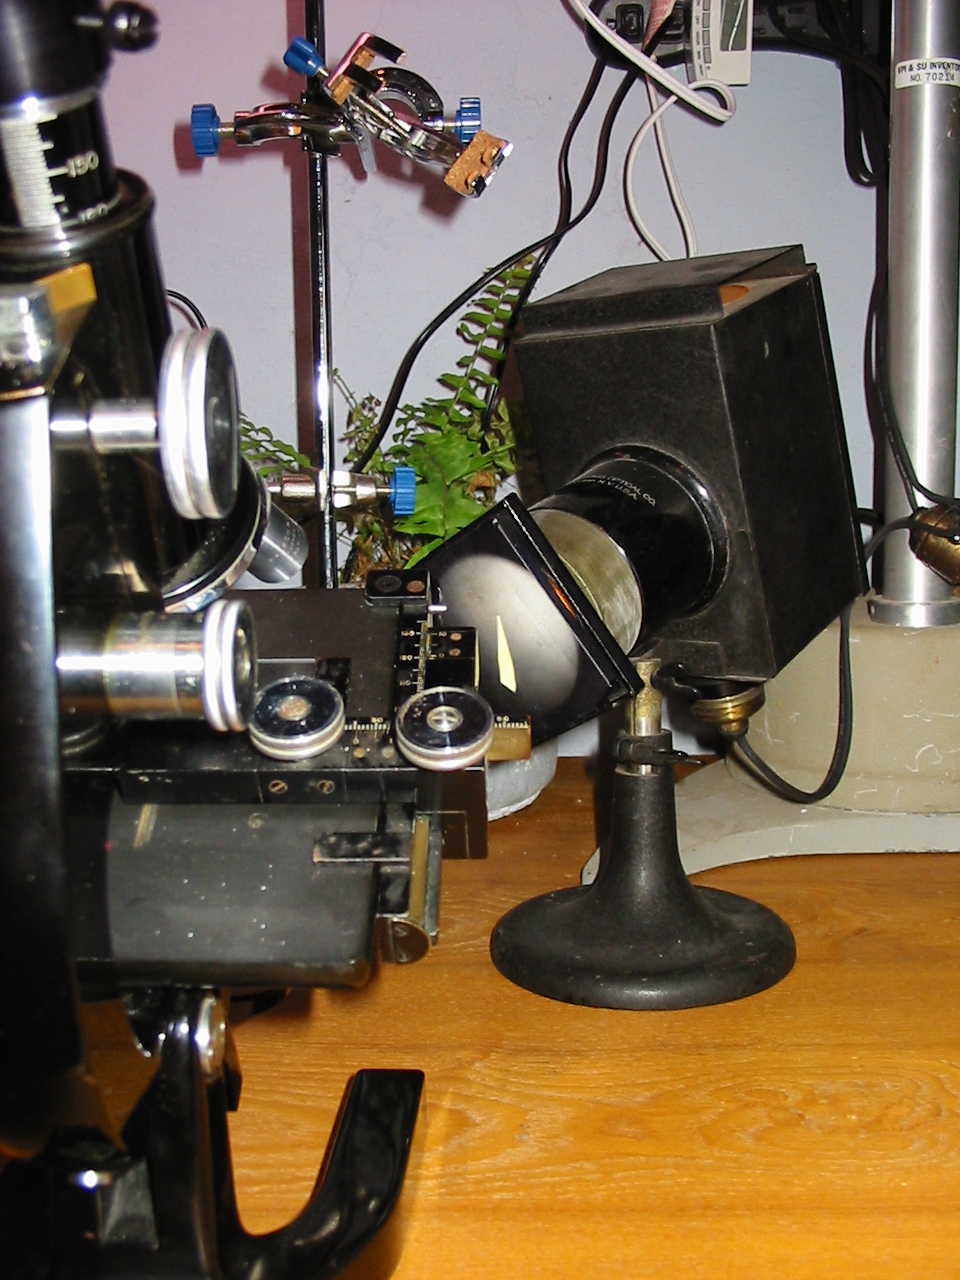
Largely as a response to the need for simplicity and convenience when introducing microscopy to students, a large number of manufacturers began to sell small self-contained light sources in the mid-twentieth century. These simple lamps could be used in the conventional way with a mirror bearing microscope by sitting the lamp upon the table, or by mounting it directly to the base of the microscope. The Bausch & Lomb lamp shown here was available with two different mounting brackets; one which made use of the mirrors mount, and that pictured which would be fit over the removable substage iris diaphragm before it was screwed back into the base of the substage condenser.

This illuminator consists of a small 15watt (medium base) incandescent bulb in a switched, sturdy, Bakelite shell. Over the bulb is mounted a blue glass filter with one ground glass surface, followed by a Plano-convex lens. The exposed convex surface of the lens is ground as well. Depending on the arrangement in which the illuminator is used, one can work with critical illumination or not, but again Köhler illumination is not possible.

Such lamps are chiefly recommended by their simplicity, durability, and availability at low cost. Less often mentioned is the versatility of such lamps. Any illuminator of this sort§ may be arranged to provide ample light in most circumstances a beginning microscopist is likely to encounter. It may be used with or without a substage condenser, or even without the mirror; as it may be set on the table between the foot of the microscope with the light projecting upwards through the stage. If such a light source is to be used it should be considered a component of the microscope, and kept with it at all times.

In the upper photomicrograph the lamp was placed on its back below the substage. Although the illumination is not critical the central portion of the field is even lit and free of grain. In the lower photomicrograph the lamp was positioned ten inches from vertical axis of the microscope and its light reflected by the plane mirror. With the surface of the ground glass focused critical illumination resolves the center of the field of view with slightly less spherical abbaration, although grain is once more introduced into the image and it is evident that this author did not take time to properly center the lamp.

Notes:

∗Well into the twentieth century arguments continued to be raised as to the technical or practical superiority of the various methods of specimen illumination. One may at first wonder at the controversy but it seems to have largely resulted from the need for more specialized light sources with Köhler illumination and the practicality of critical illumination when used with any large (flame or cloud for example) light source. The past popularity of point light sources is a product of the growing pains of the adoption of Köhler illumination as it was generally felt that a bright point of light provided more capacity for filtering without diminishing intensity.

†Technically, in critical illumination that brightly lit filed is formed just before the back focal plane of the objective and moves closer towards it as the power of the objective is increased.

‡Obviously with the lamp mounted directly to the substage condenser one can not bring the ground glass surface into focus in the specimen image plane as is required for critical illumination. Working with the lamp on the work table, or with the lamp mounted to the mirror bracket it may be brought into focus with the substage condenser if it is in range of the primary focus. I am uncertain as to why B&L would grind the convex surface of the lens, but I suspect it was motivated more by the desire to make the device less open to damage by unskilled hands (there are no exposed polished lenses to worry about) than by optical concerns.

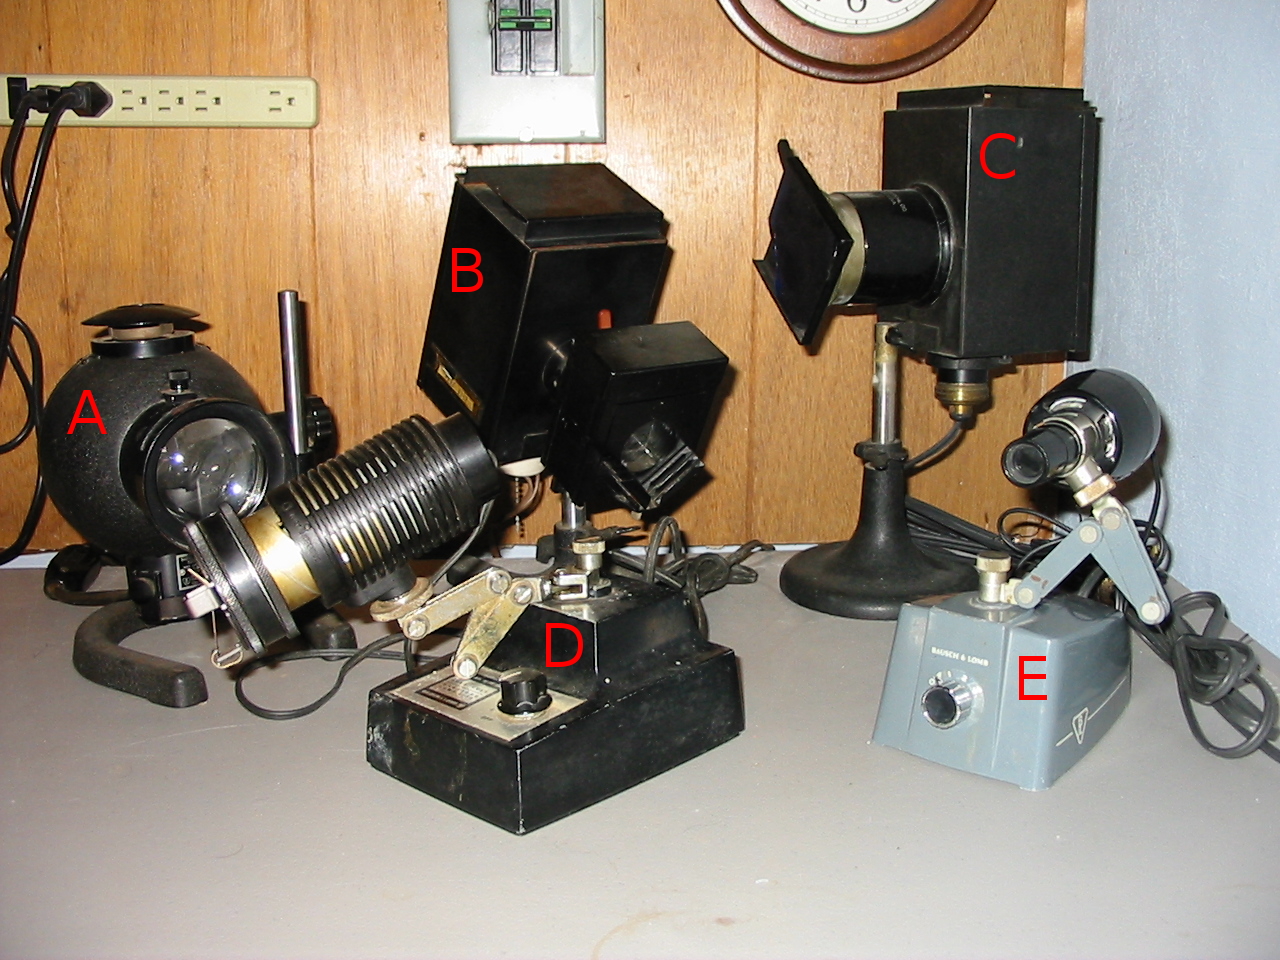
§All of the major manufacturing houses put out similar lamps with differing arrangements as to bulb and glass. A popular American Optical model was equipped with a blue filter and swing out ground glass or bullseye lens, providing a limited means of controlling the intensity of the light. Modern LED or incandescent lamp housings are available that will mount in place of the double sided mirror of most vintage stands, one need only verify that the mounting is compatible.

If things seem complicated don’t wait on the availability of fancy equipment, great work has been done with desk lamps and white clouds. Next time we’ll look to external illuminators. -K