The Bausch & Lomb Micro-Tessar

At times it seems that for every field that makes use of a light microscope there is a specialized stand. If not a particular stand, then an outfit of unique accessories. At the very least there’s optics for every occasion. A Bausch & Lomb Micro-Tessar objective is one more.

Just as photographers are wont to speak about portrait lenses when they mean Petzval’s so too are photomicrographers stage-whisper secretive when it come to Tessars. Although, a photographer who’s worked in a chemical darkroom is apt to know the Tessar as well, it frequently finding a place on the business end of an enlarger, for many a photomicrographer it is all too unfamiliar. Everyone knows about Flourites and Apochromats, even the utility of green filters for achromats, rather less know of Tessars.

A discovery of Zeiss, and therefore found in the Bausch & Lomb catalog only after the Triple-Alliance era, a Tessar lens is composed of four lenses (two each of crown and flint glass) with an aperture diaphragm between the first two lenses (which are separate) and the final two (which are cemented together. It’s an exceptional lens. With excellent correction for spherical aberration, a Tessar is likewise well corrected for color and astigmatism, which is to say it’s magnificently flat at even the lowest equivalent focus. A Micro-Tessar is such a lens outfitted in the RMS (society) thread. Although, B&L includes the LTM (M39) 72mm Teassar lens in their catalogs under the same designation.

Through the unimaginable generosity of a dear friend and member of that loose organization that is the community of microscopists a fine example of Micro-Tessar has been added to the collection. It’s a 48mm Micro-Tessar and though in need of a little cleaning quite irresistible. Here’s a few scans of negatives exposed just this past evening on the only film that wasn’t in the freezer (Ultrafine Xtreme 100) run through some Diafine that happened to be at the back of the shelf—a poor choice for a budget film but sure to compensate nicely for over or under exposure.

2019-04-13-0003

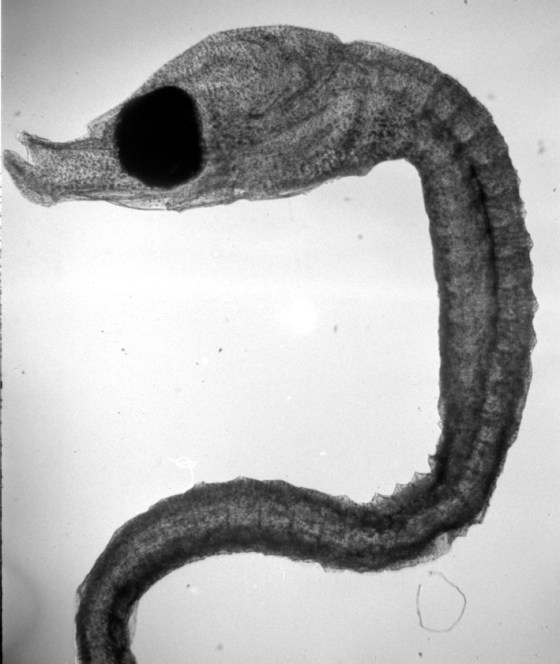
Young Pipe Fish, Bright-field, cropped

2019-04-13-0010

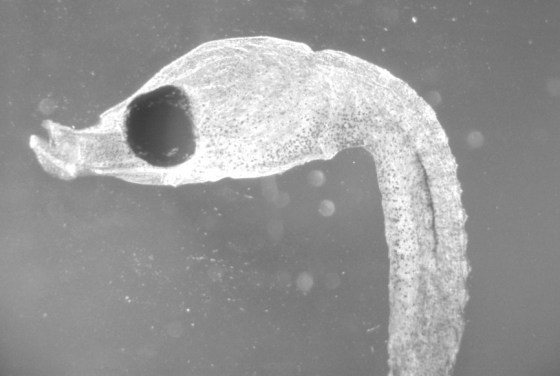
Young Pipe Fish, Dark-field, cropped

2019-04-13-0014

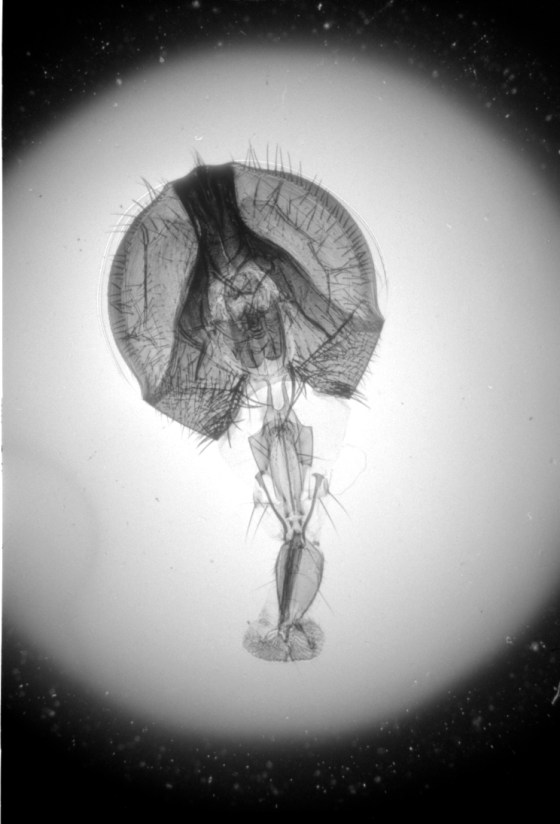
Head of a Blow-fly, Bright-field, un-cropped

2019-04-13-0013

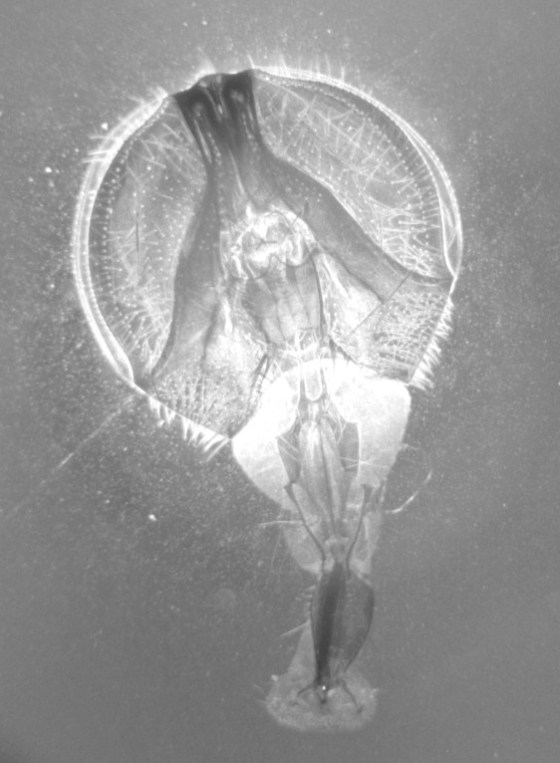
Head of a Blow-fly, Dark-field filter, cropped

In spite of the rush with which the above were produced, without an objective, and using a desk-lamp and mirror with no condenser, observe the above. The field of view on the first image is in excess of 9mm. That blow-flys head is 4500μm and this lens has oodles of dust on it. Only unavoidable scheduling conflicts prevent giving this lens the attention it deserves…

Amateur Photomicrography IV

The setup for photomicrography can seem complicated. In fact it’s quite simple, and one already knows everything involved; provided of course there is some familiarity with the visual use of a microscope. Visually one need only place an object on the stage, direct the illumination of the light source, rough focus based on the objectives working distance, and move ones eye to the eye-point of the ocular. That done, adjust for fine focus and enjoy.

With photomicrography a camera is substituted for the eye. If the camera happens to have the precise optical characteristics of the operators eye then fine focus may be obtained visually and translate without adjustment to the camera. Otherwise the focus can obtained by some other component that duplicates the characteristics of the camera. In theory it’s simple. In practice—particularly if time has not permitted the fabrication of a coupler—switching from the focusing tube of the Kodak No.0 photomicrographic outfit to the camera is a recipe for vignetted images. Wouldn’t it be nice if the camera itself could serve for both focusing and photographing?

It absolutely can and it’s now the only method this technician would recommend if not using an integrated camera system!

Permit me now a lengthy aside not at all written in my usual, tedious, arms-length style. I had never before considered using sheet film in a box camera, honestly, never! Reading through the B&L Amateur Photomicrography manual I saw the words “use cut film” and about lost my mind. Cut film! It’s so obvious! I’m not a skilled photographer and as such am not prolific—more’s the pity I’ll take forever to get any good. As such I might go weeks before shooting the last of even an 8 frame roll of 127, and even longer as I stress way too much over exposure and generally end up with endlessly bracketed frames. But with sheet film! NO WORRIES! 

It turns out sheet film is expensive, a dollar or more for B&W 2-1/4 x 3-1/4, Well, buy 4×5 and cut it down in pitch black! IN PITCH BLACK?! No thank you, I’m enough of a klutz with the lights on. But wait, X-Ray film is orthochromatic? X-Ray film is $20.00 for a pack of 100 5×7 sheets?! A single sheet will cut down to 4 of the slightly less than 2-1/4 x 3-1/4 frames that will fit in Kodak No.0 which means I get sheets of film I can work with under red light for $0.05 a frame! So, yeah, I’m all over that!

Using orthochromatic film would have been easy in the time when the B&L Amateur Photomicrographic outfit was new, today it’s a bit of a wait to obtain film as it will nearly always need to be ordered from a medical X-Ray supplier. With film in hand and all in a changing bag or darkroom remove a single sheet to be sacrificed. Use that sheet to trace out the size of a frame which will just fill the film plane of the camera, and cut it out carefully. Once the size is perfect a method of safely cutting down the film under a dim safelight will be needed. To that end obtain a guillotine paper cutter. Lay the cut down sheet on the cutter and align the long edge with the blade. Then put down a length of white (or otherwise highly contrasting) tape aligning that with the edge of the film farthest from the blade. Repeat lower down from the taped guide for the short edge. By this means a full size sheet may be speedily cut down to precise dimensions in the dim safelight (or total dark if sufficient care be taken).

UNADJUSTEDNONRAW_thumb_47a

Model R arranged for photomicrography

In a dark room (for simplicity) one should arrange the microscope so it be secure (rubber bands wrapped about the foot will give the Model R a firm grip). Further bands may be used to secure it to the base of a ring stand if one be employed. The arrangement shown at left illustrates the method described. For illumination any handy source may be employed, though it is advisable to use as a source something well baffled which will not permit stray light to fill the working area. Stray light is less a concern when working with roll film but for use with cut film it should be well avoided if at all possible.

Working in subdued lighting one may open the rear of the camera and use a sheet of cut (but exposed to room-light and undeveloped) film as a focusing screen with the shutter held open. Place the film in the back of the camera and carefully arrange the camera over the eye-piece. Turn on the illuminator and make adjustments as required for alignment of the whole apparatus.

When all is well positioned turn out the room light and illuminator. If working with orthochromatic film one may turn on a safelight. Place a sheet of unexposed cut film into the camera, taking care not to move at all the camera or focus of the microscope. Turn on the illuminator and trip the shutter of the camera. Working as just described will likely result in blurry images due to camera shake. Rather than more securely arranging all the elements one may simply leave the cameras shutter open and control exposure by turning on or off the illuminator or placing an opaque card into the light-path.

The images above were enlarged onto Fomalux silver-bromide enlarging paper from X-Ray film negatives which were exposed using the Kodak No.0 Amateur Photomicrographic apparatus and Model R microscope from B&L. The issues seen in the thin section (lack of uniformity in lighting) is from a processing defect (uneven development) and is present in the negative. In all of the above images the obstruction of  illumination was used in place of the cameras shutter and the front element of the microscope objective on the Model R was removed.

The resolution of the diatoms in the image at left is far better than one could have expected from a “toy” microscope. No doubt the impeccable condition of the Model R contributed significantly. It’s worth noting as well that without a meniscus lens (as would normally be found in a Kodak No.0) only the Model R’s well-engineered optics were able to affect the image. One is certain to find significant loss of resolution if working with a Kodak No.0 (or other box camera) that has a meniscus lens.

Amateur Photomicrography III

1020181242

Photographic Kodak No. 0 (left) and Photomicrographic Kodak No. 0 (right)

The Bausch & Lomb amateur photomicrographic outfit is built around a Kodak No. 0 Brownie 127 film box camera. Before getting into the process of actually using it, it might do to look at just what is different between the photomicrographic No. 0 and the standard No. 0. Apart from the addition of a focusing telescope and a stand-clamp the only difference is purely optical. While in the off-the-shelf No. 0 the camera is equipped with a simple meniscus lens, the photomicrographic No. 0 is completely free of optics in the image forming path.

With a modern professional photomicrographic apparatus there’s certainly going to be some optics in the photomicrographic light path—more about why in a moment. This most often consists of a focusing relay lens system, usually in the form of a reducing series .7x or .5x being the usual magnification factor. This reducing series may additionally include lenses for the correction of spherical aberration (as in the BalPlan or flat-field DynaZoom/Dynoptic). In standard achromatic systems the system is free of such correction optics and may well consists solely of a beam splitter, or reducing lens only.

The reducing factor of such systems is, somewhat confusingly, sometimes found coupled with a body tube labeled anywhere from 1x to 10 or even 15x. The two portions work together and serve to provide a cropped frame that is then enlarged to fill entirely the film frame. In third party “eye-piece” cameras this crop factor was accomplished by quite inferior optics (if any at all). The reason such a reduction is necessary is owing entirely to the small size of what’s become the standard imaging surface. Currently, that’s a CCD or CMOS sensor somewhat smaller than a 35mm film frame. Where film photomicrography is still pursued, or was prior to the great digital migration, that nearly always meant a 35mm film frame. It bears remembering that 35mm film is a “miniature” film format—no matter how many folks tout their “full frame sensor” camera—it’s still miniature, which means reducing the image forming cone of light to get something near to the optical field of view in the frame. Early photomicrography used large format film and handled cropping with long bellows extensions.

With no optics in the camera, and a box ‘bellows’ of three inches, the No. 0 can be expected to offer almost no crop factor at all. This is functionally a good thing. By greatly restricting the ‘bellows’ enlargement chromatic and spherical aberration present in the simple optics of the Model R are prevented from revealing themselves (as they surely would be at greater enlargements).

The other significant upshot of an lensless camera is the practical impact on focusing. With no optics to worry about the system that is employed to focus the camera is made more simple. To duplicate the focus of the camera one need only use a device of identical length with a ground glass at the imaging surface. In the Photomicrographic No. 0 that is a tube one inch in diameter with a circular ground glass at the far end. Although the ground glass is much smaller than what one must expect the film to capture it certainly enables accurate focusing. One must ensure the primary feature of which a photomicrograph is desired is centered, and hope for the best.

In a complete system there is a further component, a circular bushing (also void of any optical components) which fits one end over the Model R’s ocular while the other end inserts into either the focusing telescope, or No. 0 as required. It should be a simple matter to drill out a hardwood dowel as a fabricated replacement. With that knowledge, the reason for the unique aspect of the shutter opening on the photomicrographic No. 0 becomes apparent. It is constricted as it nears the shutter mechanism (while the standard No. 0 is wide open) because the bushing must be prevented from pushing too far in and obstructing the shutter mechanism.

In use then, one would attach the photomicrographic No. 0 to a ring stand with the Model R held steady underneath. The camera may then be rotated such that the focusing telescope is over the ocular while the a slide is positioned and brought to a clear focus. The camera may then be swung into place and the shutter tripped for either an instantaneous (snapshot) exposure of the time bar may be pulled out if a longer exposure is required.


Kodak No. 0 Box Brownie Digression

The oddity of 127 film is not so much owing to the negative size—sure it’s smaller than 120 and bigger than 135, but to the lack of sprocket holes. This characteristic has a significant effect that is apt to go uncommented even when it is recognized. Without sprocket holes the cameras are mechanically much more like medium format “red-window” cameras than either 110, 126, or 135 film cameras. Red-window cameras are far simpler mechanically than other film advance types.

Where 135 cameras take advantage of the films double sprocket holes and by the use of a gear system count the distance the film has advanced with each stroke of the advance lever, turn of the knob, or activation of the motorized advance, red-window cameras require the active attention of the camera operator. When loaded with film a red-window camera permits a view of the films backing paper. A standardized system of numbers on the backing paper show through the red window and thereby indicate the position of the film in the camera. When the advance knob is turned one numbers moves from the window and is replaced by the next.

Some cameras have a single red window and the progression is simple. By turning the knob 1 progresses to 2 and on through the total range. Other cameras may feature two red windows and the operator should then use both. When 1 is displayed first in one window, the shutter is tripped to take the first photo. The film is then wound on until the 1 shows in the second window. At this point the shutter may be tripped again for the second photo. The same process is repeated for the complete range.

In cameras making use of two red-windows the total size of the negative is restricted to half of the total size of the largest standard frame size. Such that for 120 film a 6×9 frame is reduced to 6×4.5 or in 127 a 4×6 frame is reduced to 4×3. The Kodak No. 0 Brownie is a single red window camera and captures 8 frames in the 4×6 format. Although a fundamentally obsolete format (even if it is still manufactured) 127 film and the 4×6 frame size are small enough that a photographer can often use a 135 negative carrier for (admittedly severely cropped) enlargements or a 6×6 120 negative carrier with an improvised mask for un-cropped enlargements. Not having to purchase a unique and hard to find negative carrier is a great boon to anyone working with 127.

On the topic of specialized equipment, one is apt to feel the need of a new developing reel. Although many of the common and currently manufactured plastic tanks and adjustable reels are able to handle 127 (as the adjustable reels are still equipped to take it despite it’s comparative obscurity) anyone favoring steel tanks and reels is apt to face a long search for a 127 reel. At least this only applies to those who must use daylight processing tanks. Those with access to a dark room may use the old roll-film standby of the open-tray loop.

In the field anyone accustomed to working with box cameras is apt to notice primarily the diminutive size of the Kodak No. 0. Those for whom the No. 0 is an introduction to box cameras are liable to feel quite the opposite. In either case one thing that is quite small are the viewfinders which are of the frosted window, lens-and-mirror type. However small the two (one in portrait and one in landscape) may be they are usually preferable to the wire-frame type that require the camera be held at eye-level. Holding a camera is a practiced skill and those unaccustomed to it may struggle to obtain clear photos with the quite slow shutter speeds of old box cameras. Needing to hold the camera to the eye only complicates the task.

Still, like all the box Brownies the No. 0 is a breeze to use. The simple flip-flop shutter is unlikely to ever fail and although the camera itself is small the winding key is full-sized and easy to turn. Equipped as it is with a pull tab for timed exposures one may wish to use it on a tripod only to find the No. 0 not offering a tripod socket. Thankfully, it’s small size mean it is easily fit into any of the common and inexpensive cell-phone tripod mounts. Take care though, the minimum focus distance is around 5 feet.

10-16-2018 1 copy

Birdhouse on 127 size Kodak BW400CN


Amateur Photomicrography II

UNADJUSTEDNONRAW_thumb_40b

Kodak No. 0 Brownie and 127 film

The Kodak No. 0 Brownie box camera is not currently in high demand, doubtless owing to it’s use of 127 film. So-called “cartridge” film, 127 is a 1-3/4 inch wide, 23-1/2 inch long unperforated roll film. It seems strange to describe it in terms of inches but honestly, using millimeters in this case is rather confusing as the film was designed using imperial units rather than metric. Somewhat confusingly it is not incased in a cartridge or cassette despite it’s colloquial moniker, rather it is wound on a spool with numbered backing paper in the style of more common (nowadays) 120 film. Cameras using 127 film are frequently seen in one of two frame formats, either the square 1-5/8″ (4 cm) or rectangular 1-5/8 x 2-1/2 (4 x 6.3 cm) produced by the Kodak No. 0 Brownie.

For a time in the mid 90’s the 127 film format was no longer in production by the major photographic houses. It continued to be available from specialty sources or as expired film on the used market. In general even the expired film cost in the area of $10 USD roughly double the significantly larger (and continually manufactured) 120 film format. Although currently a number of manufacturers have revived production of 127 film it is still generally in the $10-$20 USD range for a single roll. For that reason anyone wishing to pursue photomicrography with the Kodak No. 0 Brownie (or photography in general with a 127 film camera) would do well acquire only a few rolls and saving both the spools and backing paper.

Provided a supply of 127 spools and a numbered backing paper or two (though the paper could be fabricated from any light-opaque paper stock) one can easily and cheaply produce 127 film for personal use. The easiest method would be to simply spool a length of 135 film (standard 35mm film) onto the 127 size backing paper. Regrettably, 135 film is perforated and between that and the fact that it is already 10mm narrower than 127 film much of the frame will go un-captured. A better option is to begin with an unperforated film wider than the 127, 120—being nominally 60mm wide—is an ideal choice, and slit it down to the 127 width.

UNADJUSTEDNONRAW_thumb_41d

Simple film slitter

The above diagram of a film slitter may be used to slit one film width to another and can be with a few simple changes so constructed as to slit any desired width from any other. The basic rule of construction is that the film path must be of the width which is being slit from (the widest films width). In the crude diagram A is a block of wood of just over the width of 120 film. On either side of this are attached guides B which are additional blocks of wood which rise a short distance over the bed of block A. The position C is a groove cut into block A into which has been inserted a utility razor. The figure to the right shows this in profile. One further piece is needed, block D, which is the width of A and has a wide cut at location E into which the razor is able to slide without making contact with the wood. This channel covers the blade so it is not exposed while slitting (which must be done in total darkness) and allows block D to hold the film down such that it is slit by the razor rather than passed over it.


Amateur Photomicrography

Bausch & Lomb in it’s finest incarnation was based in a large upstate New York city on the shores of Lake Ontario called Rochester. At the time it was The Flour City, so named for the many mills along the Genesee river which ground the wheat towed into the city by that turn superhighway of historic New York, the Erie Canal. Now, The Flower City is remembered less for the great optical firm of B&L and more for the once mighty company of another golden age optical company, Kodak. Even today the George Eastman house is at once one of the most well appointed and well respected museums of photography in the world, host every year to dozens of programs and feature presentations.

It should be no surprise that microscopy and photography should intersect. That two of the greater names in each field should call the same city home is surprising, but perhaps less so when one considers that the two would have been attracted by the same resources. B&L made optical instruments and components of all sorts, and no small variety of microscopes. The Eastman dry-plate Co. (later Kodak) made dry photographic plates and film, together with the low-cost cameras which would create a demand and market for their more profitable consumable products. With the two companies calling the same city home one could expect that the Kodak cameras and film would be sure to see use at the eyepiece of B&L microscopes.

Amateur Photomicrography

That B&L should have published a manual specifically treating with one of the early Kodak box cameras is only natural. It’s this manual we’ll be looking at in the next few posts. Chances are good anyone in the United States of America knows someone who has an old Kodak box camera laying around they’d be happy to make a present of. Otherwise pick up a Kodak Brownie No. 0 to work with the B&L model R and follow along with the manual or pick up the larger Kodak Brownie No. 2a to work with a full size B&L microscope.

B&L Model R and Eastman Kodak Brownie No. 0

B&L Model R and Eastman Kodak Brownie No. 0

Large Format Photomicrography part: XIII

If someone was of a mind to get into large format photomicrography, I’d say go for it. I knew, and still do know, next to nothing about photography. I can do it. Sure, I’ve got a leg up in that I have some gear that does most of the work but even still, a cardboard box will do in the end. Just let it be an adventure.

What to Buy and Where

f you’re going to be getting a number of items shop around. If you buy several things, try and get them from the same source, in the end you might spend a dollar more here or there but you may well end up saving on shipping. If you’re looking for accessories, buy used. A used 4×5 film holder is always cheaper used than new, often less than $10.00 including shipping. For consumables like film, be willing to buy more than you need. A box of 50 sheets of 4×5 works out to $0.70 a sheet while a box of 25 usually ends up at over a dollar a sheet.

4×5 film: Get the cheap stuff. Don’t worry about buying the high speed stuff either, 100 ISO is fine. Amazon works but check out specialist suppliers like Freestyle Photo and B&H.

Paper: Foma. Get the stuff from wherever but buy Foma. Foma is a Czech company that makes all manner of photographic materials. They also happen to be widely available and one of the few companies that still makes a paper slow enough for contact printing on one of those old contact printers.

Chemistry: Pick a developer and know that you will form an unhealthy loyalty to that developer. I picked D76 and love it, I feel like it’s simple enough I will take a shot at making it myself. Can I use it on paper? Yes. Color film? Yes. Expired film? Yes. It’s what works for me. Whatever developer you pick will work for you, don’t stress about it. Same goes for the fixer. All developers develop, all fixers fix.  Pick up a bottle or a pack from Amazon or one of the retailers mentioned above. Then check and see if it isn’t available cheaper on Photographers Formulary.

Changing bag: Buy new. Used ones might leak light and depending on what they’re made of might be devitrifying on the inside. Just buy a new one and use it till you die. It’s going to last forever.

Daylight Tube/Tank: Buy used. My recommendation is the Color By Beseler #8912. It’s great it can do 4 sheets of 4×5, 2 5×7, or an 8×10 and only drinks an ounce and a half of chemistry a shot. If you think you won’t get the bug, and will only do one at a time get an Ilford Cibachrome daylight print tank, smaller is better but get the one that will handle the biggest size you think you’ll need.

What to Read

Anything by Steve Anchell. The Film Developing Cookbook and The Darkroom Cookbook are excellent. You may be surprised that even if you buy used neither of these books are really available for less than $20.00 and that is not at all overpriced. They’re that good. They aren’t something you’ll want to sit down and read cover to cover but they are something you’ll want to refer to again and again.

Black and White Photography by Henry Horeinstein. But you want to shoot in color? Get Horeinstein’s book. Just do it. Light is light and while color is a bit different Black and White Photography is the sort of firm soil I wish I had started out with.

Apart from that there’s tons of stuff out there on the web but it tends to be… well, there’s plenty of great stuff out there. There’s also plenty of absolute trash. Folks who will actively oppose the efforts of anyone who doesn’t pursue photography with the same goals and intents as they do love the internet. I wonder how much of that attitude is the dependent of those people who fought tooth and nail in the early days of photography to give it the imprimatur of art and how much is just the effect of the internet on otherwise lovely folks. Never mind, the less said about insufferable people the better.

Try the people on Flickr, really most folks are nice and the people who chose to associate with the Film Photography Podcast in particular are wonderful. Try the community of people at Lomography as well. There’s something in the attitude of both groups that is so positive and infectious!

In Conclusion

I hope someone out there who never thought they could try large format photomicrography, or who was despairing at only having a low resolution eyepiece camera see’s just what is possible. If you have the gear you can do it. If you have the desire and a shoebox you can do it. Dress up your science fair project, enrage your photography teacher, make a unique gift, or an intriguing photo for the mantle. Film photography is now truly a part of my microscopy and a part of my life. As long as film in being made, I’ll be shooting it.

Next time, freehand sectioning! -K

Large Format Photomicrography part: XII

One thing I’ve learned on this little project is that I’m certainly no photographer! Most of what I know of photography has been gleaned from a handful of books and a few dimly remembered classes at school so I hope anyone who is enough of photographer to call themselves one will take this next bit in the spirit in which it is intended. Photographers are crazy!

Macro-Madness

Photography is amazing, it’s a powerful, scientific medium and profound means of artistic impression. In the right hands a camera can be a paintbrush or a chisel and mallet. A camera can shout with the report of shotgun or whisper as the falling of snow. It’s not lightly that I say some of the efforts of photographers just make no sense to me, I’m referring to, of course, macrophotography. Some of the accoutrements of macrophotography make sense to me. Specialized lenses that are specifically constructed for high magnification and short working distance are perfectly reasonable in my mind. Even those macro extenders and bellows units that extend the distance from the rear element to the film plane and thereby reduce the minimum focusing distance make sense to me.

I can’t even begin to understand the motivation for some other macro accessories. There are society thread (microscope objective) to camera body adapters that I have to call absolutely insane. This is asking for a bad experience and all but ensuring the objective will be badly damaged. Then there’s so-called lens reversing adapters, or macro-reversing-rings that seam to me with my meager photographic knowledge to be an equally dangerous abuse of a camera lens. Maybe these sorts of devices are sold more for novelty than anything else, or perhaps with my microscope slide orientated vision I have trouble seeing how these are best used.

To my mind if a photographer wanted to have a crack at photographic a microscope slide they’d need a box full of macro optics and a finely controllable vertical tripod of some sort. It seems far easier to my mind to just use a microscope. No, I don’t mean a forty pound monster like the BalPlan or any expensive trinocular microscope at all. I mean a flea-market bargain or a school surplus, monocular, two objective microscope.

Large Format Small Budget

A photographer probably has access to a cut film holder and apart from that all any aspiring large format photomicrographer needs in a microscope. Everything else (not necessarily including the slide one wishes to photograph) is likely already on hand. Today, I used an Amazon shipping box and a desk lamp to get a large format negative of a pine needle section. I supported the box that acted as my camera on a ring stand but I could have used a couple stacks of books just as well, it may have even been more stable if I had!

I took my little shipping box and tapped it up with some strips of duct tape. Next, I traced the outline of my film holder on one end of the box. That done, I measured out a rectangle just under 4×5 inches which I cut out with a razor. On the opposite end of the box I cut a small hole in the center. The hole I cut in the center was only just the size of the ocular, I wanted to keep the hole small enough that I didn’t need to bother with any sort of baffle or light-seal around the eyepiece. I should have used a box a bit longer, a shoe box would have been much closer to the ideal. A sufficiently long box would provide enough extension as to be par focal with the virtual image seen by the eye at the eyepiece. Additionally it would have been a good idea to use a projection or photographic eyepiece so the real image… well lets keep it simple.

Instead of some fancy ground glass a sheet of lean with the protective cover was used but I might just as easily have used a sheet of wax paper. I didn’t bother with any light proofing or consideration for stability. A layer of fleece glued to the face of the box where the film holder would sit would be a useful improvement as would a layer of black paint on the inside of the box—good ideas if I ever find a longer box to use.

The Process

  1. Load a sheet of film into the film holder in a changing bag.
  2. Position a desk lamp with a frosted bulb on the table with the shade oriented to direct all the light downward, place it about 8 inches from the mirror of the microscope.
  3. With your eye at the eyepiece manipulate the mirror so that the light fills the field of view.
  4. Place a slide on the stage and bring the microscope to visual focus.
  5. Place the “camera” over the eyepiece and stabilize it with a bit of masking tape.
  6. Place the focusing screen (wax paper, ground glass, etc.) over the large opening.
  7. Focus the microscope such that the image on the screen is clear.
  8. Turn off the room lights (the darker the room the better, but just enough light to see is ideal).
  9. Remove the focusing screen and turn of the desk lamp without moving the lamp or “camera”.
  10. Place the loaded cut film holder over the opening of the camera and gently pull out the dark slide.
  11. Briefly turn on the lamp to make the exposure and then quickly turn it back off (exposure times up to 5 seconds are reasonable for 100 ISO film, a 40 watt bulb, and a low power objective).
  12. Carefully replace the dark slide.
  13. Process the film.

The Result

I put this whole thing together in about 15 minutes. It took me longer than that to develop the film! Here’s the scanned negative together with an edited inversion in lieu of a print.

Not bad considering I didn’t make overmuch of an attempt at being precise. I should have used a longer box or a more powerful eyepiece, something to raise the magnification enough to fill more of the frame with the specimen. I might have used a shorter box if I enjoyed the look of a circular vignette. A shorter exposure would have been good as well, the negative is very dense and the only thing that saved it was the very dark stain in the specimen. With the 40 watt bulb, 10x objective, and 5x ocular I’d wager a 2-3 second exposure would have been closer to an ideal result. Still, not bad for a microscope that I picked up for under $20.00 USD.

Next time, the wrap up! -K

Large Format Photomicrography part: XI

At this point I sort of know what I’m doing as far as large format photomicrography goes. Which is to say I can put a slide on the stage and reasonably expect to end up with a serviceable print. For anyone who’s been here through the entire series to this point it likely feels as if this has been going on forever. All told what with the demands of work, other interests, and responsibilities, on any given day when I picked up a film holder I’ve probably spent no more than an hour on the project. Between reading up on things, photographic work, operating the scanner, and making notes the whole things been rather a rush.

Forgive me then if I step back a minute and put a couple scribbles up on the ‘fridge.

Two Scanned Negatives

Two Scanned Prints

Pretending I’m A Photographer

The negative of the lilium ovary section above is a bit thin but has enough density to provide all the detail that’s present in the visual. It was a 1/15th second exposure which I was a touch concerned would be a bit too long with the lightly stained section. The negative of the zea stem, 1/8th of a second, is about right but has a defect where something (I checked later and it was a mote on the System II relay lens) obscured a portion of the negative.

I made up for the lower density on the lilium negative with a bit of a longer exposure on the contact print, I might have over-done it a bit but I’m not unhappy. With the significantly more dense negative of the zea I used what I felt would be a long enough exposure for the contact print, just under two minutes. If I had the presence of mind to I might have dodged the mote while I made the contact print. I expect I’ll give that a try if I ever make a second print from that negative.

With photomicrographs large format really opens up the possibilities for the microscopist. In this the day of digital cameras and desktop photo manipulation one can capture an image with an extensive depth of field and an enormous field of view. Their isn’t really a way to expand the depth of field for the chemical photographer short of better objectives. The field of view can be greatly expanded by making the switch from the classic—notably called miniature historically—35mm format to a medium format 120 film, or low end large format like 4×5. From there the step up to 8×10 would mean capturing the zea stem with a 20x objective or the entire lilium ovary with a 10x. Considering that it’s somewhat strange that in the large format photomicrography did not last quite so long as 35mm, which oddly enough still has a presence in electron microscopy to this day.

Up to this point I’ve made use of standard equipment. Earlier I theorized in an off hand way about how one could knock together a 4×5 camera for a basic monocular microscope without too much trouble. For my next trick, I’ll give that a shot! The target audience would be someone who happens to have a microscope and a friend who shoots 4×5, or someone who shoots 4×5 and wants to give extreme macro photography (photomicrography) as go. I’ll skip over the business of developing the negative, as that grounds been covered, and focus on seeing if I can get a negative at all with a shoebox and a few odds and ends.

Large Format Photomicrography part: X

For absolutely silly reasons I’ve done this a bit out of order. By all rights I should have exposed and processed my first contact print in my improvised darkroom using open trays. Under the light of my spray painted night light “safe light” I could easily set up my exposure and observe the level of development as it progresses. That would give me a ready idea of the required development time and let me somewhat adjust for over or under exposure by pushing (extending) or pulling (limiting) the developing time.

The Changing Bag Contact Prints

Loading everything into the changing bag wasn’t too terrible. The worst part of the whole thing was being entirely unable to see if I was aligning the contact paper up with the negative. I had to resort to tracing the outside edge of one of the metal slats and slowly bringing the edge of the paper up to it. It was all the more hard as the changing bag prevented me from fully opening the lid of the contact printer. The lid fails to stay in the open position unless fully open so it was all the more difficult as a result. Patience was the key and below is the first result.

1 sec 2x40

Overexposed contact print

This first contact print (at left) was made using the decades old dual 40 watt Mazda bulbs that were installed in the contact printer when I received it. The exposure was made for one second after which it was processed in Dektol for just under 45 seconds with constant rotary agitation followed by a two minute plain water stop bath. The print was then fixed for two minutes using a 1:7 dilution of Kodafix. As may be seen the print is exceedingly overexposed having hardly any definite texture in the legs of the opilione (daddy long legs spider) and none in the body. I drastically underestimated the brightness of the lamps serving as the light source. I took into account that with the contact printer the distance from the light source was easily ten times shorter than that one would use with an enlarger and working the manufacturers data sheet describing the paper as 30 times slower than normal papers I selected a one second exposure and well, at least it was educational.

3 sec 2x15 d

Unevenly exposed contact print

With the above as a reference point I looked at what I had available in the way of medium base (medium Edison screw, or E27) bulbs. Failing to find anything less than 40 watts with a frosted or opal glass I settled on a pair of 15 watt night light sized clear bulbs—the type used in the B&L Opti-Lume illuminator. Apart from being significantly lower in wattage, the night light bulbs are much smaller physically and have a shorter total filament length. In the second print (at right) I used an exposure time of three seconds and processed the print as above. The results were better than those had in the first contact print but still quite a bit off from acceptable. The mounting hardware in the contact printer is on one side only so that two full sized bulbs have their filaments centered beneath the frosted glass. The smaller bulbs were far from centered and an internal wire partially occluded one of the bulbs.

Tray Processed Contact Prints

3 sec 2x15

Preferentially developed right corners with tray development

Resolved to get something much more like an acceptable print from the contact printer I adjusted the position of the internal wire and repeated the three second exposure with the night light bulbs and a different negative. This time I worked in my improvised darkroom and processed using Dektol and Kodafix in an open tray. I used a plain water stop in a third larger tray. Trying to be too clever for my own good in my first attempt at tray processing I sought to overcome the effect of the off center bulbs in my contact printer. I used roughly a minute and a half of total processing time and for nearly a third of that I held the side that corresponded with the bulbs out of the tray using my tongs and preferentially developed the opposite side of the print. The results as seen at left aren’t more even as a result, if anything they’re less. Rather than being more even the one side is significantly less developed overall and there’s somewhat less overall contrast. With little experience on the matter I’ll tentatively attribute this to the far lower rate of agitation I was able to achieve in the trays as compared to the constant agitation in the rotating print drum.

At this point I decided to make an attempt with my photographic enlarger. I had actually bought the enlarger on whim on the off chance that I’d one day be sufficiently enthusiastic to have a go at putting together a darkroom. The portable enlarger by Ilford isn’t able to handle a 4×5 negative for enlarging but it will work for a contact print. I began with a 15 second exposure time and processed in trays. When after the first minute of developing nothing was visibly happening with the print I started to think I must have had the print upside down in the printing frame. I tossed it in the general direction of the water tray and moved on, setting up another sheet of contact paper on my printing frame. Then I noticed something on the print that lay in the sink beside the water bath, it had developed to a limited extent! I gave it another couple minutes in the developer and started to see it a bit more clearly, at which point I put it in the water stop bath and thence into the fix. The result is below on the left. I left it in the water bath while I exposed the next attempt.


For the second print with the enlarger I used an exposure of 30 seconds, two minutes in the developer, two in the water stop, two more in the fix and then into the water bath. I ran the water from the sink into the water tray while I poured the chemistry from the trays back into their storage bottles. I made small hash marks on the masking tape labels of the bottles so that I could gauge the remaining capacity of the solution in the bottles. With that done I took the prints one by one and hung them to dry.