Wait, is that… blood?!

Just buy a used sofa off a guy with a van on craigslist? Find a knife stained red under the floorboards while insulating the attic? Enjoy CSI but hate how the show is super bad about science? Well, let’s play a game I’ll call: IS! THAT! BLOOD?

A little while back, 1853 to be specific, a fellow named Ludwik Karol Teichmann devised an amazingly simple and accurate test for blood. It’s called the Teichmann test or sometimes the hemin crystal test. It’s pretty simple to identify fresh blood from say, stage blood (corn syrup and red dye) or ketchup; blood has red cells and white cells, just make a smear and take a look under the microscope. Old blood, from as little a a few minutes to a few hours can be much harder to identify.

A great many things have cells and are red or brown when dry. Meaning simply re-hydrating a stain and checking for cells under a microscope is not enough to identify blood. If we were on television we could shine a blue light on it or poke it with a stick to test for DNA. Fortunately, human blood contains a number of compounds that are unique to it, and human DNA is just one. Hemoglobin is another and the Teichmann test, acts upon that hemoglobin to form easily identifiable hemin crystals and it works on even decades old samples. Most folks have everything they need right in their kitchen. If you don’t, a five dollar bill is enough to collect the needed supplies from the nearest grocery.

The Materials

Acetic acid, anything from the purest laboratory grade glacial acetic acid to plain old white vinegar will work.

Sodium chloride, iodized salt will do but if there’s a choice it’s better to go with pure sodium chloride-pickling salt or Kosher salt for example.

Something that may or may not be blood.

A glass slip and cover.

A heat source-anything from a candle to a Bunsen burner will work.

The Process

Take the sodium chloride and pulverize it. Only a few grains of salt are needed and the smaller it can be crushed the easier things will go later. For this reason the flake style Kosher salt sold in the baking aisle can be. the best choice. Table salt grains can be effectively pulverized between two slips pressed together and rubbed gently over a third.

With a scalpel or razor knife take up a little of the material to be tested and scrape it onto the slip with the pulverized salt. Only a very little material needs to be used and the proportions of the salt to the possible blood are not important.

Using an eye-dropper introduce a few drops of acetic acid and place a coverslip over. Heat the slip gently just until bubbles are seen to form. It is not necessary or desirable to boil the solution. If the area under the cover should begin to dry out from overzealous heating a few additional drops of acetic acid may be introduced without issue.

Observe the slide under low power-a 10x objective and ocular will do.

The Result

Hemin crystals are elongated hexagonal crystals which will appear ruby colored under daylight corrected illumination. If the salt was not perfectly dissolved in the acetic acid the hemin crystals will be seen to form closely around the un-dissolved salt crystals. This makes for unattractive photomicrographs but has no negative impact on the results of the test. Let’s take a look:

IMGP0040

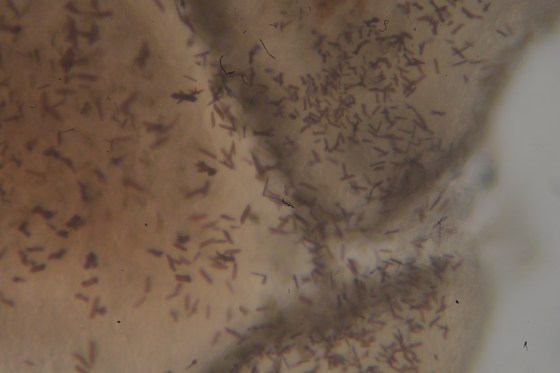
Hemin crystals formed in a positive result for the Teichmann test

So it would seem: YES! IT’S BLOOD!

What now?

If someone was going to aspire at being a sleuth they could prepare in advance a saturated solution of sodium chloride in acetic acid and cary it in a dropper bottle. To do so place 10ml or more of acetic acid in a test tube and introduce sodium chloride a few grains at a time while heating the test tube over a burner. Continue until a small amount of sediment is built up at the bottom of the tube. Allow the solution to cool and place into a stoppered dropper bottle.

In the field a scraping of the material to be tested is placed on a slip and a few drops from the bottle introduced to cover. Place a coverslip over the whole. One will still need to heat the solution to induce the formation of hemin crystals but something as pedestrian as a cigarette lighter will do the job. Observed with even an inexpensive field microscope the results will be obvious.

Sectioning part: II freehand

Although a double edged razor of the type sold for shaving is best for free-hand sectioning, owing to its more stringent manufacturing controls and increased thinness, for initial attempts a single edge utility razor blade is recommended. The thicker blade and single edge contribute to a sense of safety on the part of the nervous practitioner. In either case, the process is the same. One should first toss out any thought of force or slow pace.

For this example a pine needle is firmly pressed against a glass slip with the nearly vertical thumb of one hand. The glass slip is oriented on a slight angle, such that it is in line with the arm which is owner of thumb holding the pine needle against the slide. The reason for this orientation is that it permits the other arm, and the hand which will be holding the razor is easily brought at a right angle to the other. The position of the arms being important as it is the shoulder and elbow of the blade holding arm that will be moved to make the cut. Using the long bones of the arm as something of a pendulum contributes to the smoothness of a cut section and uniformity of thickness. A chopping cut, or wrist controlled section is sure to be too thick, or horribly distorted.

With a drop of water or two introduced to the slip the needle is first trimmed to expose a cut surface. The blade is then placed so that its flat surface is against the thumbnail of the opposite hand. As the arm holding the blade is drawn backwards the blade is allowed to cut a section. Although the blade should be held firmly force should not be applied to make the cut, allow the shard edge to do the work. Any likely sections may be left of the slip or transferred to a second slip for inspection on the microscope. In either case one should not allow the sections to dry out.

I have never acquired the skill for making a good free hand section, but have managed workable results when making cursory examinations of objects I’ll later section with my B&L sledge style microtome. Here are a few images of comparatively “good” results.

One can see that I managed a reasonable thin section but failed as regards uniformity. This is not clear by examining the sections with the naked eye but is glaringly obvious on the microscope. The probable reason for this is down to my not holding the razor perfectly vertical. I’m satisfied with the work of two minutes as compared to the days labor of processing a specimen for the microtome.

Sectioning part: I Theory

It’s bound to happen sooner or later, particularly in a classroom setting where the microscope is not a chosen pursuit, one will run out of things to look at. There’s only so many things that naturally exist in a form that’s suitable for observation with the compound light microscope. Newsprint, onion skin, insect wings, pollen, pond water, and blood, are enough to occupy the interested for a lifetime while others are sure to tire much sooner. Lucky for the instructor, most pupils can be trusted with a knife.

IMGP4502

Principles of Sectioning

Transmitted light microscopy is all about the specimens capacity to permit the passage of light from the illumination source through itself and onwards into the objective, ocular, and finally the eye. Some materials are able to permit the transmission of light, more or less, in their natural state, onion skin and Elodea leaves are great examples. Onion skin is comparatively easy to separate from the whole in a sheet one layer of cells thick and many types of Elodea form leaves that are only a single layer of cells. Other materials must be mechanically manipulated to form a suitable specimen. Insect exoskeletons may be macerated, pressed, and cleared. Blood may be smeared. Minerals may be ground. Much else in the natural world, most organic materials, may be thinly sliced.

The thinly slicing of materials as a practice is called sectioning and those materials after sectioning are called sections. An ideal section is thin and uniform with a thickness that is matched to the depth of field of the objective which is used to observe it. In practice a section is apt to be rather thicker than the depth of field but this is generally an acceptable defect provided that the section is uniform and as thin as possible. One may set themselves up for success in regards to uniformity by beginning in sectioning with small objects—a pine needle rather than a branch, the thin tip of a carrot rather than the thick root.

The thinner the section the better the resolution of the resulting visual image. When one focuses on the section the microscope may only focus on the materials that exist within the depth of field of the particular objective, all else exists outside the narrow range of the objective and obscures the image—one will not see the fuzzy and out of focus layers, they will merely lower the sharpness of the image.

Practice of Sectioning

In a professional setting specialized, and nowadays fully automated, devices take care of sectioning; a sample goes in one end as a complete object and comes out the other as a finished slide. Manual apparatus for the preparation of sections are called microtomes (micro for small and tome from the Greek through Latin and French for section) which hold the material and assist the operator in obtaining the thinest and most uniform sections possible.

Microtomes are more often than not used with specimens which have previously undergone a series of preparatory treatments. The object to be sectioned is first dissected from the whole into a manageable portion. It’s then dehydrated and fixed in alcohol to completely remove all moisture and stop all biological processes of the cells. From here the alcohol is displaced by a solvent of paraffin wax which is in turn displaced by the paraffin itself. The paraffin (or other medium) acts to enclose and infiltrate the specimen supporting both the internal and external structures of the object. Properly infiltrated specimens are preserved perfectly and may be stored indefinitely—tissue samples treated by this means have been used successfully in genetic paternity testing decades after preparation and centuries later in the case of infectious disease research!

With their cytoplasm replaced by a supportive and preservative media infiltrated specimens are placed into a microtome and sectioned with exceptionally sharp blades called microtome knives. Some microtomes make use of what’s called a chisel microtome knife which is in essence a large, wedge shaped, razor blade. In some types of microtome the blade is held in ones hand, or by the microtome and moved against the specimen. In other types of microtome the blade is stationary and the specimen is moved against the knife. The microtome knife may also take the form of a cut-throat razor (although the blades have a specific cross section that differs from a shaving razor) or even a disposable razor blade.

The individual wishing to section specimens at home need not obtain a complex and expensive microtome or exotic knife, a simple disposable razor blade and a steady hand is all that’s required. The specimen to be sectioned is held securely in place in one hand over a glass slip. A few drops of water are introduced to the slip and one then slices the specimen with a smooth and speedy motion of the razor. The water serves to maintain the integrity of the sectioned portions which would otherwise dry out in an instant and the quick motion of the blade contributes to minimal distortion.

The razors that work best for sectioning are the thin and precise type sold for use with a safety razor—look for them in the shaving aisle of the grocery. Because razors of that type have a blade on both long surfaces one is forced to hold them delicately and is not able to apply excess force with sectioning. Far from making the activity more dangerous this contributes to safety by ensuring that one is not sectioning tough and obstinate materials that will lead one to slip and slice a finger. After a few sections are made, a likely one is transferred in a drop of water to a second slip and a coverslip is introduced.