Ballpoint

Something odd I read recently sent me to the B&L electroplaters microscope. In the book portion of Matt Rota’s Ballpoint Art Pack an aside about how ballpoint pens work states “The surface of the ball is covered by thousands of tiny holes connected by tiny channels that allow the ball to retain ink within it…”. This was in contrast to my conception of the ball in a ballpoint as a smooth an uncomplicated marble. Naturally, this must be investigated.

To that end I pulled the metal tip from off a cheap ballpoint. Lacking a suitable mount I placed a round of blu-tack on a slide and pressed the metal pen tip into it such that the ball pointed upwards and remained firmly secured to the slide. The slide I placed on a detachable mechanical stage which I had previously affixed to the electroplaters microscope.

I did not have high hopes as the size of the ball meant using what should be considered a very high power or any spherical surface. The rapid slope from any given point on the surface of the ball was sure to leave only a very limited field in focus at any given time. Still, one could expect to see any holes if indeed holes there were. No more preface is needed I think, here then is the surface of the ball of a ballpoint pen:

One is sure to notice the rough surface, and conspicuous absence of any holes that would infiltrate the ball as described by Rota. Of course, a single example is hardly enough to prove that no such ballpoint exists, perhaps the simple rough ball is a product of the cheapness of the pen I used. Further investigation may be warranted.

Kodak No. 0 Box Brownie Digression

The oddity of 127 film is not so much owing to the negative size—sure it’s smaller than 120 and bigger than 135, but to the lack of sprocket holes. This characteristic has a significant effect that is apt to go uncommented even when it is recognized. Without sprocket holes the cameras are mechanically much more like medium format “red-window” cameras than either 110, 126, or 135 film cameras. Red-window cameras are far simpler mechanically than other film advance types.

Where 135 cameras take advantage of the films double sprocket holes and by the use of a gear system count the distance the film has advanced with each stroke of the advance lever, turn of the knob, or activation of the motorized advance, red-window cameras require the active attention of the camera operator. When loaded with film a red-window camera permits a view of the films backing paper. A standardized system of numbers on the backing paper show through the red window and thereby indicate the position of the film in the camera. When the advance knob is turned one numbers moves from the window and is replaced by the next.

Some cameras have a single red window and the progression is simple. By turning the knob 1 progresses to 2 and on through the total range. Other cameras may feature two red windows and the operator should then use both. When 1 is displayed first in one window, the shutter is tripped to take the first photo. The film is then wound on until the 1 shows in the second window. At this point the shutter may be tripped again for the second photo. The same process is repeated for the complete range.

In cameras making use of two red-windows the total size of the negative is restricted to half of the total size of the largest standard frame size. Such that for 120 film a 6×9 frame is reduced to 6×4.5 or in 127 a 4×6 frame is reduced to 4×3. The Kodak No. 0 Brownie is a single red window camera and captures 8 frames in the 4×6 format. Although a fundamentally obsolete format (even if it is still manufactured) 127 film and the 4×6 frame size are small enough that a photographer can often use a 135 negative carrier for (admittedly severely cropped) enlargements or a 6×6 120 negative carrier with an improvised mask for un-cropped enlargements. Not having to purchase a unique and hard to find negative carrier is a great boon to anyone working with 127.

On the topic of specialized equipment, one is apt to feel the need of a new developing reel. Although many of the common and currently manufactured plastic tanks and adjustable reels are able to handle 127 (as the adjustable reels are still equipped to take it despite it’s comparative obscurity) anyone favoring steel tanks and reels is apt to face a long search for a 127 reel. At least this only applies to those who must use daylight processing tanks. Those with access to a dark room may use the old roll-film standby of the open-tray loop.

In the field anyone accustomed to working with box cameras is apt to notice primarily the diminutive size of the Kodak No. 0. Those for whom the No. 0 is an introduction to box cameras are liable to feel quite the opposite. In either case one thing that is quite small are the viewfinders which are of the frosted window, lens-and-mirror type. However small the two (one in portrait and one in landscape) may be they are usually preferable to the wire-frame type that require the camera be held at eye-level. Holding a camera is a practiced skill and those unaccustomed to it may struggle to obtain clear photos with the quite slow shutter speeds of old box cameras. Needing to hold the camera to the eye only complicates the task.

Still, like all the box Brownies the No. 0 is a breeze to use. The simple flip-flop shutter is unlikely to ever fail and although the camera itself is small the winding key is full-sized and easy to turn. Equipped as it is with a pull tab for timed exposures one may wish to use it on a tripod only to find the No. 0 not offering a tripod socket. Thankfully, it’s small size mean it is easily fit into any of the common and inexpensive cell-phone tripod mounts. Take care though, the minimum focus distance is around 5 feet.

10-16-2018 1 copy

Birdhouse on 127 size Kodak BW400CN


New Section!

So I’ve spent a rainy week-end scanning, processing, and uploading quite a few Bausch & Lomb documents I’ve got in my collection. These documents have been placed on their own page accessible via a link at the top of this page. The offerings run the gamut from catalogues and price lists, too reference and instruction manuals. Some of these manuals are no doubt already out there on the web but many are not available in any other place that I am aware of. It is my hope that by making these resources available I will in some small way contribute to others ability to get the most from their microscopes.

I have made an effort to provide these materials in a convenient and serviceable format. The color pdf files provided are hardly archival quality but they are I believe of a character that will contribute to the ongoing availability of the information contained therein. In most instances I have included all pages-notably those which are blank-so that anyone wishing to print the documents may assemble the pages accordingly and do so. Where loose inserts are associated with the main document they are included as additional pages at the end of the file.

I would hope that other collectors, hobbyists, or professionals who have similar materials in their possessions make an effort to make those materials more widely available. Please feel free to download, share, and enjoy these materials however you wish. If you get some use from them, I’ll consider my time well spent.

Mosquitoes Part I: The Zika Vector

For residents of the United States it’s been hard to ignore the alarmist “news” about the Zika virus this spring and summer. Like a number of tropical diseases it’s mosquito borne and the particular vector is Aedes aegypti.

DSC_1234

Zika? No! This is a male and it’s the wrong species!

Individuals in northern areas may feel somewhat reassured by the fact that vector insect population data from the Centers for Disease Control shows only a scant few places where A. aegypti have become established. Well… that information is out of date at best and flat out wrong at worst. After all, this is the yellow fever mosquito we’re dealing with. Remember yellow fever, they used to all it the American plague, no one should be surprised that this particular mosquito is all over the place in North America.

Want some specific location data? I’ve been sampling populations in my area (at two locations one 30 miles East of Rochester, NY, the other a further 10 miles East of that) for a few years now just for fun. Wonder of wonder, there’s several species around, including A. ageypti. What’s better than my word? Your own hard data, lest we give in to the complacency of ignorance lets find out what mosquitoes we have in our own backyards!

I should point out that one doesn’t need a microscope to identify mosquito larvae, nymphs, or adults; but in each stage of development they’re wonderful subjects for the microscopist. Larvae (eggs too if you find them) and nymphs make wonderful live or preserved specimens. Newly killed adults may be examined nicely in temporary mounts. Permanent whole mounts in resinous media are only a little more involved. Unlike with other flying insect species, prepared slides of the mosquito life cycle are widely available, but they’re so simple to do at home anyone who isn’t in a mad rush should really consider it.

Obviously one will first need to get a quantity of mosquitoes. Before rushing outdoors to wait for a hungry little vampire in search of a blood meal to land on an arm (which is an option for the impatient) consider: a feeding mosquito will be female, will probably be damaged during capture, and must be suffered to bite. It’s a great deal simpler to collect mosquitoes with a live trap (for adults) or a turkey-baster (for larvae and nymphs). In fact, anyone with an empty jar can run out and collect hundreds of mosquitoes in an few hours, if they consider the aquatic larvae sufficient; and they are! Those larvae will become adults in short order.

This isn’t a series about how to prepare permanent mounts of the specimens, this is about how to get them, and observe them in temporary mounts. Some other time we’ll get into permanent mounts of mosquitoes for now the goal will be simple and three-fold:

  1. Locate a likely source of mosquito larvae, and collect some.
  2. House those larvae in a vessel in which they may mature through all stages of development.
  3. Sample and observe specimens from that vessel representing each stage.

Hey check it out I can be topical! -K

Polarized Light Microscopy

The Background

Very often those introduced to light microscopy, and enthusiastic about it, rapidly become dissatisfied with not being able to work with all of the methods read about in books. From differential interference to phase contrast there are more than a few methods of light microscopy that one may long for, but lack the budget to pursue. Fortunately, one exotic sort of light microscopy has been doing nothing but becoming more accessible for the last one hundred years or so; that method of course is polarized light microscopy. A step beyond simple things like throwing the mirror to one side for oblique lighting, or slipping a patch stop into the filter holder for dark field or even Rheinberg illumination, polarized light microscopy is now more economical than ever.

When light microscopy was just finding its stride among professionals and hobbyists, opticians sold microscopy equipment in much the same was as furniture stores pursue their trade today. One might purchase a central item and then outfit it with a number of accompaniments either immediately or a bit down the line. In many ways this meant that one could pursue the limits of microscopy as an amateur as easily as any professional. Regrettably, it also meant that the cutting edge in microscopy as pursued by professionals was just beyond the financial means of most amateurs. Apparatus for polarized light microscopy was no exception.

With the patent of polaroid (the product as opposed to the company) in 1929 it became possible to produce polarized light microscopy apparatus for far less than had been possible previously. From then, the quality of polarizing films has increased while the cost of manufacture has decreased.  At this very moment one is likely within reach of a number of polarizing filters. Liquid crystal displays, windows, eyeglasses, and sunglasses are all common made with polarizing filters. It’s only a slight stretch to say that polarizing filters are everywhere, and the ability of the internet to connect suppliers with clients has made finding the product simple and fast.

The What & Why of Polarization

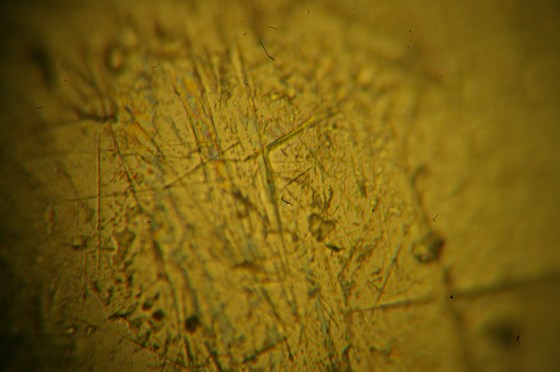
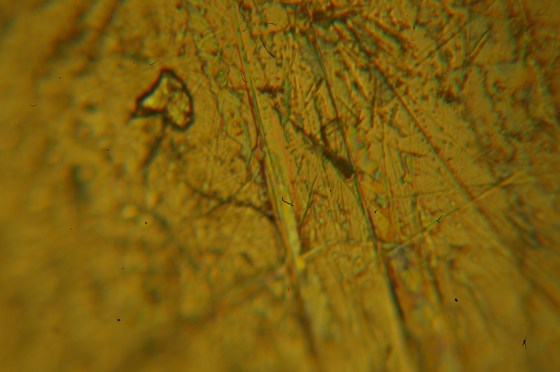
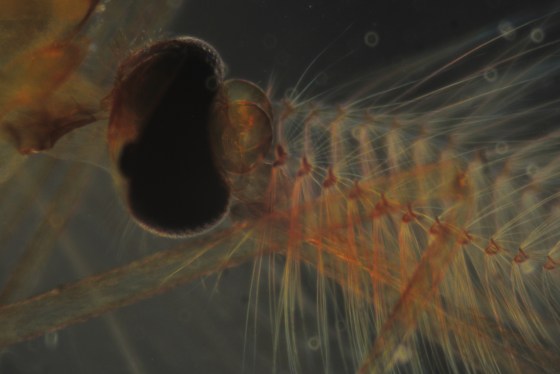
As with most specialized methods of illumination, polarized light microscopy has nothing more as its goal than increasing the microscopists understanding of their specimen. With polarized light microscopy visibility of some structures is outright increased and specimens or particular structures glow brilliantly in the dark field of crossed polarizers. Crystals may turn from bland colorless structures into colorful landscapes that provide a key to upstanding their form and composition.

The increased visibility offered by polarized light microscopy is the product of two polarizing filters. One filter, called the polarizer, is placed below the specimen so that the light which passes through it (and illuminates the specimen) is polarized. A second polarizing filter, called the analyzer, is then placed above the specimen so that the light which reaches the eye of the observer has passed through two polarizing filters. A polarizer or analyzer used on its own will not reveal much but with both one can determine the following with a little effort:

  • Whether the object is polarizing (ainsotropic) or isotropic (non-polarizing)
  • Whether it is uniaxial or biaxial
  • Whether it is subject to interference phenomena
  • Whether it rotates the plane of polarization
  • Whether it is pleochroic
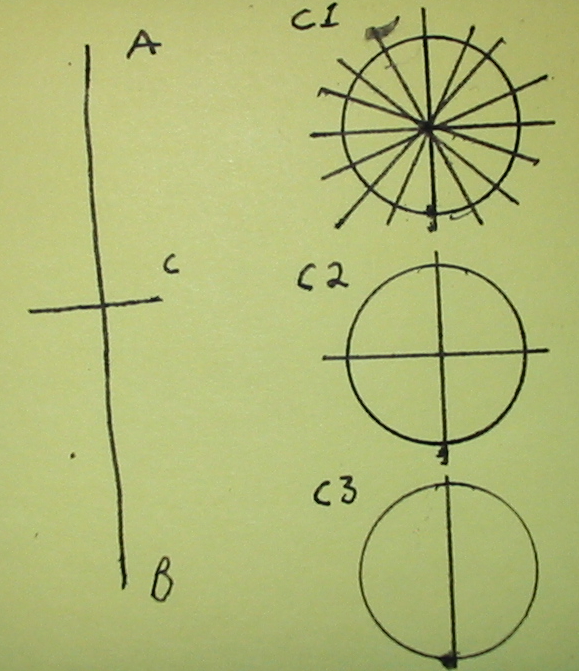
Polarization sketch

Polarization sketch

Light can be thought of as vibrating (it’s a particle and a wave) in all planes surrounding an axis of propagation. With the microscope this axis of propagation is (ideally) aligned with the optical axis of the microscope. In the little sketch is shown the optical axis of a microscope with B at the point of illumination and A at the point of observation. C represents the image plane of the specimen. In normal use the light vibrates as in C1, in all planes around the axis. When a single polarizer is introduced into the optical axis all vibration is eliminated save for two planes that vibrate at right angles to each other as in C2. By introducing a second polarizing filter one may orient the two so that one, both, or neither of the two remaining vibrational planes remain. In C3 the filters have been oriented to leave a single plane. Crossed poles, or crossed Nicols (abbreviated in the literature as XN) block out all planes and results in a perfectly dark field, unless a specimen in the image plane is birefringent.

It is the orientation of the polarizer and analyzer to each other that reveals much of this information. Because the polarizing filters act upon light in a very specific and consistent way, we are able to describe the way the specimen acts upon light with as much certainty. Consider polarized light microscopy something akin to optical algebra.

Next time: classic, brass-era, polarized light microscopy apparatus! -K

Notes:

∗A linear polarizer. There are different sorts of polarizing filters. Many used for photography or general glare reduction are circularly polarized and although suitable for a general demonstration will not reveal as much as a linear polarizing filter. Don’t rush out and buy polarizing filter that is not linear.

The E. Leitz Mikas (Micro-Ibso) Attachment

Happened to see a lovely blog post about a fine old 35mm camera and it got me itching to shoot a roll. However, first let’s have a look at a nice common apparatus that will get anyone started in photomicrography! -K

The apparatus fitted to a worn but serviceable stand.

The apparatus fitted to a worn but serviceable stand.

Years ago all the larger firms had a line of photomicrographic apparatus or two. One of the earliest to capitalize on the 35mm market was Leitz who took their popular Leica and adapted a shutter and prism set up to suit the needs of the microscopist. The result was the Micro-Ibso (later to be called the Mikas) a small eyepiece mounted shutter.

The E. Leitz Micro-Ibso (Mikas) photomicrographic apparatus pictured with its case.

The E. Leitz Micro-Ibso (Mikas) photomicrographic apparatus pictured with its case.

The Micro-Ibso features a timed shutter just as one will find on mechanical 35mm cameras, which would have been imidiately understood by contemporary users-even if it might take a bit of getting used to for those who grew up with digital or point-and-shoot film cameras. It’s not overly complex and that’s part of the appeal. The other draw is the versatility, and the viewing eyepiece. Unlike earlier large format microscope cameras, the Micro-Ibso carried a focusing eyepiece and did not require a ground glass focusing plate.

A variety of bellows could be fitted between the shutter and the photo-sensitive material. There are at least three that I am aware of: a 1/3x bellows that was intended for use with 35mm camera bodies, 1/2x bellows called the Macca which took a large format film or small photographic plate, and a 1x bellows called the Makam which was able to take an image measuring 9x12cm on plates or film backs. All of the bellows would screw into the Micro-Ibso and were fitted with reducing lenses-except for the Makam which I understand required no lens.

The 1/3 bellows is perhaps the most common today, and it is likely the one which will be most used. Featuring a standard Leica Thread Mount, the Mikas could be fitted to the camera one already had. In the first picture it may be seen fitted to an old, Russian, FED3 rangefinder.

Working up from the base in the photo below, the Micro-Ibso has a threaded ring which fits over the eye-tube of the microscope and is held in place by a convenient set screw. With this ring removed one can seat an ocular (the periplanatic flat-surfaced ocular of Leitz are ideal) into the base of the Micro-Ibso and then screw it in to hold the ocular firmly in place. The ocular itself creates the light-tight connection of the photomicrographic apparatus to the microscope and because of the arrangement adds less than two millimeters to the tube length of the microscope.

Order of assembly with Leitz 10x periplan ocular.

Order of assembly with Leitz 10x periplan ocular.

In the photos one will notice that their are two shutter release cables connected to the apparatus. Only one of these actually controls the shutter, the other operates a spring-loaded prism. When the dual cable release is pressed a prism is pushed out of the optical path before the shutter is tripped so that all the light from the ocular is directed towards the photosensitive material. Naturally one cable is noted as “Prisma” on the dual release adapter and the other is labeled “Verschluss” respectively. When assembling the Micro-Ibso make sure that the “Prisma” cable is fitted to the body of the device and the “Verschluss” to the silver shutter connection.

In practice the Leitz Mikas is a breeze to use. With the cameras shutter set to “B” one simply winds the camera, focuses the object appropriately as seen through the viewing port and selects the best shutter speed for the lighting conditions and objective in use. Depress the cameras release first and hold it while then pressing the dual release to take a photomicrograph.

If the process seems complex then one might do well to note that even inexpensive 35mm film has a resolution equivalent to  15 MegaPixels. Without too much trouble-let’s not even mention the price of a 15MP digital microscope camera-one can find a Leitz Mikas for under $50.00 on online auction sites. Additionally because the Mikas features the common Leica Thread Mount a ring adapter can be found for most modern digital cameras (with removable lenses) so that one can use their modern camera with ease.

Obtaining Unfamiliar Supplies

It never ceases to amaze, the capacity of people to complicate simple things. -K

When the microscope enthusiast is starting out they generally begin with the sorts of objects which may be collected and prepared with what’s on hand. Eventually they may find that there is a clear and drastic line that must be at some point crossed, the supply familiarity line. Some of the consumables used in microscopy are more available these days than previous, distilled water for example, others far less, camphor and red lead come to mind. While the present day MSDS and GHS standards provide an accessible method of understanding the nature of the chemicals involved, and the internet a means of finding them, there is still a greater barrier provided by the marketplace: language. Simply put: people love a synonym, but a duvet is not just any blanket.

Today I needed to replenish a few of my supplies, and one of them being turpentine, I was reminded of something from my art-school days, “the art store argument”. This argument goes as follows: “A pint of turpentine costs $20.00 at the art store, and $5.00 at the hardware store. Where should one shop?” The initial reaction is likely to be “The hardware store! I can buy a bunch of other stuff with the money I’ll save.” To this the teacher or old-hat will smirk and say something to the effect that “Absolutely not, the turpentine from the art store is of a higher quality and standard, it’s just what you’ll need and will give you results that are well worth the cost. Besides, everyone knows the hardware turpentine smells like embalming fluid.”

At this point I’ll take a minute to say that turpentine was once only one of two products obtained by processing the sap from a variety of species of the genus Pinus. When this sap is refined the distillate is a volatile solvent of primarily, terpenes, that is called turpentine. The residue of this distillation is a solid pitch resin called rosin-the stuff violinists use on their bows. Presently, terpenes can also be extracted from other compounds that contain them in much lower concentrations than are found in pine sap. That method will produce a functionally similar product primarily composed of terpenes, but will contain a significant amount of other VOC’s. In the United States, the name “Gum Spirits of Turpentine” is actually restricted for use with products which are produced from Pinus spp. by distillation, specifically so it may be set apart from other terpene based solvents. The two and a half fluid ounce bottle of turpentine one can buy for $4.99 at the art store, is functionally identical to the $5.00 pint from the paint aisle at the hardware store, it’s produced from the same source, by the same method. Anyone who has experienced the headache and sworn off using cheap turpentine has been using a terpene product that is not “Gum Spirits of Turpentine.”

One of these cost about four times more than the other, and is worth every penny!

One of these cost about four times more than the other, and is worth every penny!

This brings me to my point and the bane of many facing the supply-gap for the first time, language. If reading along in a book, Dr. Carpenter describes a method for mounting a specimen one would like to try that makes use of “Venetian Turpentine,” the reader should absolutely not rush out and buy a gallon of turpentine. A few minutes consulting a dictionary will reveal that Venetian Turpentine is in fact quite different from anything we have discussed thus far. Venetian Turpentine is a terpene distillate produced from the sap of the Western Larch. It’s suitable as a resinous mountant.

When looking for supplies It’s important to know what one needs before one searches it out for purchase. It doesn’t matter if one purchases Xylene as a safer alternative to Benzene or Histo-Clear as a safer alternative to Xylene, what matters is having an understanding of what the substance is required for. The best way to find out what the substance is required for is to understand the process for which it is being used. Once the process and the part played by the substance is understood look to a dictionary, not the internet, not a blog or a forum, a dictionary. Common use is far more flexible than even contemporary dictionaries and is far less reliable. A quick look at a dictionary (which would make the distinction between turpentine and Gum Spirits of Turpentine) cold have saved this old student a bundle. Once one is familiar with the requirements of the substance, and knows what the substance is specifically called, it’s much easier to seek it out with confidence.

Rapid Process Mounting

Sorry for the lack of updates, the summer is always a less leisurely time than one expects. -K

When last macerated and pressed mounts were mentioned the method employed required a long weekend at a minimum, but the entire process can be done in a day. Some people will appreciate progressing from specimen collection to finished slide so rapidly and some are sure to prefer the day by day process of a longer method. For the summer months when both specimen availability and social obligations are at a peak, the following entries from my notes may prove welcome. Embellishments not appearing in my notes but provided here for clarity appear in parenthesis:

8 Jun. ’14 10:00am Captured 5 spiders from under the addition. Collected them into stoppered test tubes finding it easier than Mason jars (a flat of small jelly jars often makes up my collecting kit when working in the garden). Three of the spiders are larger and of orange hue which leads me to identify them as males of the common house spider. Two despite being smaller I take as females of the same species. (The description in the Audubon field guide describing males as orange and smaller than females, while Comstock elaborates at the striking variety of forms exhibited by the species and its tendency for differing specimens to be taken for differing species by novices. The habitat and cohabitating species contribute to my identification.)

Killed them by introducing Ether soaked cotton swabs to the test tubes. One stopper was ejected by the expanding gas and I feel a better poison will need to be collected (for use with this method I imagine chloroform will prove superior and more desirable than for instance, ethyl acetate, as speed is a factor).

11:18am Have processed the three males through to the pressing jar. Each was boiled in 3ml of 10% NaOH until quite transparent. (The test tubes into which the spiders were initially collected were used and heated over an alcohol burner. When doing so the test tube should be slightly tilted to face away from the preparer and towards bare floor or table to minimize danger in the case of bumping. Agitating the test tube slightly and holding over rather than in the flame will also help to prevent bumping.) The solution was then drawn off and aprox(imately) twice the volume of distilled water added to the test tube. Into this was placed several drops of glacial acetic acid until diffusion currents were no longer observed. The solution was then poured off and replaced w(i)t(h) aprox(imately) 2ml of distilled water.with a rubber stopper inserted the specimen was swirled in the tube until near the mouth and then rolled to be on the side away from the water adherent to the side of the tube. With the stopper removed the tube was manipulated so as to wash the specimen into a Syracuse glass.

(Here in my notes is a sketch depicting the motions required to carry the spider from the test tube with such a small amount of water. It is of course simpler to simply employ a larger volume of water but then it requires a larger Syracuse and in the end more potential for spillage. The ease of adding a sketch to handwritten notes is reason enough for me to never adopt an electronic medium for note taking.)

The females were placed into a Syracuse in the vacuum desiccator together with a jar of Drierite to await processing after the males are completed. (I try to work with specimens of a single type only at one time for the sake of simplicity. It’s far easier than one might expect to mix things up when working with only five specimens.)

(After a lite lunch with my wife, which gave the alcohol sufficient time to harden and dehydrate the specimens, I returned.)

1:50pm Removed pressed males and transfered them through to clove oil one by one. Find the first macerated to be a bit to opaque and hope the clearer will improve its appearance. All removed intact and came away from pressing slips without incident. (I use slips of the cheapest sort for pressing and some are never quite clean enough-or smooth enough-to release the specimens without damage. The cheap slips is a compromise I make for budgetary reasons as the spring clips which I use to hold the pressing slips together can be quite hard on the slips.)

2:45pm Mounted the males on plain beveled edge slips from Ted Pella in balsam under 22×35 Gold Seal covers. (I quite like the plain economy slips from Ted Pella, the beveled edges decrease immensely the tendency of chips to form when used on spring loaded mechanical stages.) One specimen became far off center and the cover was lifted and the specimen repositioned under a new glass, a leg was separated in the process but was left in approximately proper posit(ion). (Misplacement of specimens can be upsetting but unless it approaches the edge of the cover should be overlooked as the risk of damage is quite large once the balsam has begun to penetrate the specimen. I properly should have placed the whole into xylene to dissolve the balsam and then remounted as normal but with several specimens on hand I become less careful than I should be.)

3:12pm Slides placed in attic to cure. (If more rapid curing is required a cool oven or hot plate on very low setting can set the mountant nicely in a few hours. I prefer the heat of the attic of my home during summer as the hot [32-35C] dry [below 5% RH] attic cures slowly enough to permit even the largest and deepest air bubbles time to escape.)


Uncut Pages and Antique Microscope Books

Microscopy has been around long enough to build up a colorful and vibrant history, the new works produced every year is poor excuse for neglecting the past. -K

The present condition of publishing is such that I will always recommend one starting out with the microscope look to the past for their first text. Modern works have a distinct tendancy to be disapointingly basic or profroundly technical. In the latter case far too expensive for someone trying the hobby on for size-a fault of a great many textbooks. At the turn of the century microscopy as a hobby (and potential future career) was in a sort of golden age as far as publishing went. So much so that today a fair few professionals remember fondly the works for people like Philip Henry Gosse and Thomas Davies.

When buying a work that was as widely available as-for example-Gosse’s Evenings at the Microscope, the most economical option is as often as not a book that may well be far older than the purchaser is used too. Old books are quite unlike those of today, just ask an enthusiast. In any case if one happens to purchase an antique microscopy text one may encounter something odd; uncut pages. The uncut page is a not infrequently found in antiquarian books and together with ragged edges is not anything one should be overly concerned with. In the copy of Evenings at the Microscope shown below a great many pages are uncut, and we may well reason that this book, published in 1902, has never been read.

An example of uncut pages.

An example of uncut pages.

In order to make use of the book the uncut pages will need to be opened by cutting through them at the crease. If this was 1902 and the book were new one might simply pull out ones pen-knife whenever necessary and carry on reading. Today the paper is apt to have been somewhat oxidized and the risk of errant cuts thereby somewhat increased so that greater care is required. For my part I prefer to use a sharp (but not recently honed) straight-razor style section cutter, it works nicely and seems rather fitting. Whatever knife is used when cutting keep the blade only slightly off from parallel with the crease and make a small sawing motion rather than a slice to minimize the risk of damage to the pages.

The community of antiquarian book enthusiasts is somewhat at odds as to whether cutting the pages affects the value of a book, but for the most part the value of the microscopy texts one encounters that have uncut pages is likely to be small in any case. So should one encounter a book with uncut pages when reading up on things microscopic, by all means open those pages and show them the light of day! I am the first to see this precise illustration of a Perophora in 112 years!

Image

Simple Crystals

Some crystals are rather pitiful without the use of polarized light, but that’s best left for another time. -K

Crystals are a fine object for the microscope and few are the beginners texts which do not direct the observations of one sort of crystal or an other. By far the most common directive is to create a saturated solution of salt (sodium chloride) and placing a drop on a clean slip observe the process of crystalization as the water evaporates. Interesting enough as an activity, but not as enlightening as it might be. Occasional one might be directed to try kosher or even rock salt and compare it to iodized table salt, but even then a salt crystal is a salt crystal and one is apt to find it dull.

If one has been diligently preparing insects via the maceration and pressure method one will have on hand a solution that makes a rather more interesting crystal. The sodium hydroxide or potassium hydroxide one has been using to macerate insects may be deposited in the center of a slide in a small drop and put aside under a cover to dry. There’s no need to prepare a saturated solution, yet, but in a short time the liquid will evaporate and one will have a delightful snow-flake like crystal to observe.

Naturally having created a fine crystal one will desire to keep it. The slide might be retained as it is, without a mountant or coverslip, indefinitely. It is much better to use a coverslip and create a more secure slide. One may think that upon application of a liquid mountant the crystal will immediately dissolve and be lost, occasionally this will be the case, but then there are always other mountants and methods one may employ. Try mounting a sodium hydroxide crystal under natural balsam; is the result different if xylol balsam is used? Is the result different for Euparal or Damar, for Nu-Mount or Hyrax? If the crystal proves to be soluble in all of the mountants one posses it may still be secured under a cover by a method that is becoming increasingly uncommon, the thin cell mount (to be covered in an upcoming post).

Once one has the hang of creating a simple crystal mount certain questions may come to mind concerning their form. Before running to the nearest chemical handbook, I would recommend trying to answer a few questions by practical experiment:

  1. Does a different concentration of chemical yield a different form of crystal? (10% vs. saturated for example.)
  2. Does a different temperature or speed of crystallization? (Place the slide upon a hot-plate, or in a freezer.)
  3. Does a different solvent? (There’s water, but what of the other solvents, isopropyl and ethyl alcohol are likely on hand.)

Afterwards run off and see if the results are congruent with what is shown in a chemical text, then wonder at the career you might have enjoyed in chemical analysis. This is of course the most basic sort of crystal mount one may make but the idea is to discover a new object for microscopy and many owners of the microscope will have never examined anything beyond the world in a drop of water.