Saving Slides With Mountant Issues: I

Obtaining Damaged Slides

Very often the amateur may come upon the opportunity to obtain significant quantities of prepared slides of a type that makes use of methods or materials that are not generally within the scope of ones own activities. Such slides may provide valuable objects for study. Regrettably, one may find that many slides prepared in professional circumstances only find their way onto the market at excessive cost or when damage sustained in one way or another has rendered them unsuitable for study.

Recently a quantity of slides were obtained by the author that consisted of serial sections from Leptonycteris sp. The exceptionally thin and expertly stained sections were mounted in series under rectangular 18x40mm or 24x50mm coverslips. All of the slides showed degradation of the mountant to a greater or lesser degree characteristic of repeated stress from heating and cooling.

Due to the visible damage 75 individual slides were had for the incredible price of ten United States dollars. One would be hard pressed to obtain a similar number of blank slips or coverslips for the same price.

Assessing the Damage

Visibly degraded mountant, black background.

Initial observation showed that the slip was in fine condition without chips or cracks which would greatly complicate the task of rehabilitation. Despite the significant degradation of the mountant the cover slip remained firmly in place, a good sign that the sections beneath would be intact. Running a fingernail over the cover is often all that is required to determine if the coverglass itself is similarly undamaged.

Visual inspection showed the mountant to be significantly degraded on most of the slides. Pronounced yellowing at the edges gave way to white patterns where mechanical damage had caused the mountant to crack to an extent that it was no longer in optical contact with the coverslip. In some instances the mountant had become brittle to the point that the coverslip had come off entirely. The areas occupied by the specimen were invariably damaged even in places where the surrounding mountant remained sound, as may be seen at the extreme right of the image at left.

Under the microscope one could observe the extensive cracking of the mountant shown below. Focusing on the specimen with a 16mm objective was nearly impossible as the depth of focus afforded by the objective ensured that the cracked mountant would intrude into the image plane. At higher levels of magnification one could optically section the image enough that the cracks were not immediately evident, but resolution was impaired to the point of near total occlusion of any detail.

Photomicrograph showing degraded mountant.

Photomicrograph showing degraded mountant.

Cats Whisker Forceps

A recent brush with greatness (see this excellent chap) inspired me to work on a few opaque, dry-cell, mounts. This of course reminded me that I have always lacked a delicate touch. -K

Delicate Objects

When mounting one is apt to run into all manner of materials, from algae too zea stems there is no limit to what one might encounter. While some of the objects to be mounted are simple to manipulate with droppers, section lifters, or brushes, a few require a forceps to be handled effectively. Unfortunately, some of what one may wish to mount is fragile (part of the reason one will want to protect it with a sturdy mount) and the usual forceps will be sure to result in damage unless one is possessed of the most careful hand. There is, of course, specialized equipment for working with small (right down to the truly microscopic) objects; specialized equipment for working with delicate objects; specialized equipment for working with small delicate objects; and it is nearly all difficult to find and expensive.

The Old Solution

The old solution was a simple modification to the common sort of forceps or needle. It proved such a fine remedy to the problem that few who make use of it are unimpressed. In fact, the solution was so elegant that one can still pay (exorbitant prices; $12.00 is usual) for professional equipment making use of the common (wait for it…) eyelash. When a small and delicate specimen had to be manipulated the workers of old would cement an eyelash, for the finest objects, or cats whisker to the usual needle holder or standard forceps and thereby create a more exacting tool without recourse to more expensive instruments.

As a Probe or Pick

If one must manipulate a small object, perhaps pollen or butterfly scales, a straight eyelash bound to a suitable handle will do nicely. It was once (inappropriately enough) thought that lashes from particular genders or ethnicities were superior and catalogs often boasted about the origin of their offerings as being more gracefully curved or uniformly black. Todays suppliers are rather ambiguous as to the source of their offerings and the eyelashes themselves may be human or otherwise. If one takes any comfortable handle, and cleans of oil with a solvent (alcohol-ether 50% would have been traditional) an eyelash, it may be fixed to that handle by a drop of balsam or a few wraps of thread. Such a tool comes to a very fine point that is surprisingly resilient, easily visible, and not prone to breaking, This last point rather important as any who have wade use to the thread of glass micro-manipulators may attest.

As a Forceps

For a larger object an eyelash may prove insufficient when fixed to the end of a dime-store forceps, and that is where a certain degree of preference comes in. Some historic texts make reference to using the bristles of a pig or hair from the white-tailed deer. For a modern worker those materials may prove difficult to come by. One might instead give their floors a sweep and recover a whisker or two from the family cat. Cutting away the very fine half nearest the tip, set it aside for use as with an eyelash, one should then affix the more robust end to a convenient forceps.

Such a tool at times seems to work wonders, as objects may now be grasped without fear of crushing. In truth one would be hard pressed to hold an object so tightly with such a device as to cause damage. Simultaneously, one may be assured of a sound grip. Considering the price of similarly fine ready-made forceps, the result is better than might be otherwise possible.

The Classic Blood Smear

Blood smears can be fun, but be safe and sterile! -K

Assemble everything required whether only the most basic slide is being made or a more complex preparation. It’s always a good idea to begin with the required materials and a clean work area.

  1. Use a sterile lancet to procure two drops of blood from ones own, or a volunteers, (alcohol swabbed) finger tip. Discard the first drop and place the second on a very clean slip.
  2. With a second slip pull a smear on the first slip.
  3. Dry and fix the smear by ones preferred method. It’s simplest to grip the slide firmly and wave it about until dry.
  4. Stain the smear with ones preferred stain. For Wright’s stain: a. Drop on stain solution to cover the smear and leave for minimum of two minutes. b. Drop on an equal volume of distilled water and leave in place until a greenish scum forms on the surface (1-4 additional minutes). c. Rinse with a few more drops of distilled water. d. Dry in air, do not blot.
  5. If desired mount under a coverslip with neutral balsam or green euparal.
  6. Clean, label, and store slide.

Now for a few notes:

If you have trouble getting a suitable amount of blood try using a larger gauge lancet. A common 33 gauge lancet is very narrow and might not be successful for some people, but a 10 gauge (most common size for Unistik spring loaded lancets) might be too painful for others. A 28 gauge is apt to be more universally acceptable.

When pulling the smear one may find that by holding the second slip at a shallower or steeper angle the thickness of the smear can be controlled in a limited way. The speed at which the smear is made also has some effect on thickness. Try to maintain a consistent speed every time but don’t be afraid to experiment to find the angle that is most successful at ones own speed.

Do not try to fix with any substance (except for some methods of vapor fixation) before the smear has been dried, it will come off, the smear will be ruined. If one is working with a large number of smear it may be better to dry and fix in an oven.

Stains are available in many forms. Even something as common Wright’s stain may be found in a one step buffered solution, as a more traditional un-buffered preparation, or a powder. The directions above will give acceptable results with a buffered or un-buffered solution. When provided, follow the manufacturers directions for the stain used. Additionally, remember that all stains have a shelf life. Most solutions of Wright’s will only work their best after seasoning for a few weeks, and lose their potency after eighteen months.

A stain like Wright’s will bleach out somewhat in an acid mountant. It is therefore advisable to use an ostensibly neutral mountant like euparal or green euparal (which retains stain brilliance better than regular euparal). Alternatively one might keep a few pieces of marble in their balsam bottle to cut down on its acidity.

Depending on the size of the smear one may find a certain need for longer than average coverslips. 22x50mm and 22x35mm covers are widely available but one may also use a smaller cover that only covers a portion of the smear. In any case one should take the time to clean the area not covered after the mountant had cured.

There’s a great deal more to the microscopy of blood and for many people a simple smear can get dull quickly. However, it’s still an important skill and covers many of the various aspects of mounting in a way that can be moved through rapidly in just a few minutes. It’s useful also as a demonstration of the importance of specimen preparation as even an unstained smear will show more than a simple drop of blood under a coverslip. -K

General Program for Preparation of a Chitinous Specimen with Pressure

In the previous series I stretched a rather simple mounting technique out to a few thousand words. I did my best to make things clear and explain the why and how of things. It’s easy to understand that way, but it’s easier to follow along with brevity. Here’s the same information all in one page and about 500 words. Easy to print out and refer to as required.

1) Remove killed and fixed specimen from storage, clean superficially with a camel hair brush, and bring into distilled water if necessary (removing fixatives such as alcohol or formalin). Dry specimens do not need to be brought into distilled water.
2) Place superficially cleaned specimens into a 10-15% solution of caustic potash (Potassium Hydroxide) or caustic soda (Sodium Hydroxide) for macerating. Ensure sufficient of the macerating solution is present to remain at 10% concentration when the fluid diffused from the specimen(s) are added to it.
3) Retain specimen in solution for 12-72 hours, or until visual signs of internal organ decomposition. Alternatively, heat the specimen in solution for up to 30 minutes to accelerate the process, do not allow the vessel to “boil dry.”
4) Remove specimen from macerating solution and wash in several changes of distilled water.
5) Add 5 or more drops of acetic acid to specimen in distilled water, both to ensure complete removal of macerating solution and to further soften chitinous tissue. If required specimens may be stored in strong acetic acid until ready to continue.
6) Apply pressure to bulbous portions of the specimen with the butt of a camel hair brush or needle holder, working from the head and expressing liquefied internal organs through the anus. For small ants and thin bodied specimens this treatment is not required.
7) Lay specimen out in position desired for mounting on slip not suited for general mounting (slips with chips or imperfections may be used). Arrange all appendages as desired before continuing.
8) Place a second slip over the first applying pressure first at the head of the specimen, hold slips together closely and prevent slipping of one across the other.
9) Use clips or other convenient apparatus to bind slips tightly together.
10) Place bound slips into vessel of anhydrous alcohol (95% denatured if none better is available) and leave for not less than 1 hour to dehydrate and harden. Specimens may be left in alcohol until convenient to proceed.
11) Take bound slips from alcohol and hold close while removing clips holding them. Separate slips flooding with alcohol so that the specimen does not adhere.
12) Wash specimen into watch glass with alcohol and use a camel hair brush to remove any internal debris that adhere to the specimen.
13) Transfer specimen to clearer required by the final mounting medium to be used. Leave for as long as the particular clearer demands. 1-24 hours is the usual time.
14) Take specimen from clearer and allow excess to run off before placing onto clean slip for mounting.
15) Apply mountant to one side of a cleaned cover glass of appropriate size for the specimen and lower directly onto specimen.
16) Add mountant at edge of cover glass if insufficient mountant was used, clean exuded mountant from slide in the event of excess.
17) Affix temporary label to slide and put up for mountant to cure as required.

Clearing and Mounting

The next bit is rather simple compared to everything previous but does require a bit more dexterity. It is important to remember that not all the specimens that have reached this step will come out unscathed. In fact, some specimens might not be suitable because they have been damaged in those earlier steps! Ever heard some tough walking cliché say “pain is weakness leaving the body”? Well friends, failure is just experience entering the body. Believe me, if I can do this, so can you.

At this point one should have a container of alcohol (denatured is fine provided it’s 95% or better) with specimens inside held together between two slips. During their time in the alcohol the water in the specimens has been dehydrated out by the alcohol. After having been used a number of times (more or less depending on the initial quantity of the alcohol and size and number of the specimens) the small amount of water present in the specimens will be enough to dilute the alcohol noticeably and it should be retained for other uses that require less complete dehydration.

One might be aware that besides dehydration alcohol will act as a hardener on many organic substances, chitin among them. Ardent hikers should know the old trick of preventing blisters by hardening the souls of ones feet with rubbing alcohol before a big hike. The hardening effect of alcohol will ensure that our specimens remain in shape for mounting, but it will also make them quite brittle. Avoid the temptation to rush and be careful as possible in the upcoming steps.

With a large watch glass or Syracuse glass on the table, and a wash bottle or pipette of alcohol at hand, remove one set of slips from the container of alcohol. Slowly remove the clips holding the slips together and separate them a small amount by sliding one or the other slip away. Resist the urge to lift the slips apart as an antenna or leg might more easily break off with that motion. Once the slips are slid apart a small amount it should become apparent that the specimen is more affixed to one slip than the other. Work with the slip to which the specimen is most attached at the bottom so that the specimen is facing upwards and keep the specimen wet with alcohol while gradually sliding the other slip away.

Once the top slip has been removed use a stream of alcohol from a wash bottle or pipette to rinse the specimen into the watch glass. With the specimen in the watch glass give it a quick look with a hand lens or dissecting microscope to see if any debris is clinging to it. Use a camel hair brush, fine needle, or eyelash to remove any debris from the specimen. If only a few specimens are being processed they may all be washed into the same watch glass before proceeding, or one may wish to finish each specimen before beginning the next. The choice largely depends on how much space is available in which to work, but I prefer to move each specimen though the process one at a time.

Image

An ant washed into a Syracuse glass for cleaning

If the specimen has been macerated too long, not long enough, or has been otherwise damaged it should be obvious at this point. Whether or not to continue with a damaged or poorly treated specimen is up to the microscopist. An ant that has broken off legs or antennae, or one that is falling apart from too long a maceration can still make a serviceable mount. If the abdomen has been disintegrated (as sometimes happens when macerated too long) consider mounting only the head, mouth parts, antennae, or legs. If the specimen is clearly too thick or still retains its internal organs one can wash it in water and return it to the macerating solution, or start anew with a fresh specimen. Whatever the case, keep written notes on the quality of the specimen had at this point, as it relates to the operations performed on it. It’s one thing to read someones account saying a day or two of macerating is sufficient and something else entirely to know from experience that 48 hours of macerating is too much for one specimen and not enough for an other.

Once satisfied that the specimen is free of debris it must be cleared. Clearing is a simple operation in which the fluid of the specimen is replaced with one which is miscible in the mounting medium to be used. If working with Euparal for instance the clearer used would be Euparal essence or even simple the purest most anhydrous alcohol available. With Canada Balsam (sometimes called xylol Balsam, neutral Balsam, fir Balsam or simply Balsam) one has their choice of clearers, the one selected being largely a matter or preference the procedure is the same whichever is used. Three of the most popular and readily available clearing agents for Balsam are turpentine, xylene, and Clove oil. Of the three Clove oil is the safest to work with (though it is also more expensive and harder to find than either turpentine or xylene) and it is worth noting it has the least offensive scent.

With a fair amount of clearer in a small jar close at hand, remove the specimen from the watch glass using a section lifter, dry camel hair brush, fine forceps or whatever is convenient. Once lifted from the watch glass allow as much alcohol as possible to flow from the specimen without its drying out completely. A small corner of filter paper can be touched to large specimens if necessary. Place the specimen into the jar of clearer. The amount of time required for the clearing agent to penetrate the specimen is dependent on its size and just how well macerated it is. I find that 24 hours is nearly always enough time but have used as little as one or two hours in the past.

Image

Ant in clearer with section lifter and centering card

After 24 hours the clearer should have penetrated the specimen entirely and replaced the alcohol that was used to dehydrate the specimen. If xylene was used as the clearer and it was observed to become milky when the specimen was placed into it then specimen was not fully dehydrated and should be placed into pure alcohol for an hour or so then put into a new dish of clearer. With a fresh and scrupulously clean slide laid out on a centering card the specimen should be removed from the clearer and laid out as desired. It will not be quite so brittle as it was after being taken from alcohol but one must still be exceedingly careful with the delicate appendages.

With the specimen centered on the slide take a small corner of filter paper and leach away any excess clearer clinging to the slide without removing that which wets the specimen. At this stage I find that Clove oil is not only the best smelling clearer but the most forgiving. It will not evaporate nearly as fast as turpentine or xylene and provides some valuable extra time with which to ensure that the specimen is positioned properly. Unfortunately, this also means that specimens produced with Clove oil as the clearer will also require a longer curing period.

Cover slip placement is often treated as a matter of preference but I vigorously oppose that notion. For particular styles of mounting, particular methods of cover slip placement are undoubtedly superior. The best method is however that with which the mounter is able to achieve the best results. In the case of pressed and macerated insect mounts it is easiest to place a drop of mountant on the cover slip and then lower it directly onto the specimen. This method does the most to prevent displacement of the specimen and is the method by which the amount of mountant used is best gauged, an invaluable asses to the novice. One large drop or two small drops from a slender glass rod is about right for most specimens the size of a harvester ant.

Once the cover slip is set one may chose to apply a small amount of pressure with the eraser end of a pencil or a camel hair brush but its not often necessary. Any excess mountant exuded may me cleaned up with bit of filter paper, but take care not to disturb the cover slip. The slide may now be placed in a cool oven or incubator (if one is available) for a few hours to cure. The time required for curing depends on the mountant and clearer used as well as the temperature. If time is of the essence the slide may be warmed over a spirit lamp or Bunsen burner to hasten things along, but superior results are often achieved by simply placing the slide in a case of some sort to keep the dust off and putting it on a shelf or a hot summer time attic for a few weeks. At room temperature a natural Balsam mount with Clove oil clearer can take as long as two months to cure.

Don’t be discouraged by the waiting time, the longer the period which is available for curing the more opportunity there is for any bubbles in the mountant to work their way out. In some up coming posts I’ll write about putting together a simple slide dryer and ringing a mount of this sort, but for now here’s an ant thats been produced over the course of these blog entries:

Image

Note the air bubble to the right of the lower antenna, and how unconcerned I am about it

New Year, Next Step

Happy new year! How appropriate that today begins a new step in the preparation of a whole insect mounted with pressure. The previous step was maceration and some specimens will always macerate faster or slower than others. Seeing as I must return to work tomorrow I decided to move things along today, even though one specimen appeared unready.

Image

Todays supplies

After the (Chemical) Fire

No there hasn’t been an accident, but after just over fifty hours of macerating the ants may appear as though there has been. When they were initially placed in the macerating solution each ant was quite buoyant, floating on the surface of the liquid. Withing twenty-four hours small bubbles were in evidence on the surface of their abdomens and they were noticeably less so. In the early evening of yesterday one of the ants was observed to be exhibiting neutral buoyancy. This morning it was resting on the bottom of the macerating jar with its abdomen appearing markedly lighter in color than the other. Enough time was felt to have passed for the next stage of slide preparation to begin on the sunken ant at least. Operations were carried out on each in any case.

Until today every activity performed on the specimens has consisted of nothing more than placing them in some container of liquid and waiting. At first today will prove no different. The ants will be transfered to an empty container and washed of the macerating solution. After this, any remaining traces of the macerating solution will be neutralized chemically. Finally the specimens will be pressed, dehydrated, and hardened.

A Wash and a Brush Up

Remove the macerated specimens to a small container. I find that a low profile beaker is best but any small container with a spout will prove convenient. Once the specimens are in the empty container pour over them a quantity of distilled water and leave them for not less than fifteen minutes. After fifteen minutes pour off and replenish the water. This activity may be carried out more or less extensively depending on the preparers confidence in ridding the specimens absolutely of the macerating solution.

Some mounters (among them R. M. Allen in his manual The Microscope) recommend performing the process of washing over the course of several hours. It is also possible to hasten the procedure by washing in the more cursory way described above provided an acid is used to ensure the absence of any Sodium Hydroxide after washing. I have read in one account or an other that after removal from the macerating solution the specimens may be washed and placed into a vessel of concentrated acetic acid and left indefinitely. I have never done so personally, I may post about the effect if I ever do.

After the second wash the ants were removed to a Syracuse glass of distilled water. Once there they were lightly spread with a camels hair brush to remove them from the posture they had taken after killing, five drops of glacial acetic acid was introduced to the Syracuse glass. For particularly bulbous insects the abdomen may be pressed gently with a camels hair brush while in the Syracuse glass. This will discharge the liquefied organs and help to make the following step easier. For the small ants I used this was not warranted.

Layout and Pressure

Put out two clean glass slips for each specimen, these will be used to apply the pressure needed to flatten the subject for mounting later. With four slips on the table, one need not use expensive slips of first rate quality provided only that they are clean, remove one ant to the center of one slide and using a corner of blotter paper draw off as much liquid from around the specimen as is possible without drying it entirely. Removing the liquid is not essential, but will help to ease the process of arranging the specimen.

With a clean camels hair brush and fine pair of forceps (or fine, blunted, dissecting needle) arrange the ant as desired on the slip. Care should be taken to extend the antennae, mouth parts, legs, or any portion which is of interest. One should act quickly so that the specimen is never permitted to dry out completely. Once satisfied with the arrangement lower a second slip onto the first so that the head contacts the lowered slip first and the edges of each line up. Carefully apply pressure while maintaining the alignment, failure to do so (lateral movement of either slip) may tear specimen.

Once the slips are as close to each other as careful pressure with the hand permits the slips must be bound together. An assistant could tie a short length of strong thread around either end of the slips, or any number of a variety of spring clips may be applied. Clothes pins may be used but they are quite bulky. The traditional binder clip is superior but one must search out a supply that is composed entirely of plain metal.

Image

A specimen pressed between slips for placement in alcohol

Hard and Dry

As soon as the slips are bound together they are placed into a vessel of alcohol sufficiently large and full that the entire slip is submerged. The alcohol should be not less than 90% pure, but denatured alcohol is perfectly acceptable. Two things will be accomplished by the alcohol in this step; the specimen will be dehydrated, and its tissues will be hardened in its flattened condition.

Once in the alcohol the specimens must be left for a period of time that is largely dependent on their size. Allen describes the required time only as “short” and I will not hazard a guess as to the unit of time that best describes. I can say that the slips may be left in the alcohol until it is convenient to carry on. I have left harvester ants pressed as described above in alcohol for as short as three hours and as long as twenty-five without noticing any difference.

Next time, things finally become clear!

Maceration

Be careful and nobody gets hurt. It’s great advice but seriously if one does not feel confident in performing the following operation safely then by all means do not build your confidence with this exercise! Chemical burns are not the sort of thing one experiences lightly. However, common sense and some basic protective equipment are all that’s necessary, more about that below.

Supplies for preparing the macerating solution.

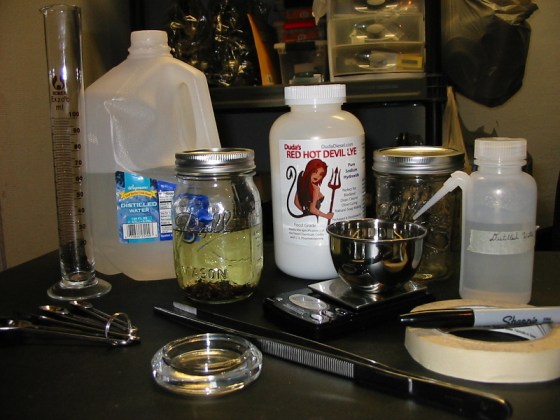
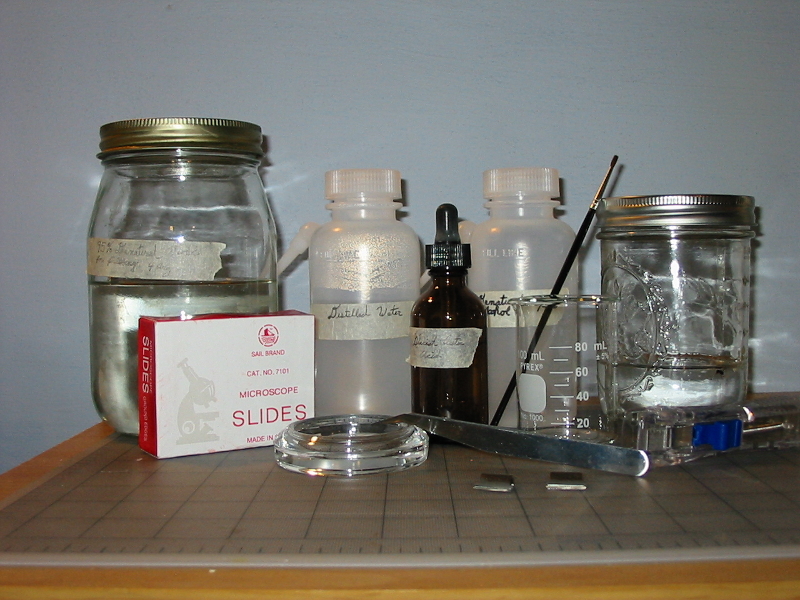
Supplies for preparing the macerating solution, etc.

What, Why, and How

Continuing on with the previous slide prep, at this point a quantity of specimens should have been aquired. It’s unimportant if they are in alcohol as the preceding post describes or dry. It’s assumed that some manner of ant (order Hymenoptera) or spider (order Araneae) has been collected and it will be required. In order to prepare a pressed insect (even if spiders are no insect I trust the simplicity of writing as such will be forgiven) one must first do something about all the bits and pieces inside it’s chitinous skeleton. Secondly, the chitin will need to be acted upon to soften it so that it may be made to fit under a cover-glass, thirdly it will need to be rendered a bit more transparent so that the microscope may be used as with a transparent object.

The process by which these three operations occur is called maceration. During maceration soft tissues (proteins, fats, and nearly everything else organic) undergo a process of chemical decomposition. The organs will be liquefied and the chitin itself softened and somewhat bleached. If one observes a specimen of Hymenoptera post maceration it will be seen that the chitinous plates of its abdomen will be somewhat separated at their joints. The specimen as a whole will exhibit a noticeably flabby appearance and be quite pliable. This is a good thing, don’t worry.

Maceration can be performed by any number of operations but the simplest is by the use of a strong base in 10% solution with distilled water. Of the bases Potassium Hydroxide (caustic potash, potash lye, KOH etc.) and Sodium Hydroxide (caustic soda, lye, NaOH etc.) are the most frequently employed. Each has it’s particular merits but Sodium Hydroxide is somewhat more forgiving in its action on the specimens and is generally more widely available. For our purposes the differences between the two are inconsequential so one is free to employ whichever is available.

One can order the chemical from a reputable supplier online without any great difficulty or expense. It may also be found at a well stocked hardware or grocery, often in the plumbing isle. Each is likely to be available as a liquid of varying concentrations, or a solid in flakes or pellets. The pure, pelleted solid is perhaps the best choice and easiest to work with.

Safety; or, Please Ignore Tyler Durden

Does anyone remember the movie Fight Club? Perhaps the scene where Brad Pitt burns the back of Edward Norton’s hand comes to mind? They were making soap and Sodium Hydroxide just happens to be used in the soap making process. Pitt burned the back of Norton’s hand with lye to make some point about the value of being a masochistic luddite or some such and then proceeded to dump a quantity or vinegar on the site of the burn as treatment once he’d made his point. This is really a terrible idea.

There are two ways a strong base can cause a burn, chemically and physically. Neither is pleasant. The chemical burn is caused by the strong base breaking the bonds of ones very flesh, in essence macerating skin just as we will be macerating the specimens to be mounted. The physical burn is caused by heat. When a strong base is added to a solvent like water, or say the moisture in the cells of human skin, it will separate into its ions (a chemical reaction that causes a chemical burn, but) this is an exothermic reaction that can give off quite a bit of heat. The more totally it separates and the faster it happens the more heat is produced.

Vinegar is a weak acid, lye is a strong base, and water is ideally neutral. If one puts an equal amount of lye into 100 ml of water and 100 ml of vinegar, the lye will separate more completely and much faster in the vinegar. It will give off more heat and not provide the instant relief the film might lead one to expect. Proper first aid for an accidental application of lye in solution (or dry) is water, lots and lots of water, for 15 minutes. Don’t apply vinegar, and don’t take advice on chemistry from movies or blogs on the internet. If there is an accident and some water is applied till it stops hurting, but for less than 15 minutes (until all of the base is neutralized) the chemical reaction will continue and the burn will become worse. Look up the safe handling requirements of Sodium Hydroxide (and any chemical) before handling it if there are any concerns. Wear gloves and goggles and work in a room with immediate access to plenty of running water. Clean up any spills immediately using plenty of water and wash everything used to handle the Sodium Hydroxide throughly.

A final note, the Sodium Hydroxide (or Potassium Hydroxide) is going to come packaged in an air tight container. The chemical inside will be as free from moisture as the packager could make it. When exposed to the air it will absorb some moisture from the air. Seal it tightly to keep it from forming a solid block during storage. When handled it may stick unpleasantly to whatever it contacts either as a result of its extreme dryness or its affinity for moisture. Be careful that no little bits go unnoticed sticking to the underside of this or that. Always add the base to the water, and always add it a little bit at a time. 

Weights and Measures

Mixing up a 10% solution of Sodium Hydroxide is a simple matter. Add one part of Sodium Hydroxide to ten parts of distilled water in a suitable container. What makes a container suitable? Particularly high concentrations of Sodium Hydroxide can etch glass over time. Sodium Hydroxide will also react with some metals such as aluminum. So for a suitable container a tightly sealed plastic jar may serve. However, as 10% is not a particularly high concentration, and many jars used for canning employ stainless steel lids, a wide mouth pint Mason jar or similar is recommended. Clearly label the jar ahead of time so it isn’t forgotten later.

When comparing one part of a dry compound with ten parts of  liquid a common unit of measure will be necessary, in this case mass (though weight will be used if one feels like being technically accurate). Distilled water (in microscopy one should nearly always employ distilled water) has a practical mass of one gram per centimeter cubed. One cubic centimeter just happens to be equivalent to one milliliter. So if one intends to make up approximately 100 ml of 10% Sodium Hydroxide solution, one will need 100 grams of distilled water and 10 grams of Sodium Hydroxide.

Chemistry professors might cringe at the preceding but exact concentration is not really important, it just needs to be in the neighborhood of 10%. Remember, Sodium Hydroxide is a bit more forgiving than Potassium Hydroxide so a concentration varying as much as 5% in either direction is no great failure. Supposing however, a significant textbook of chemistry resides on a nearby book self… one might consult it to find that a 10% concentration of Sodium Hydroxide in water has a density of 1.10890 kg/L at room temperature (1.1089 g/mL). This would mean one should add 11.089 grams of Sodium Hydroxide to 100 ml of distilled water for a 10% solution.

That same textbook will likely describe a number of formula for the calculation of pH. With a digital pH meter or some indicating paper one might measure the pH of the solution produced and work a few equations to determine the final concentration after the solution is mixed. But Molarity and pH calculations are only fun for a special few and all this chemistry is just taking away from time at the optical bench!

In any case measure 100 ml of distilled water into the jar using your graduated cylinder or whatever measure is handy. Then weigh out the proper amount of Sodium Hydroxide on a balance or scale and carefully add it a small amount at a time to the water. If a sensitive enough scale or balance isn’t handy then one should note that two teaspoons of pure pelleted NaOH weighs in at 12.6 g. Add it slowly a little at a time to the water to give the heat of the reaction time to dissipate. It will dissolve slowly and for a time the water will appear quite cloudy. Do not put the lid in place until the solution becomes clear (pressure may build up and burst the container!) which may be some minutes. Cleaning the utensils used to measure is a good activity while one waits for the solution to clear. Do not be alarmed if the jar becomes warm to the touch (it will no matter how slowly the Sodium Hydroxide is added) it will not pose a hazard if due care and time is taken.

Finally

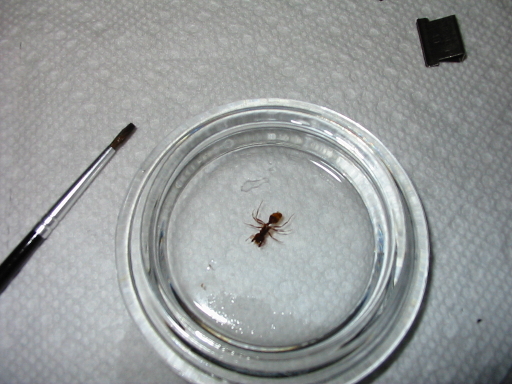
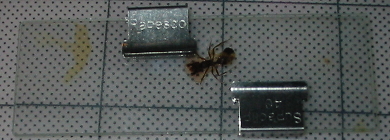
At this point one should be in possession of a 10% solution of a strong base in water, and a quantity of insects in alcohol. Carefully remove the specimens to a dish of water. A long set of forceps wielded carefully is ideal for the operation. I find a set of stainless steel thumb dressing forceps invaluable.  Pour off and replenish this water once or twice to remove the alcohol. Then carefully introduce the specimens to the macerating jar. If working with dried specimens rinse them in distilled water to remove any debris before adding them to the macerating jar. A wash bottle of distilled water and a Syracuse glass makes the operation the work of a moment.

IMG_1119small

Washing the specimens prior to maceration

The time required for maceration is widely variable and dependent on the size and toughness of the specimens. As a general guide to begin with; a period as short as 24 hours will prove sufficient for small, lightly colored ants and spiders. As long as 48 or 72 hours is often required for larger ants (like the black carpenter ants one finds on decks and trees). Trial and error provides a better eye for success than any text so do not be afraid to experiment with different periods of maceration.

When in a hurry the prepared macerating solution can be made more potent or heat my be applied to speed its action on the specimens. Several handbooks recommend boiling the specimen in the solution for a few minutes. Doing so is markedly more hazardous and the savings in time is not worth the added risk. Boiling will not generally produce superior results. If a specimen is possessed of a particularly large abdomen it may be necessary to puncture its underside with a dissecting needle prior to placing it in the macerating jar to ensure the action of the solution on the internal organs.

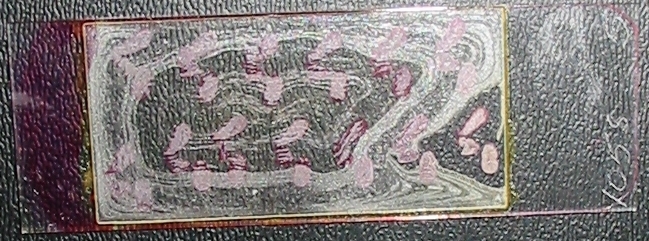
The next step will be posted after my specimens are prepared for it!