New Year, Next Step

Happy new year! How appropriate that today begins a new step in the preparation of a whole insect mounted with pressure. The previous step was maceration and some specimens will always macerate faster or slower than others. Seeing as I must return to work tomorrow I decided to move things along today, even though one specimen appeared unready.
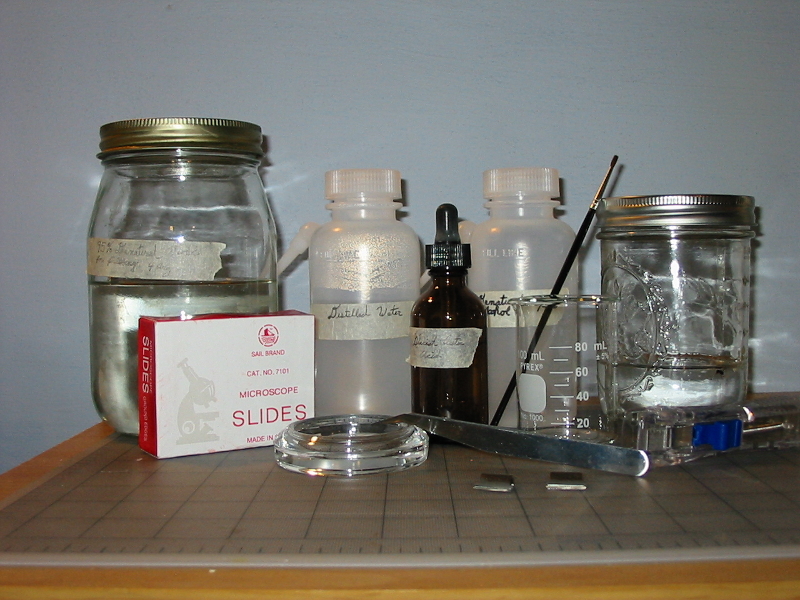
Image

Todays supplies

After the (Chemical) Fire

No there hasn’t been an accident, but after just over fifty hours of macerating the ants may appear as though there has been. When they were initially placed in the macerating solution each ant was quite buoyant, floating on the surface of the liquid. Withing twenty-four hours small bubbles were in evidence on the surface of their abdomens and they were noticeably less so. In the early evening of yesterday one of the ants was observed to be exhibiting neutral buoyancy. This morning it was resting on the bottom of the macerating jar with its abdomen appearing markedly lighter in color than the other. Enough time was felt to have passed for the next stage of slide preparation to begin on the sunken ant at least. Operations were carried out on each in any case.

Until today every activity performed on the specimens has consisted of nothing more than placing them in some container of liquid and waiting. At first today will prove no different. The ants will be transfered to an empty container and washed of the macerating solution. After this, any remaining traces of the macerating solution will be neutralized chemically. Finally the specimens will be pressed, dehydrated, and hardened.

A Wash and a Brush Up

Remove the macerated specimens to a small container. I find that a low profile beaker is best but any small container with a spout will prove convenient. Once the specimens are in the empty container pour over them a quantity of distilled water and leave them for not less than fifteen minutes. After fifteen minutes pour off and replenish the water. This activity may be carried out more or less extensively depending on the preparers confidence in ridding the specimens absolutely of the macerating solution.

Some mounters (among them R. M. Allen in his manual The Microscope) recommend performing the process of washing over the course of several hours. It is also possible to hasten the procedure by washing in the more cursory way described above provided an acid is used to ensure the absence of any Sodium Hydroxide after washing. I have read in one account or an other that after removal from the macerating solution the specimens may be washed and placed into a vessel of concentrated acetic acid and left indefinitely. I have never done so personally, I may post about the effect if I ever do.

After the second wash the ants were removed to a Syracuse glass of distilled water. Once there they were lightly spread with a camels hair brush to remove them from the posture they had taken after killing, five drops of glacial acetic acid was introduced to the Syracuse glass. For particularly bulbous insects the abdomen may be pressed gently with a camels hair brush while in the Syracuse glass. This will discharge the liquefied organs and help to make the following step easier. For the small ants I used this was not warranted.

Layout and Pressure

Put out two clean glass slips for each specimen, these will be used to apply the pressure needed to flatten the subject for mounting later. With four slips on the table, one need not use expensive slips of first rate quality provided only that they are clean, remove one ant to the center of one slide and using a corner of blotter paper draw off as much liquid from around the specimen as is possible without drying it entirely. Removing the liquid is not essential, but will help to ease the process of arranging the specimen.

With a clean camels hair brush and fine pair of forceps (or fine, blunted, dissecting needle) arrange the ant as desired on the slip. Care should be taken to extend the antennae, mouth parts, legs, or any portion which is of interest. One should act quickly so that the specimen is never permitted to dry out completely. Once satisfied with the arrangement lower a second slip onto the first so that the head contacts the lowered slip first and the edges of each line up. Carefully apply pressure while maintaining the alignment, failure to do so (lateral movement of either slip) may tear specimen.

Once the slips are as close to each other as careful pressure with the hand permits the slips must be bound together. An assistant could tie a short length of strong thread around either end of the slips, or any number of a variety of spring clips may be applied. Clothes pins may be used but they are quite bulky. The traditional binder clip is superior but one must search out a supply that is composed entirely of plain metal.

Image

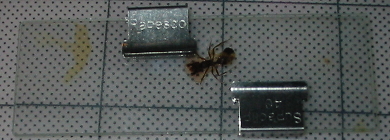
A specimen pressed between slips for placement in alcohol

Hard and Dry

As soon as the slips are bound together they are placed into a vessel of alcohol sufficiently large and full that the entire slip is submerged. The alcohol should be not less than 90% pure, but denatured alcohol is perfectly acceptable. Two things will be accomplished by the alcohol in this step; the specimen will be dehydrated, and its tissues will be hardened in its flattened condition.

Once in the alcohol the specimens must be left for a period of time that is largely dependent on their size. Allen describes the required time only as “short” and I will not hazard a guess as to the unit of time that best describes. I can say that the slips may be left in the alcohol until it is convenient to carry on. I have left harvester ants pressed as described above in alcohol for as short as three hours and as long as twenty-five without noticing any difference.

Next time, things finally become clear!

Maceration

Be careful and nobody gets hurt. It’s great advice but seriously if one does not feel confident in performing the following operation safely then by all means do not build your confidence with this exercise! Chemical burns are not the sort of thing one experiences lightly. However, common sense and some basic protective equipment are all that’s necessary, more about that below.

Supplies for preparing the macerating solution.

Supplies for preparing the macerating solution, etc.

What, Why, and How

Continuing on with the previous slide prep, at this point a quantity of specimens should have been aquired. It’s unimportant if they are in alcohol as the preceding post describes or dry. It’s assumed that some manner of ant (order Hymenoptera) or spider (order Araneae) has been collected and it will be required. In order to prepare a pressed insect (even if spiders are no insect I trust the simplicity of writing as such will be forgiven) one must first do something about all the bits and pieces inside it’s chitinous skeleton. Secondly, the chitin will need to be acted upon to soften it so that it may be made to fit under a cover-glass, thirdly it will need to be rendered a bit more transparent so that the microscope may be used as with a transparent object.

The process by which these three operations occur is called maceration. During maceration soft tissues (proteins, fats, and nearly everything else organic) undergo a process of chemical decomposition. The organs will be liquefied and the chitin itself softened and somewhat bleached. If one observes a specimen of Hymenoptera post maceration it will be seen that the chitinous plates of its abdomen will be somewhat separated at their joints. The specimen as a whole will exhibit a noticeably flabby appearance and be quite pliable. This is a good thing, don’t worry.

Maceration can be performed by any number of operations but the simplest is by the use of a strong base in 10% solution with distilled water. Of the bases Potassium Hydroxide (caustic potash, potash lye, KOH etc.) and Sodium Hydroxide (caustic soda, lye, NaOH etc.) are the most frequently employed. Each has it’s particular merits but Sodium Hydroxide is somewhat more forgiving in its action on the specimens and is generally more widely available. For our purposes the differences between the two are inconsequential so one is free to employ whichever is available.

One can order the chemical from a reputable supplier online without any great difficulty or expense. It may also be found at a well stocked hardware or grocery, often in the plumbing isle. Each is likely to be available as a liquid of varying concentrations, or a solid in flakes or pellets. The pure, pelleted solid is perhaps the best choice and easiest to work with.

Safety; or, Please Ignore Tyler Durden

Does anyone remember the movie Fight Club? Perhaps the scene where Brad Pitt burns the back of Edward Norton’s hand comes to mind? They were making soap and Sodium Hydroxide just happens to be used in the soap making process. Pitt burned the back of Norton’s hand with lye to make some point about the value of being a masochistic luddite or some such and then proceeded to dump a quantity or vinegar on the site of the burn as treatment once he’d made his point. This is really a terrible idea.

There are two ways a strong base can cause a burn, chemically and physically. Neither is pleasant. The chemical burn is caused by the strong base breaking the bonds of ones very flesh, in essence macerating skin just as we will be macerating the specimens to be mounted. The physical burn is caused by heat. When a strong base is added to a solvent like water, or say the moisture in the cells of human skin, it will separate into its ions (a chemical reaction that causes a chemical burn, but) this is an exothermic reaction that can give off quite a bit of heat. The more totally it separates and the faster it happens the more heat is produced.

Vinegar is a weak acid, lye is a strong base, and water is ideally neutral. If one puts an equal amount of lye into 100 ml of water and 100 ml of vinegar, the lye will separate more completely and much faster in the vinegar. It will give off more heat and not provide the instant relief the film might lead one to expect. Proper first aid for an accidental application of lye in solution (or dry) is water, lots and lots of water, for 15 minutes. Don’t apply vinegar, and don’t take advice on chemistry from movies or blogs on the internet. If there is an accident and some water is applied till it stops hurting, but for less than 15 minutes (until all of the base is neutralized) the chemical reaction will continue and the burn will become worse. Look up the safe handling requirements of Sodium Hydroxide (and any chemical) before handling it if there are any concerns. Wear gloves and goggles and work in a room with immediate access to plenty of running water. Clean up any spills immediately using plenty of water and wash everything used to handle the Sodium Hydroxide throughly.

A final note, the Sodium Hydroxide (or Potassium Hydroxide) is going to come packaged in an air tight container. The chemical inside will be as free from moisture as the packager could make it. When exposed to the air it will absorb some moisture from the air. Seal it tightly to keep it from forming a solid block during storage. When handled it may stick unpleasantly to whatever it contacts either as a result of its extreme dryness or its affinity for moisture. Be careful that no little bits go unnoticed sticking to the underside of this or that. Always add the base to the water, and always add it a little bit at a time. 

Weights and Measures

Mixing up a 10% solution of Sodium Hydroxide is a simple matter. Add one part of Sodium Hydroxide to ten parts of distilled water in a suitable container. What makes a container suitable? Particularly high concentrations of Sodium Hydroxide can etch glass over time. Sodium Hydroxide will also react with some metals such as aluminum. So for a suitable container a tightly sealed plastic jar may serve. However, as 10% is not a particularly high concentration, and many jars used for canning employ stainless steel lids, a wide mouth pint Mason jar or similar is recommended. Clearly label the jar ahead of time so it isn’t forgotten later.

When comparing one part of a dry compound with ten parts of  liquid a common unit of measure will be necessary, in this case mass (though weight will be used if one feels like being technically accurate). Distilled water (in microscopy one should nearly always employ distilled water) has a practical mass of one gram per centimeter cubed. One cubic centimeter just happens to be equivalent to one milliliter. So if one intends to make up approximately 100 ml of 10% Sodium Hydroxide solution, one will need 100 grams of distilled water and 10 grams of Sodium Hydroxide.

Chemistry professors might cringe at the preceding but exact concentration is not really important, it just needs to be in the neighborhood of 10%. Remember, Sodium Hydroxide is a bit more forgiving than Potassium Hydroxide so a concentration varying as much as 5% in either direction is no great failure. Supposing however, a significant textbook of chemistry resides on a nearby book self… one might consult it to find that a 10% concentration of Sodium Hydroxide in water has a density of 1.10890 kg/L at room temperature (1.1089 g/mL). This would mean one should add 11.089 grams of Sodium Hydroxide to 100 ml of distilled water for a 10% solution.

That same textbook will likely describe a number of formula for the calculation of pH. With a digital pH meter or some indicating paper one might measure the pH of the solution produced and work a few equations to determine the final concentration after the solution is mixed. But Molarity and pH calculations are only fun for a special few and all this chemistry is just taking away from time at the optical bench!

In any case measure 100 ml of distilled water into the jar using your graduated cylinder or whatever measure is handy. Then weigh out the proper amount of Sodium Hydroxide on a balance or scale and carefully add it a small amount at a time to the water. If a sensitive enough scale or balance isn’t handy then one should note that two teaspoons of pure pelleted NaOH weighs in at 12.6 g. Add it slowly a little at a time to the water to give the heat of the reaction time to dissipate. It will dissolve slowly and for a time the water will appear quite cloudy. Do not put the lid in place until the solution becomes clear (pressure may build up and burst the container!) which may be some minutes. Cleaning the utensils used to measure is a good activity while one waits for the solution to clear. Do not be alarmed if the jar becomes warm to the touch (it will no matter how slowly the Sodium Hydroxide is added) it will not pose a hazard if due care and time is taken.

Finally

At this point one should be in possession of a 10% solution of a strong base in water, and a quantity of insects in alcohol. Carefully remove the specimens to a dish of water. A long set of forceps wielded carefully is ideal for the operation. I find a set of stainless steel thumb dressing forceps invaluable.  Pour off and replenish this water once or twice to remove the alcohol. Then carefully introduce the specimens to the macerating jar. If working with dried specimens rinse them in distilled water to remove any debris before adding them to the macerating jar. A wash bottle of distilled water and a Syracuse glass makes the operation the work of a moment.

IMG_1119small

Washing the specimens prior to maceration

The time required for maceration is widely variable and dependent on the size and toughness of the specimens. As a general guide to begin with; a period as short as 24 hours will prove sufficient for small, lightly colored ants and spiders. As long as 48 or 72 hours is often required for larger ants (like the black carpenter ants one finds on decks and trees). Trial and error provides a better eye for success than any text so do not be afraid to experiment with different periods of maceration.

When in a hurry the prepared macerating solution can be made more potent or heat my be applied to speed its action on the specimens. Several handbooks recommend boiling the specimen in the solution for a few minutes. Doing so is markedly more hazardous and the savings in time is not worth the added risk. Boiling will not generally produce superior results. If a specimen is possessed of a particularly large abdomen it may be necessary to puncture its underside with a dissecting needle prior to placing it in the macerating jar to ensure the action of the solution on the internal organs.

The next step will be posted after my specimens are prepared for it!