I accept full responsibility for the following as the majority is not attributable to any particular authority but only my own experiences. -K
In practice ringing a slide (this deals only with circular covers, when treating with rectilinear covers I will refer to it as sealing) is a simple task and once performed is easily repeated indefinitely, provided a few points are always observed. The keys to successful ringing are entirely mechanical and essentially every other aspect can be overlooked provided the mechanics are given priority. For example the sealing cement is less important than it’s viscosity and the position of the ring much more crucial than its appearance.
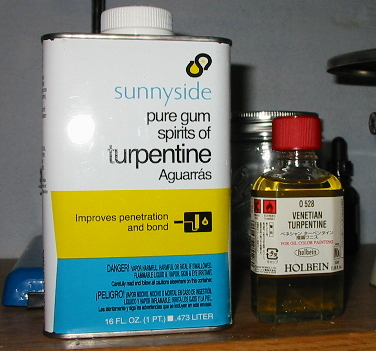
The easiest cement is often the one on hand, but for beginners or those wishing only to get a feel for the practice I can not more highly recommend gold sizing. For those unfamiliar, gold sizing is a gilders sizing cement for the application of (primarily) gold leaf. Any of the larger art supply houses can provide a suitable gold sizing and it may generally be found among the model paints. Available in a number of grades, look for one which is described on the label as “fast drying” or “suitable for exterior varnish.” It will likely be the least expensive of the sorts on offer. Do not purchase gold size which is described as “for picture varnish.” Higher grades of gold sizing dry incredibly slow, some behaving more like an oil paint in that they never set up completely which is wonderful protecting art which needs to breath, but not for sealing a coverslip.
Acquire also a fine camels hair brush, any will do provided it may be pointed (either purchase a pointed brush or plan on trimming it) and has natural bristles. Gold sizing may be cleaned from the brush with xylene (xylol in Germany and many continental European countries) and many synthetic bristles will dissolve partially (or completely) in xylene and similar solvents (benzene &ct.).
One should already have a ringing table of some sort. If not, Brunnel in the UK and BioQuip in the US appear to be the only contemporary sources. If one would purchase a second hand turntable or construct one for themselves it must be outfitted so that it turns perfectly without wobble, and freely completes many revolutions at a fair speed without slowing. There should be a simple means of holding the slide quite firmly and some convenient and sturdy rest for the wrist and forearm. I prefer a rest which supports the hand above the surface of the turntable so that the wrist may be held straight while holding the brush vertically over the slide.
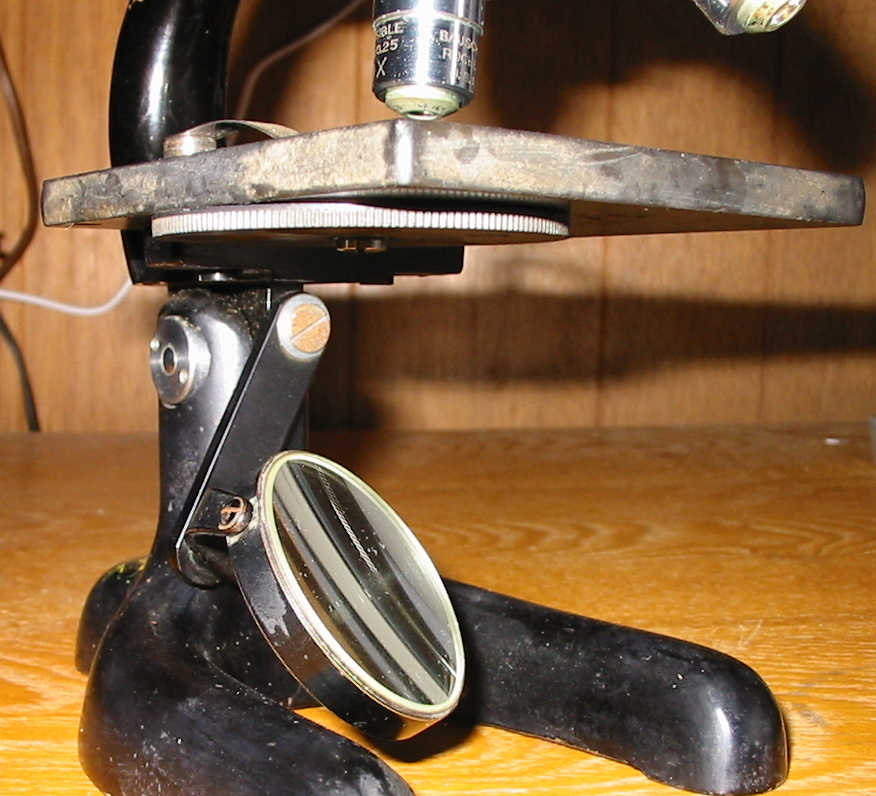
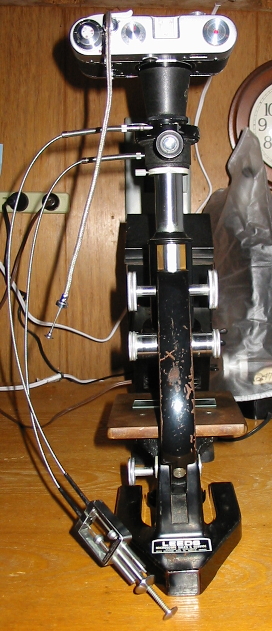
Prior to beginning one should clean the slide thoroughly; first scraping any exuded mountant with the dull side of a heated scalpel and following by a lens paper wet with a small amount of an appropriate solvent. When positioning the slide to be sealed upon the turntable one must be sure to center not the specimen, but the coverslip. With turntables that are marked by concentric rings (as most are) it is simple to get the position if the coverslip is near to the size of a marking. In any case once believed to be centered set the turntable spinning and look down from above to determine that it is indeed centered. A ring which is not concentric with the edges of the cover will serve but is less secure and less effective.

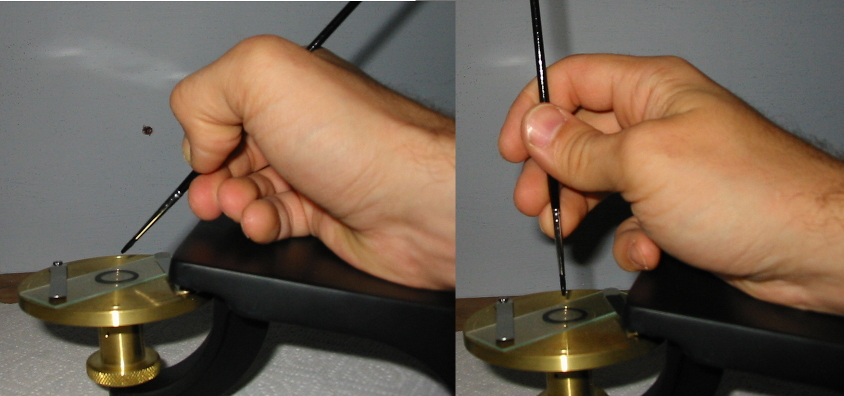
Effective position seen at right.
As seen in the right half of the above image holding the wrist straight helps to maintain a steady hand and places the point of motion at the more sturdy joint of the shoulder rather than at the wrist. It’s rather similar to the form one uses when writing in the Palmer method, for any old enough to remember being instructed in that technique.
Why though should it matter if the hand is kept steady? The seal is applied in an instant by just touching the tip of the loaded brush to the slide, and as the turntable should be rotating a fair clip it only requires a second or two for the ring to be built up by many revolutions. In that short time there is little opportunity for motion to be sure, but the place at which the ring is applied is paramount and ensuring a minimum of motion keeps the ring from being located improperly.
The author is of the oppinion that an improperly positioned ring is worse than no ring at all. Being improperly positioned a ring fails to adequately seal the slide and presents significant chance for damage when it must be removed either to remount the spoiled specimen or to properly ring the slide in the future. For preservation, the ring should be applied so that it’s thickest portion is adjacent to the corner created by the bottom of the coverslip and the top of the slip. Covers which have been first properly sealed may then be added to with decorative and functional pigments which extend farther onto the other surfaces of the coverslip or slip. Concentric rings of contrasting colors may be laid down with ease that present an eye-catching and very finished appearance, as long as their is an underlying ring located correctly such additional layers can not but help, however superfluous they may be.

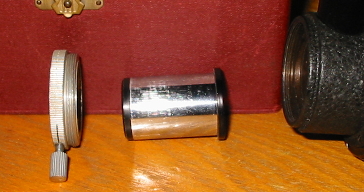
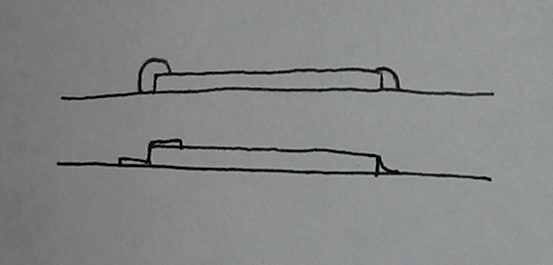
Note the outline at the top right
Taking a sidelong glance at a cutaway provides an illustration of properly positioned rings. On the top are rings which are excellent; just covering a portion of the coverslip and slide and presenting a significant barrier to oxygen infiltration or volatile compound escape. The example at the upper-left is representative of the sort of seal one is likely to find on antiquarian slides and is achieved by successive layers of cement or the use of a highly viscous cement. Asphalt varnishes or gum/rubber bearing shellacs will produce a ring of this character in a single application. The image at the upper-right is what one can expect of a properly located ring of gold size.
Below are rings which although correctly located will provide almost no protection. On the left one can see the product a ring which suffered for either being applied with too much pressure on the brush (just the faintest touch is needed) or with a cement of to low a viscosity, the thin cement spreading out because it was not substantial enough to support itself in the place of the force created by the spinning turntable. At the right one sees the cut-away of a ring that was applied without flowing freely from the brush. If the cement will not flow properly onto the slide one might need to first wet the brush in a small amount of the solvent to encourage a healthy flow. Another cause of rings of this sort is an unclean slide, which can result in rings that flow excessively or are seemingly repelled by the surface of the slide (depending on the nature of the contamination).
At some later time I will try to post some of the very serviceable sealing cements I have employed over the years and speak to the virtues and vices of each. For the time being I recommend those who desire an excellent all-around sealing cement stick with gold size as it is perfectly serviceable for most needs and of high quality. I must say that many cements available, at first seemingly excellent are much less impervious to the compounds apt to find their way onto a slide as it is used. Simply being available from a reputable supply house is not a proof of serviceability and one should never rely on an untested cement for a valuable preparation.