After a few weeks of seemingly endless labor, waiting, and paperwork, I’m all moved in to my new home and finally privy to some free time for microscopical pursuits. One of my upcoming efforts requires a very simple apparatus that positively anyone can construct at home, and no maker of permanent mounts should be without: the centering card. When producing a slide one must be mindful not only of the handling of the specimen, but of the appearance of the finished slide as well. An excellent specimen and fine label can go a long way towards providing a professional look, yet the effect may be spoilt by something as simple as an off-center cover-slip.
A centering card is a surprisingly simple device which I first saw illustrated in the pages of Simon Henry Gage’s perennial work The Microscope. The illustration below is taken from the sixteenth edition of that august work.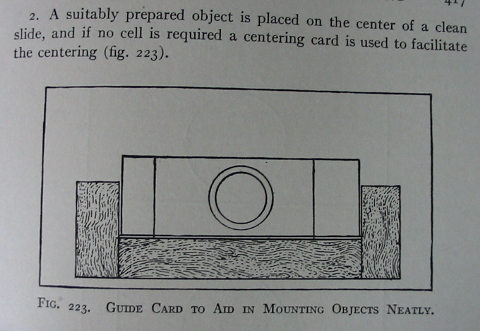
One can see just how simple the thing is and and acknowledge the virtues of a well centered cover-slip yet still fail to appreciate the utility of the centering card, until of course one puts such a card into use. Of all the methods and devices one may use in centering a cover-slip none is quite so straight forward and versatile, so let’s set about producing one.
No very specialized materials are required to construct such a card and one can utilize whatever is on hand. Today I used two 5″x7″ index cards, a pair of shears, some rubber cement, a pencil, a pen (not pictured), a ruler, a 1″x3″ slide (not pictured), and a circle templet by Staedtler (not pictured).

One may of course use far more durable materials than an index card, anything from poster-board to wood or even metal might serve admirably, and I would encourage those so inclined to make use of what they have. For my own part I prefer index card as the entire centering card may be produced so rapidly from them that it is a simple thing to produce one for any particular dimension of slide or cover-slip as the need arises.
After collecting the required supplies one must cut one index card into three pieces as I have already done in the above image. The goal is to produce three specific pieces: one with a long and perfectly straight edge, and two with perfect right-angle corners. Once the cuts are made the first two pieces may be glued to the second (whole) index card. By afixing the first long piece across the bottom of the second card, and one of the right-angle pieces tight against it, a depressed area with a perfect right-angle is produced. It is then a simple mater to position a slide against the edges of those two pieces and glue the third piece to the card so that a three-sided depression exactly fitted to the slide is produced. Tracing a pencil line along the top of the slide and drawing two diagonals with a straight edge pinpoints the center of any slide of the same dimensions placed into the card.
One may now finish the card for whatever size cover-slip one intends to use. For my next effort I will be making use of 18mm circular cover-slips so using a circle templet (though a draftsman’s compass would work as well) I marked the area around the center point accordingly. In the case of square cover-slips it’s a simple thing to position them with the aid of a ruler. Finally I noted on the card the dimensions of the slide, and cover-slip for which it is intended.
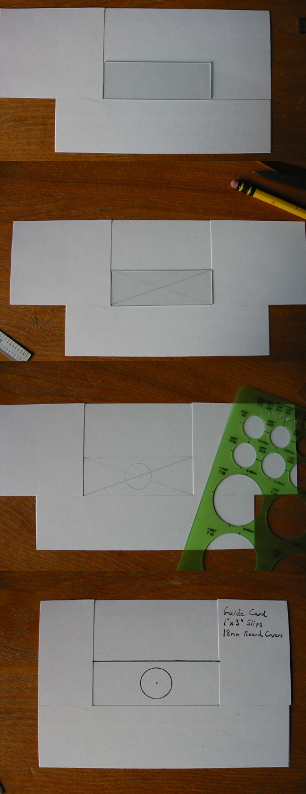
The entire operation took only five minutes and produced a functional centering card that will save me the stress of trying to “eyeball” the position of my upcoming mounts. There are of course commercial devices that can serve the purpose of our humble card, and one can often achieve quite good result simple by preparing their mounts over quadrille-ruled paper, but the speed with which one may produce a serviceable centering card specific for slides and covers of any dimension, makes them a must in my book.
