At this point I haven’t tried to make a print. So far I’ve only gone as far as developing a couple sheets of film to end up with a 4×5 negative. In order to get a look at a negative it will need to be backlit. In the old days this meant using a light box which was really just a deep picture frame containing a light bulb (usually a tube florescent) and fronted by a piece of heavily frosted or opal glass. Light boxes are still around, old and new, with the advent of LED lighting and translucent white plastic they can be had for just a few dollars. That would be a good option if there was a need, but any tablet or LCD display that can be set up to display a solid white background will work nicely.

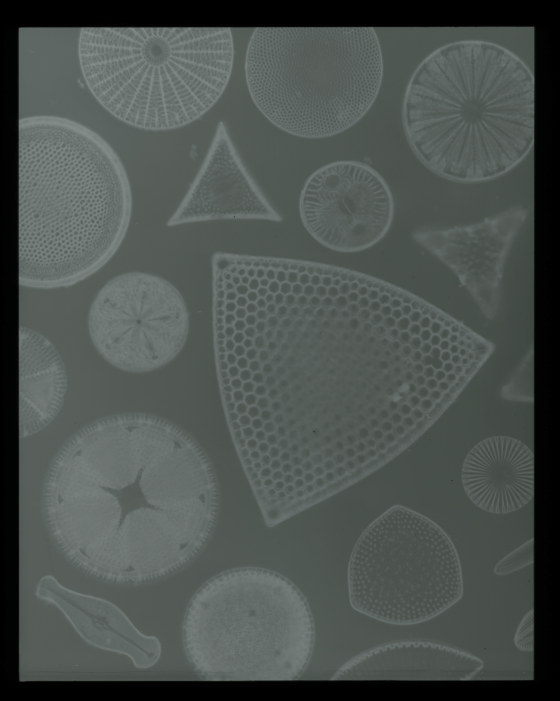
4×5 B&W negative of assorted diatoms
The Negative Visually
There it is, those are some diatoms. If one looks at the Triceratium (the big triangular one in the center) it’s obvious that a higher power objective was employed. The center of the particular diatoms test is out of focus but the majority it, by this one can tell that the objective used provides only a relatively narrow depth of view. If this was a micrograph (that is a hand drawn image of a microscopic object) then the artist could easily compensate for the narrow depth of field by making slight adjustments to the fine focus while drafting the drawing. In the modern era the fame may be accomplished with a digital photomicrograph by taking multiple identical photomicrographs in which the optical section has been slightly displaced (again with slight adjustment of the fine focus). The image is then combined digitally taking only the sharply focused portion from each to form the final product.
In looking at the negative, even with the bright backlight, it is noticeably dense. There is comparatively little difference between the lights and darks; there’s little contrast. Ideally there should be a large tonal range and significant dark, nearly opaque, areas between the diatoms. Remember, this is a negative so the bright white background of the positive print would need to have a corresponding dense black background in the negative.
The Scanned Negative
In order to scan a negative one must have a backlit scanner. This could be as simple taking a flatbed scanner and placing the negative on the bed, emulsion side down, with a light box on top while scanning. Fortunately, I have a backlit scanner so I don’t need to bother with such things. In the above image the B&W negative was scanned as if it were a full color positive. Scanning in this way prevents the image from being automatically value inverted by the scanner. During the scanning process the negative is placed in a negative carrier that holds it in position beneath the backlight and neatly crops the unexposed areas at the edge where the film was covered by the holder during exposure.
If anything the scanned negative looks worse than it did against the backlight. There seems to be even less contrast than before.

The White-Blanced Positive
Now that we’re in the world of digital photo manipulation there’s no limit to what we might do with the image. In an effort to keep things simple the above scan was simply value inverted and then Photoshop was allowed to automatically balance the white. This relatively minor manipulation didn’t increase the contrast of the image, or significantly extend the tonal range. For a first go at a 4×5 negative it’s alright but as photomicrography goes it’s a failure. Because it’s been scanned as a full color image rather than a black and white image, one could go to the small trouble of manually setting the white balance by selling the tones which should be made white, black, and a middle gray. In my mind excessive manipulation is to be avoided so I won’t bother with that.
Defects
In the Photoshopped positive we can see just how little tonal range the image has. There is strikingly little contrast and the areas that should be a pristine white are middle-of-the-road gray. Additionally, in looking at the tonal difference between the left and right hand sides of the image it’s clear that the illumination was uneven.
Settings
This negative was taken using the 20x objective of the BalPlan microscope. The illumination system was run at 9v and no special care was taken to first arrange for Köhler. Only a frosted glass filter was placed in the light path. The shutter was operated at 1/125th of a second, the fastest speed available on the B&L Integrated Camera System II. It was developed in D76 1:1 for 10 minutes under continuous agitation.
Proposal
Working from the assumption that the negative is over-exposed steps will be taken to address the issue. The exposure will be lowered by drastically cutting the power of the illuminator, dropping the voltage by half to 4.5v while keeping the shutter speed the same at 1/125th of a second. Because of the significant decrease in color temperature this will cause in place of the plain frosted filter in the light path a frosted day-light glass filter will be used. In an effort to increase the contrast the negative will be processed in an undiluted solution of D76 for 12 minutes with continuous rotary agitation. According to available information a less dilute solution of developer, and longer developing time will produce a negative with more contrast.
Tray Processing
What about tray processing the negative? Arista EDU Ultra 100 B&W film is panchromatic. Panchromatic film is sensitized to all wavelengths of light meaning it would require processing in an open tray in total darkness. I don’t know that I’m up for making my first attempt at tray processing under total dark conditions. Whats that, do it with a light on then? Sure! Why not?

Fogged Negative
The negative above was processed in open trays under a red 7.5 watt bulb. The outlines of a few diatoms are just barely visible. Note that there is no perfectly clear unexposed area at all on the negative, not even at the edges where it was covered during exposure. When the entire negative show some level of exposure it is referred to as fogged. This is a particularly heavy example of fogging and is caused by exposure of the film to wavelength of light to which it is sensitive prior to the end of fixing.
