More Blood!

Not done yet, this is just how to make the smear. -K

There are more than a few methods for making smears in general, and a couple for making blood smears specifically. By far the most generally useful method, and the easiest, is what I refer to as pulling a smear. In pulling a smear one may produce a large, thin, and even smear that is rather more uniform and consistent than that which might be produced by other methods. It’s very easy for beginners to read the method and then  perform the action incorrectly, so please observe the pictures and practice with a bit of fountain pen ink or food coloring before getting set to make the smear with blood.

Practice the method with ink before working with blood.

Practice the method with ink before working with blood.

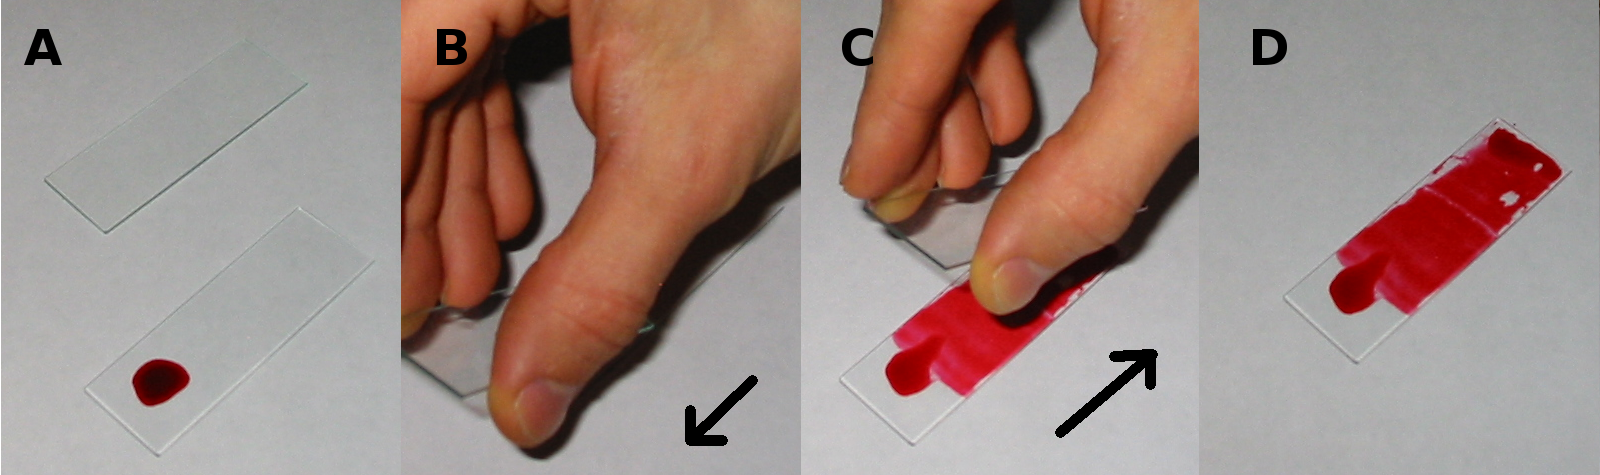
In A we see a drop of blood (in this case ink for practice) placed near one end of a slip. In B a second slip has been placed on the first at an acute angle. The second slip is then slowly pushed back until it comes into contact with the blood. Once contact is made the blood will spread out along the line the edge of the second slip. Maintain firm and even contact with the slips. The blood should remain primarily on the side next to the drop; within the acute angle. As in C, the second slip is then drawn in a smooth even motion along the first so that the blood is pulled along leaving behind an suitable smear. In D care was made to produce some of the more common troubles. Midway along the smear a lighter line is observed where the slip was stopped as it was drawn along. Further along we observe two blank areas where the slip was allowed to lose contact at the lower edge.

In the above image the camera is positioned at six o’clock, and I am seated at three o’clock. Most depictions of the process provide the impression that smears are best drawn along a horizontal from left to right (or right to left). It is easiest to ensure a smooth motion (for those who are right handed) to pull the smear from from eleven o’clock towards four o’clock.  When pulling along a perfect horizontal it is more difficult to keep constant contact and pressure along the entire length of the smear. It is in some respects a matter of preference but above all do not make the common mistake of drawing over the drop or of positioning the second slip so that the drop of blood spreads out in the obtuse angle side of the arrangement.

Apart from everything else, it’s very important to form the smear on only the cleanest of slips. Oil, dust or other imperfections can prevent the smear from adhering properly once made, or from being made effectively in the first place. Always take a moment to exhale on even a clean slip prior to beginning. If the vapor of ones breath forms an even cloud upon the slip, and it dissipates rapidly it is likely to provide good results.

With the smear made it must be fixed. One may fix via heat or chemical methods but for blood smears it is often better to simply wave the slide about rapidly (with a firm grip of course) until the smear is dry. Microbiologists are apt to follow Ehrlich and place the slide on a hotplate or in a cool oven for hours on end, but such efforts are not generally practical when only a few slides are being produced. If one desires to employ chemical fixation, the film must first be adhered to the slip and the primary method for that is… waving the slide about rapidly! Because the cells in the blood smear will retain the shape when dried, it is best to forgo complex fixation and stick with that tried and true method, regardless of how indecorous it seems.

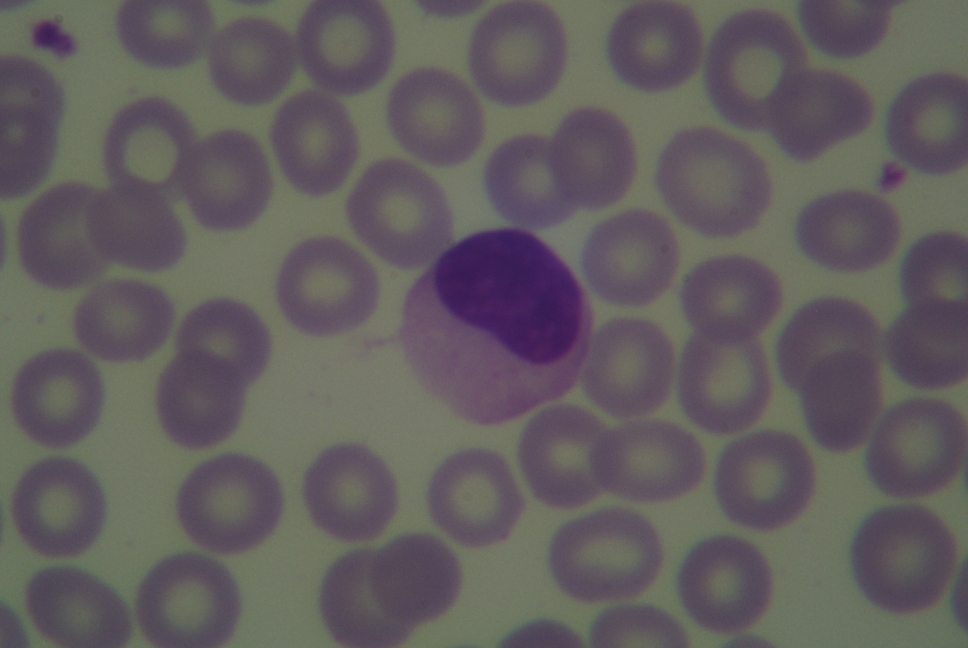
After fixation the smear may be examined immediately, with or without further treatment (even with oil immersion). Or it may be stained to improve its appearance. One my use a popular traditional stain such as Wright’s or whatever is on hand. In the next post we’ll cover the use of Wright’s, but one may wish to try the stains they are familiar with. Methylene blue is a widely available stain that will make leukocytes much more noticeable.

Blood And…

Please refer to first image in the previous post for clarity. -K

Where can blood smears be acquired?

The first two slides were purchased as part of larger collections from a student cleaning house in the first instance, and a collector in the second. If one wishes similar specimens know that they are generally not on the expensive side (as far as prepared slides go) and available wherever second-hand goods of a curious sort may be had. The second two slides and others of similar sort are available singly, or as components of general sets from dealers in educational materials. Without being too indirect let me just comment that Carolina is an excellent source if one elects to purchase commercially prepared slides of considerable quality.

As an obvious alternative, one may produce blood smears of their own without excessive trouble or exotic materials. A few slips, a stain or two and a pin are the bare minimum of supplies required. Unfortunately, things get tricky here. Blood smears are usually produced for a particular diagnostic purpose, and although they may be safely made by an amateur, it’s a medical procedure and can present some hazards. One may hardly rush about pricking friends and family with a pin for the sake a few drops of blood and a bit of curiosity. Blood-borne pathogens are very real and potentially dangerous, so that pin mentioned above is right out.

What is needed to make one?

Toss out that pin and replace it with a sterile lancet. Pharmacies provide an extensive selection of disposable lancets and reusable lancing devices for diabetics. One can purchase a box of one hundred single use sterile lancets for a few dollars and a compatible variable depth lancing pen for a few more. Spring-loaded disposable lancets are an option as well but might not be as readily available.

Any two slips of the traditional one by three inch size may be used. It is often best to select high quality slips of one millimeter thickness however, cleanliness is the most important factor for success with smears; fine smears may be made on the cheapest economy slips, provided they are clean. It’s worth noting that although the smear may be made upon any slip it is most easily produced when using a slip with plain cut edges, beveled or ground edged slips may be used but are apt to result in difficulty.

Cover slips are not absolutely necessary, but if desired one should use the largest possible and ensure all are of a thickness for which ones objectives are corrected. It may occasionally be best to form the smear directly on the cover slip and in that case one should avoid circular covers.

If employing a cover slip one will need a mountant. Any of the standard permanent mounting mediums will do. For most users this will mean Euparal or Balsam. When using balsam it should be as neutral in pH as possible as acidity will tend to bleach the stains more or less rapidly. Histomount, Mount-Quick, SHUR/mount, Meltmount, and any other of the modern permanent mountants may be used with only slight modification to the smear preparation as required.

Stains are a must when it comes to blood smears. Wright’s stain is perhaps the most popular, followed by hematoxylin and eosin (H&E). Depending on the supply of stain one already has on hand it is possible to prepare a suitably stained preparation with any of numerous combinations. Eosin and methylene blue may be used individually to produce an effect identical to that of Wright’s stain (which is of course a combination of eosin and methylene blue in methyl-alcohol). Giemsa, on its own or in conjunction with Wright’s is a popular option as well. It is always possible to try whatever is on hand provided one is familiar with its action.

What else is needed?

Nothing, nothing else is absolutely needed. At it’s most basic one needs only two slips, a drop of blood, a bit of stain, and access to running water. The next step beyond requires only the addition of a cover slip and mountant. Different sources might lead one to believe that a host of other supplies are required. Access to a Bunsen burner or hot plate is frequently required in historic methods, notably the Ehrlich method. A dozen Coplin jars and different solutions for each might be called for in others. One might be directed to add normal saline or buffer solutions to the smear while staining. Some works see fit to recommend methyl-alcohol as a fixative or drying bath.

All the extras are really just that, extra. While specialized methods are recommended for particular needs, all the extras are truly superfluous for smears intended only for general examination. If one happens to have other materials on hand and wishes to employ them effectively the points at which they come into play will be mentioned when the process is explained in the next posting. It is no great loss if only the basics are employed.

The bare minimum for a blood smear.

The bare minimum for a blood smear.

Next time: making the smear!

Blood

I’ve been putting it off but… let’s have a look at blood smears. -K

What are Blood Smears?

Blood smears are the sort of slide most people imagine when asked to think of a specimen for microscopy. They are thin, generally well-stained, films of blood secured to slips for observation under high power. Such slides also happen to be among the most commonly produced slides on earth. Medical practitioners all over the world, be they in state of the art laboratories or primitive field collection sites produce countless blood smears annually while working to diagnose and treat profoundly diverse diseases. To drive home their abundance; I’ve nearly one thousand smears provided by a student who produced them all while working on a single research project. There was a time when blood smears were routinely used in biology classrooms to introduce microscopy and cellular anatomy to students from grade school through to university, but concerns for safety left blood smears by the wayside and educators began to focus on onion skins and relied on ready made smears.

A variety of blood smears.

A variety of blood smears.

At left one may observe a variety of blood smears. The top is a double smear of blood from a laboratory mouse that was made as part of a study relating to malaria vaccination. Bellow that is a human blood smear that was used as a representative example of sever chronic anemia for diagnostic comparison as part of hospitals hematology lab collection. The final two slides are representative of modern, mass-produced slides of the sort one might find in a young students biology classroom or a popular science store. Differences among the slides are immediately obvious. One might consider that all the slides are utilitarian; constructed for particular purposes to which they are well suited.

The first two present an observable area of considerable size, such that a range of structures may be found in quantity. Large smears allow one to consider the percentages of the various types of leukocytes, for example. The size of the smear likewise ensures that some portion of it is apt to be of optimum thickness. Additionally neither of the first two slides is furnished with a cover slip. While this makes the smears rather more vulnerable, it also permits the use of very high power, high numerical aperture immersion objectives with exceptionally limited working distance.

The second two slides feature comparatively limited area for observation. What material is available for observation is insufficient to provide much for study but is instead exhibits a representative specimen, uniform, and secure beneath a cover slip. Making use of such a limited portion of the slip permits the slides to be used on microscopes lacking mechanical stages and relying instead on simple stage clips for securing the slide. Stage clips would severely damage the smears on either of the first two slides. Struck by the curious rectilinear outline of the smear in the second two slides, one might not be surprised to know their smears are actually cut from a sheet and then mounted as a transparent object. Mechanically neither of the bottom two slides is suitable for oil immersion work. However, they are widely available, inexpensive, and sturdy enough for prolonged use in a classroom setting.

If your kisses can't hold the man you love... mononucleosis will!

If your kisses can’t hold the man you love… mononucleosis will!

More on blood smears next time! I have got to stop being so long-winded… -K

Box Camera Photomicrography

Don’t follow my advice on developing, I know microscopes; not photography. -K

Of all the books on photomicrography perhaps the most in depth is that written by Dr. Roy M. Allen. As technical as it is the book is not without its own charm. Buried in a footnote, Dr. Allen relates his first attempt at photomicrography as a child in the late 19th century. He made his images with a box camera, using the sun for illumination.

Having a box camera on hand, I thought I might give the process a try. The camera is an Agfa Ansco Shur-Shot B2 manufactured a few towns over from me in Binghamton, New York back in the 1930’s. It’s a wonderful camera for this, shooting widely available 120 film and featuring a shutter that provides for both short (approximately 1/50th) and long (B style) exposures. Unfortunately, the cameras lens is a hyperfocal meniscus lens that is less than optimum for photomicrography. A quick examination showed that the lens was held in by a simple tension ring and could be easily removed without causing any damage.

Using a lab jack made elevating the camera to the microscopes eyepiece very simple, though a stack of books could do just as well. A bright illuminator (a halogen lamp by B&L) that dates to the same period as the microscope and the camera, rounds out the setup. By using such a bright illuminator I hoped to keep the exposures short and avoid the vibration of operating a manual shutter.

The low power magnification didn't require a condensor so a stand with a simple disc substage was used.

The low power magnification didn’t require a condenser so a stand with a simple disc substage was used.

The depth of the box is less than 147mm, so photo and projection eyepieces are out, and a standard 5x Huygenian eyepiece was used. Thankfully, spherical aberration was less than I might have expected using achromatic objectives and a bellows length of less than 125mm. As box cameras have ground-glass view finders that are independent of the lens, (the two circular lenses seen on the right of the camera above) focusing can not be done through the camera once film is loaded. Prior to loading one may hold a paper or ground glass at the rear of the camera to determine the size of the image formed. A simple paper tube covered at one end and having a length equal to the distance from the cameras shutter to the film, serves as a focusing screen. Exposures are made by focusing with the tube and then replacing it with the camera and depressing the shutter.

An image as seen though the focusing tube.

An image as seen though the focusing tube.

With the film loaded into the camera and the intended slides at hand it is only a few minutes before I have a roll of B&W 120 film ready for developing.

After loading the film onto a reel and placing it into a developing tank in a changing bag, I processed it for 15 minutes with Pyro-Metol Kodalk followed by a plain water stop bath. Next the developer was poured into a beaker and the fixer went into the tank for six minutes. I used an alkali rapid fixer known as TF-4. Following the fixer, the film (now safe to expose to light) went into the used developer for two minutes prior to a 30 minutes wash.

Presto! A roll of 8 photomicrographic negatives having the classic circular aspect and clarity of medium format. Each negative image measures 45mm in diameter. All in all, the results seem rather nice considering the film I used was some Kodak T-Max 100 that expired back in the mid 1980’s and came to me via eBay for just a few dollars.

The question now is whether to get a negative scanner or a darkroom for making prints.

The digital photo does not do the clarity of this negative justice.

The digital photo does not do the clarity of this negative justice.