Assisted Freehand

In a sense it’s all just assisted freehand, but I think the meaning is clear. -K

Yesterday efforts were made at getting something on paper and learning a bit on setting up properly. Regrettably those efforts will have accomplished very little of a immediately practical sort. The images produced might be used to visually identify a slide at a glance if its label has fallen off, but that is assuming there are no similar slides on hand. My little sketch could verify that it is of a letter “e” but one would be hard pressed in putting it definitely to a particular unlabeled slide of a letter “e”. Because there was no assistive device that would help with sizing and dimension, we end up only with a general rather than an accurate depiction; one couldn’t use the sketch to measure the size of the letter.

Fortunately, the technique used previously can be rendered very practical by the addition of a simple object that may be purchased for from ten to fifty dollars, or made at home for a good deal less. This device can be used for any number of very usefull tasks from micrography to counting, measuring, or locating. One can use it on essentially any microscope at any magnification and it will last a lifetime. This miraculous device? The humble graticule also erroneously designated the reticle or reticule.

A graticule, the name of which comes from the Latin for gridiron, is nothing more than an optical device on which a ruling of small squares has been marked. This is technically the only accurate description for a graticule as markings composed of either various lines or any grid which is not broken up into even shapes would be a reticule; a micrometer or sighting ocular is a reticule, while a simple counting ocular is a graticule (excluding of course the complex rulings of Neubauer which would be in places reticule or graticule). In practice few people make any distinction between the terms and one is likely to find suitable graticules under various names.

The use of a graticule is quite simple and requires only an eyepiece that contains a diaphragm located at the point in which a real image is formed. In practice this means a negative ocular of the Huygenian type with a field stop between the object lens and the eye lens. At the optical plane of the field stop a real magnified image of the object is formed, which may be observed by placing a circle of tissue paper or frosted glass thereupon. When the graticule (or anything for that matter) is positioned at a point where a real image is formed it will be seen conjugate with the virtual image one observes when looking into the eyelens of the ocular. For more detail concerning real and virtual images one can consult the section on Object-Image Math in Douglas B. Murphy’s excellent book Fundamentals of Light Microscopy and Electronic Imaging.

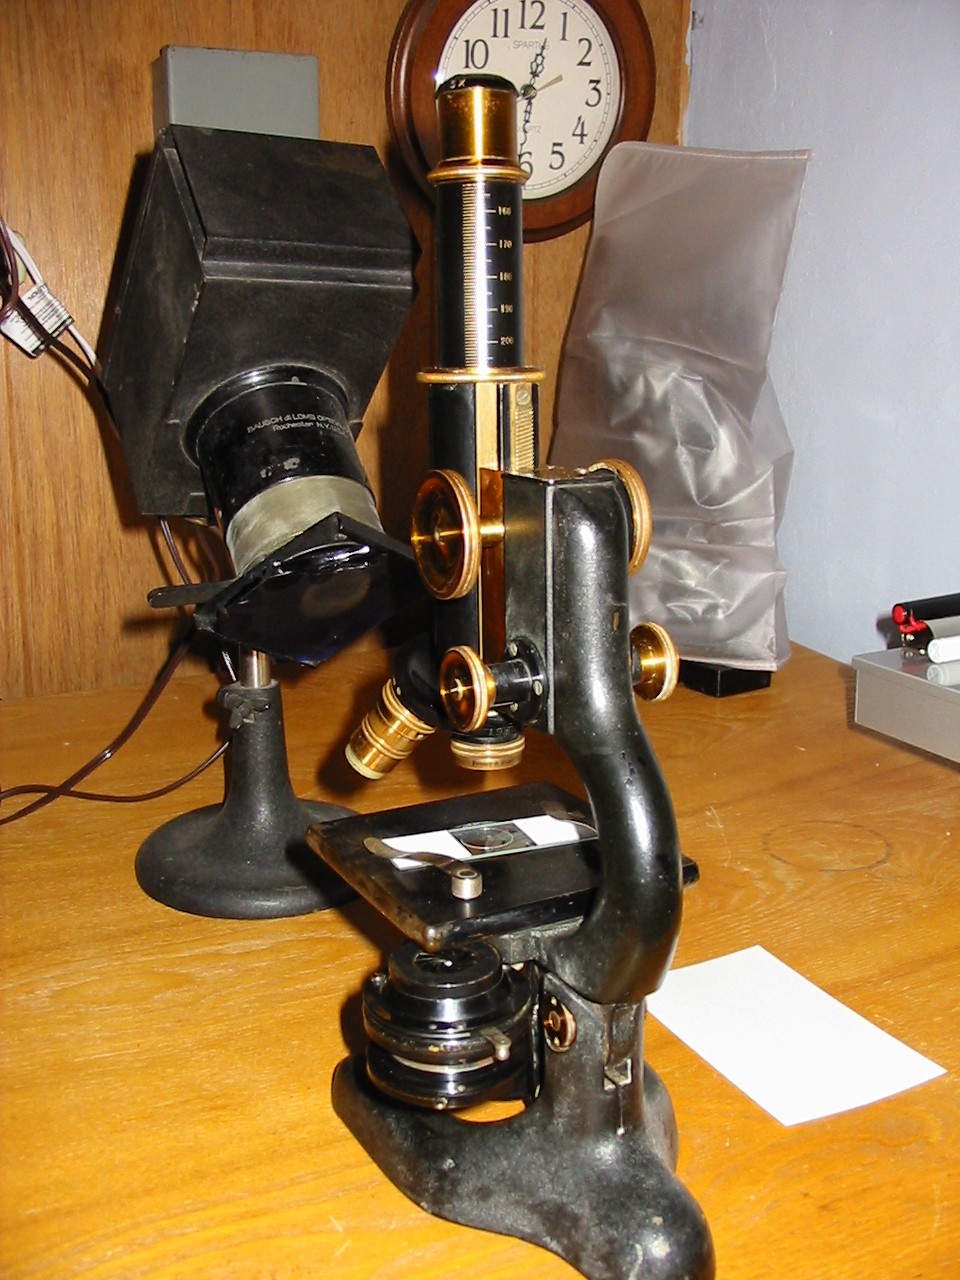
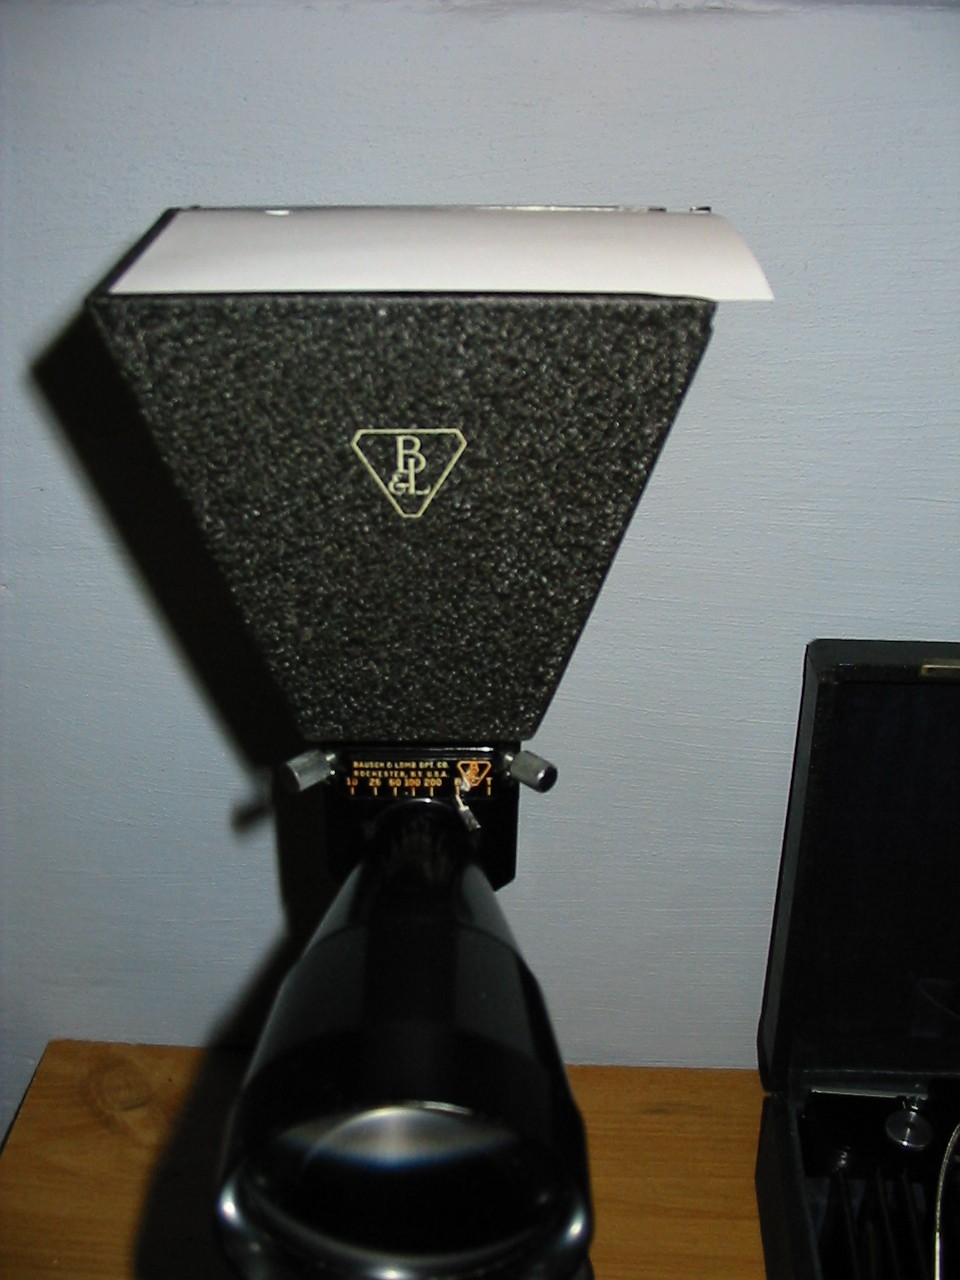
So, assuming one posses a graticule either purchased or home made and a Huygenian ocular with removable optics, one may fit the graticule to the ocular. Begin in a scrupulously clean and dust free area, as nothing is quite so infuriating as introducing dust to the inside of an ocular, and unscrew the eyelens. With the eyelens removed insert the graticule which should fit just within the tube without force or slop. For standard oculars by Bausch & Lomb and most American makers a graticule with a 21mm diameter is best. In some cases manufacturers provide split rings (as pictured) which will hold the graticule in place so that it will not rattle about even if the ocular be roughly treated. If one is had and the graticule is to be left always in a particular ocular place the split ring before screwing back into position the eyelens of the ocular.

Image

Ocular body, graticule, friction ring, and eyelens, seen in the order to be assembled.

With the majority of graticules the lines are ruled upon one surface or the other and each orientation should be tried. If the rulings are more clearly in focus with the eyelens screwed fully home then that orientation should be selected before one settles for having a loosely fitted eyelens. With the graticule in place in the ocular one should focus a slide upon the stage of the microscope and observing it with the ocular find both the rulings and the specimen sharply defined. If the rulings will not come to focus conjugate with the specimen, the eyelens must be screwed down or up until they are. The eyelens and orientation of the graticule should be manipulated until the rulings are truly conjugate with the image of the specimen. Which is to say they should be neither more or less sharply defined and appear as if on the same level as the object although overlayed.

For drawing with a graticule one would do best to use an ocular of low power and obtain higher magnification with the objective only. The reason for this is well explained by the equations in the above mentioned book but, suffice to say that the area covered by each square of the graticule at a given magnification will be less when that magnification is obtained with a low powered ocular. With the graticule in place one need only use a drawing surface ruled into squares to transfer by hand the view seen through the ocular to paper in the method described yesterday. The rulings will assist in both positioning and consistently representing the size of specimens sketched.

In the above photo one might notice that the graticule pictured has rulings in only the very central portion. At first it might seem as if the ruled area being less than that of the oculars diaphragm would be a great hindrance as the entire field of view would not appear ruled. The reason for using this particular graticule will be obvious when it is noted that it is not used with flat-field objectives. By limiting the area covered by the rulings to the central third of the field of view one insures that spherical aberration of any significance is not depicted in ones micrographs. Images in which optical defects are faithfully represented are of as dubious value as live blood examinations where quacks point to specks of dust or dirt as proof of one malady or another…

Now then, if one knows the spacing of the rule on both the graticule and drawing surface, together with the magnification employed, measurements of a sort may be taken on the drawing using no more specialized apparatus than a ruler. This method of measurement is rather less precise than others (tough quite accurate) but requires neither a micrometer object slide or micrometer eyepiece and serves well for work of all but the most critical sort.

With a graticule in place and ruled paper one may produce micrographs of impeccable quality and enormous size (by moving the slide so that the contents of a square are transported across the field). If one is of limited resources or has in the past attempted other apparatus without good results, no better aid to drawing with the microscope can be had than the graticule. Unlike other apparatus to be covered later no special positioning of the microscope is needed and no great effort is required to become adept. An ocular fitted with a graticule may be dropped into position and used at a moments notice, I commend it to any microscopist.

Freehand Micrography

Goodness this is getting to be quite the series, hope it’s not too dull. -K

Whatever method of micrography one settles upon the skills used for freehand will be put to use, by all means take some time with the following even if the intent is to expend funds and effort on more complex apparatus late; don’t put aside freehand as to difficult or simplistic. To better serve as a font of practicality, certain points must be established at the outset. If following along one would do well to use the same microscope, ocular (or series of oculars), and objective (or series of objectives) for every method and apparatus. It’s not so important that they be of the same power as those here employed but it will be a great asset not to later have some question as to what optics precisely were used.

One should use the same slide as well, and for that slide no better may be selected than a permanent or temporary mount of a small letter “e” upon newsprint. It will prove useful as a means of coming to a better understanding of ones microscope, is accessible to all, and comparatively easy object for sketching (although not without the opportunity for additional details). Select the smallest print to be found and mount the letter erect upon the slide.

Drawing freehand from sight is an ability that is quite beyond simple instructions here though all that is needed for it is practice. Instead every effort will be made to set one down the right path to creating micrographs at the outset and skill permitted to develop naturally. However straightforward it may seem, one should not to simply look through the ocular and sketch out an image. Some fine artists may enjoy great sucess in this immediately, but mere mortals would do better to seek out every advantage. First one should consider lighting, not of the specimen but of the work area. Every effort should be made to light the room to an intensity appropriate with that seen through the ocular. For many the optical bench is often well lit which will be found excessively tiresome on the eyes when the long periods of observation required by micrography (particularly at the outset) are spent. It is helpful to use somewhat less illumination on the drawing surface than is had through the ocular.

Ninety years ago one would have made use of sunlight, an oil lantern, or even a 6volt incandescent bulb for micrography. The other options (carbon arcs for example) proving too brilliant or costly even, for high powered work that did not involve a camera. With such sources of light it was often simply a matter of drawing the shades or extinguishing the rooms other light sources; the illuminator providing light for the specimen with enough spilling out to comfortably light the drawing surface. Today those sources may still be used (often in conjunction with various improvised shades), but as ones microscope is apt to include a built in illuminator which is quite effective in limiting light leakage it becomes somewhat more of a challenge to light the drawing surface well. A desk lamp which may be equipped with a dimmer is quite useful if one is without a light source such as depicted. The drawing surface should be comfortably lit so that with one eye looking through the ocular the other may gaze upon it without straining.

An older B&L with a lovely 32mm objective of 215mm tube length.

An older B&L with a lovely 32mm objective of 215mm tube length.

Which brings out the next point worth making, both eyes should be used. One eye should be always at the ocular while the other, remaining open, should gaze upon the drawing surface. This is essentially the same method one should utilize in operating a monocular microscope, except that instead of being allowed to completely relax the other eye is focused upon the drawing surface. It is something of a tiering arrangement which is why having a well lit drawing surface that is not too bright or dim is so important. If one is accustomed to wearing eyeglasses for myopia they will be need to be worn only if the drawing surface can not be seen otherwise. This is likely to prove inconvenient for those who do not possess oculars of a high eyepoint, though moving the spectacles as close to the eye as possible will often help enough that standard oculars may be used.

For paper one should use a heavy stock of very slight texture. Coarse surfaced paper will prevent one from capturing finer detail when working with sharply defined specimens and light weight papers will not bear sketching well. The plain side of a standard index card is very convenient and easily sorted and stored as well, notes being made on the reverse. Work always with a pencil initially and try not to fear making a mistake. Once the sketch is made it’s a simple matter to go in with ink if it is felt necessary.

Initially one will do well to maintain the drawing surface at the same angle as the stage of the microscope, if not the same level as well. Try this experiment, focus the letter “e” slide with a low power objective and eyepiece and produce two freehand sketches. In the first sketch incline the stage of the microscope as one finds comfortable and use as the drawing surface the table on which the microscope stands. For the second sketch keep the stage of the microscope level and use something suitable to raise the drawing surface to the level of the microscope stage. Produce the sketches rapidly but not without undue care, it should not require more than a minute and only general outlines are needed.

See, no need to go for perfection!

See, no need to go for perfection!

One will find that although their is no special optical apparatus in use (save the microscope of course) the brain processes the image differently when the drawing surface is not at the same inclination as the microscope stage and the sketch in the first instance is rather elongated on the axis of inclination. Additionally, note that although the degree of magnification employed was consistent in each sketch (a 5x ocular and 32mm objective) the first ended up somewhat larger than the second. By making use of each eye simultaneously the manner in which the brain processes the image is such that the first sketch is produced larger to account for the added distance. If one wishes to get into the matter a series of experiments may be made with optics of similar magnification and different equivalent focus (remember most microscope optics produce a magnified virtual image that is seen as though 25cm from the eye) which will prove diverting… but back to micrography.

On the back (generally ruled side) of the cards mark notes regarding the image and the setup by which it was produced. At a minimum include the objective and ocular used and relative position of the microscope and drawing surface. The date and information about the slide would be well included but are not essential, the thing here is to get into the habit of producing micrographs in something of a consistent manner.

One should produce a quantity of quick sketches making use of differing arrangements of microscope and drawing surface until a useful preference is discovered. Some will find that they prefer to have only the table while others may favor some elevated and angled drawing surface. The idea is to get into the habit of using each eye simultaneously and abolish that fear some people have in setting lead to paper. These micrographs are not liable to stand publication but there is no reason to feel anything other than pride in them however they come out, it’s a dying art and any effort in keeping it alive should be commended.

Aside from that consider my quick sketches from above, and the slide from which they were made. On the slide the letter “e” was mounted erect and seen on the stage before me appeared as it would when reading. In the sketch the letter was reversed along both the horizontal and vertical axis. Now in my case I was using a rather simple compound microscope having only the obvious optical components. There are no prisms or lenses hidden away in the body tube and no inclined head to consider. If I were to use an AO Spencer One-Sixty or a B&L Balplan with their accompanying internal optics how might I expect my sketch to differ and what would that mean is going on inside the body of the microscope? It’s all well and good to note the way in which the image moves when the slide is manipulated but a clearer understanding is certain to be had by considering the optics at play in microscopes of differing construction.

Monocular microscopes are of course well suited to this application but there is no reason one should not be able to employ a binocular head if that is all which is available. Simply use only one (that which is on the side of ones dominant hand) of the two ocular tubes and proceed as if a monocular set up were employed. A right handed individual would place their left eye at the right most ocular and view the drawing surface with the right eye.

Next time: Graticules and Huygenian Oculars!

The Complexity of Basics

It’s a great loss that the enthusiastic often give up for want of ready acumen, when enthusiasm is quite what keeps one going. -K

It’s quite going to put some people out to know there is no getting around having some talent when it comes to producing a micrograph. At its worst its no different than drawing from life, though at the best it may be compared unfavorably to tracing. The are as many tools for assistance as one could want, yet no substitute for that ability that only comes of practice. Very briefly the most common apparatus will be touched upon in this series with special focus on the principles, as they apply regardless of the tools.

The difficulty of drawing is as much a matter of recognizing position and the relationship between objects as it of gaining the mechanical skill that comes of practice. while skill counts, that comes with time; placing things accurately is something one can begin from the very start. This bears mention because many people will come to micrography with the impression that the tools provided for it will permit ready ability in producing a fine illustration. For the most part, all the tools involved provide only the outlines, dimensions, and relative positions of specimens, the detail being filled in by ones eye alone. This may appear a great imposition to some but it is worth remembering that there is a world of difference between the requirements of a micrograph and a photomicrogrpa; subsequently, one should consider ones intent and goal.

While at times a full and detailed sketch is required, more often than not one may wish only to capture a particular area or structure in any detail. Still other times one may need only to make a measurement, which is very quick to do provided preliminary gymnastics are performed ahead of time. Some apparatus requires considerable preparation, more than photomicrography even, so ones intent should align with ones purposes at the outset. While digital photomicrographic apparatus has lately turned imaging into a spur of the moment thing, the old methods simply do not allow it.

Since ones needs may vary it is not unlikely that ones tools should vary as well. Some of the tools will surely prove challenging, and the various sorts of camera lucida though all operating on the same principal, have their own vagaries inherent to their construction. It is important however, to learn well the tools one possesses, there being enough expense and difficulty in the acquiring. The tools may be thrown into a few broad categories:

  1. Those which facilitate free hand drawing.
  2. Those which project an image from the microscope onto a drawing surface.
  3. Those which project an image of the drawing surface onto the plane of the image formed by the microscope.

In the first group one will find any of various graticule’s which divide the field of view so that it may be reproduced on a similarly divided drawing surface. It is not unlike the methods a draftsman would use to produce and enlargement or reduction, or a painter would use in copying a landscape from a photograph with a ruled transparency and canvas. The one pictured below dates to the early 1900’s and has only the very center portioned ruled. Modern equivalents may be had in numerous forms from all major makers. A graticule of this sort is placed onto the diaphragm of an eyepiece (generally Huygenian) and focused by minor movement of the eye lens.

IMG_1222

B&L graticule dating to the early 1900’s

The second group includes any of the various methods of producing a microprojection. Mirrors, prisms, and projection eyepieces may all be placed in this category together with the specialized projection microscopes and old form plate photomicrographic apparatus (used as a camera obscura),  the photographic plate being replaced by a glass and bit of paper. This first photo depicts two forms of projection head by Bausch & Lomb here seen with the microscope horizontal the size of the projection moderated by the distance of the microscope from drawing surface. That on the left consists of a mirrored right angle prism with a few degrees of movement either direction of forty-five. That on the right is a collard mirror which can accommodate any angle and therefore wider angle of drawing surfaces. The second photo shows a Bausch & Lomb model N photomicrographic head with medium format attachment, being just the size for drawing on a 3×5 index card.

It's simple to work up a reflector of this sort from what is on hand.

It’s simple to work up a reflector of this sort from what is on hand.

Any light shield which can be fitted to the microscope and support a glass plate will serve.

Any light shield which can be fitted to the microscope and support a glass plate will serve.

The third group would consist primarily of the various forms of camera lucidas proper, as well as the items operating on the same principle. These are by far the most well known of all the drawing tools and the forms which they take vary wildly. From the Gunrow, and Wollaston’s, to the myriad forms of simple reflector and Abbe camera ludica, the diversity of forms is simply incredible. Abbe’s camera lucida is the most common and frequently available. Shown below are two forms on the Abbe Camera lucida. In the version on the left one is only permitted to incline the drawing surface on a single axis and is limited in its position from the microscope as the reflector is rigidly fixed. The older form on the right permits the mirror to be placed at any angle as well as any distance so that the position of the drawing surface may be made convenient.

A simple and a complex form of Abbe camera lucida

A simple and a complex form of Abbe camera lucida

Looking and Seeing and Other Pedantics

Imaging is often one of the most rapidly changing areas of microscopy, but some things never change. -K

When that dutch fellow peered through his simple microscope with its tiny lens he was eager to share the fantastic sights even as he labored to keep his methods secret. The construction of his microscope made it very difficult for others to use and photography wasn’t around yet, so to show others he had no recourse save travel (to demonstrate the use if his apparatus) and the pen. Even today the drawings of Leeuwenhoek glory in their accuracy and detail, but they are an extreme example.

The average microscopist need not dwell in tedium to capture an image, a push of a button on any number of devices can capture a flawlessly accurate image in a split second. CCD and CMOS cameras may be had quite economically; even traditional film cameras can be operated quickly at nominal expense. The availability and ease of photomicrography has steadily contributed to the decline of drawing. In fact at its inception the word “micrograph” referred only to a drawn image, but with the rise of photography it has come to take on the same meaning as the more explicit “photomicrograph.” For simplicity the word micrograph used here will be in reference to drawings only.

As I student I recall only the briefest day or two in biology being spent with the microscope. During that time we children were put to the task of sketching out what we saw through the eyepiece. The motivation then was less to provide a permanent record but to slow down our observations and force vision rather than sight only. Their are entire volumes of art theory written on the disparity between sight and vision, looking and seeing. Without showing too much of the art school pedant that I am let me just say that the way one scrutinizes a subject when creating a sketch is far different than the way one looks when appreciating a sight for its appeal alone.

Consider a photograph of a camouflaged creature. Even looking for it specifically one might overlook it, yet if taking the time to reproduce the photograph by hand with pen and paper the previously obscured specimen will quickly become obvious. For an other example, consider the way one might look differently at the layout of a garden if one wished to recreate it on ones owns property, as opposed to the way one might look when simply appreciating the flowers.

Yes, drawing still has value in microscopy. That value now lies less in the image produced however, and more in the introduction it provides to active sight. In the next few posts we’ll be looking at different methods and apparatus used to capture micrographs. Don’t worry if you’ve never been a fantastic artist, there are plenty of tricks and there’s no need to judge harshly.